
I have finally finished my midterm project, plotting and printing and all!
In this post I will mostly talk about the pen plotting experience and the necessary adjustments I’ve made to my original code in order to help the machine understand and read the code.
Process of SVG:
I have tried two methods in trying to save my code as an SVG file during this midterm, which are the following:
- Implementing the SVG system into my p5js code so that I’ll be able to export an SVG file directly from my p5.js sketch.
- Converting a PNG file that I took from my p5.js sketch into SVG using a third-party program (using this Adobe converter).
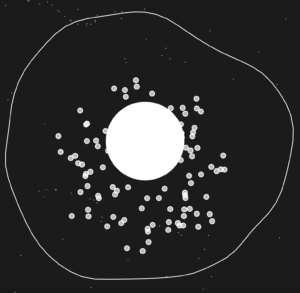
The first method did work in terms of exporting a snap of my sketch as an SVG file, but because my file was too big, I had to simplify my sketch a lot in order to make it successfully be exported as SVG like the following sketch:
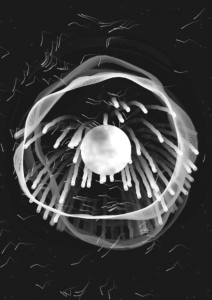
The second method also worked, but but I couldn’t remove the background in Inkscape for some reason, for it exported with the black background included like this:
So I tried to manually remove snippets of the background, but it was too tedious and basically impossible to generate a completely clean sketch with my skills.
However, after discussing my SVG file code (the above embedded sketch) with professor Aya, we came to the conclusion that I can try to delete the perlin noise inside the circle while trying to maintain the other traces that perlin noise created for the lines, loops, ellipses, etc. For this I simply had to modify this snippet of code so that the below part is moved from function draw() to function setup():
background(0, 5); //the smaller the last number is, the longer the strokes stay visible + the slower the background color switches.
I also commented out the initial background drawing function I had in setup as well as the code that created the perlin noise pattern inside the circle:
//   // loop through each pixel inside the circle
//   for (let x = centerX - radius; x < centerX + radius; x++) {
//     for (let y = centerY - radius; y < centerY + radius; y++) {
//       let d = dist(x, y, centerX, centerY);

//       // check if the pixel = inside the circle
//       if (d < radius) {
//         // calculate Perlin noise value based on pixel's position
//         let noiseValue = noise(x * 0.01, y * 0.01);

//         // map the noise value to control the grayscale color
//         let gray = map(noiseValue, 0, 0.2, 50, 120);

//         stroke(gray); // stroke color
//         point(x, y); // draw a pixel at calculated position
//       }
//     }
//   }

  // noLoop(); // stop the draw loop after one frame
  //end of circle
After that, I modified the code so that both the “exploding” and “background flow field” ellipses will be smaller in quantity and size in hopes of decreasing the file size:
...

let particles1 = []; // exploding particles
let particles = []; // perlin noise flow field particles
const numParticles1 = 50; // exploding particles number
const numParticles = 500; // exploding particles number
const expansionLimit = 360; // Set your desired expansion limit

const num = 150; // flow field particles
const noiseScale = 0.01 / 2;
...
At this point, I had this sketch running that I was able to export into SVG successfully directly from p5.js!
This is also how it looked as an SVG file:
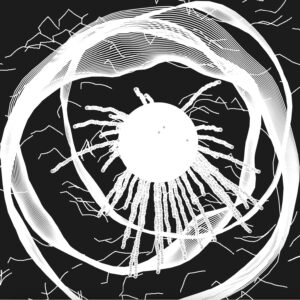
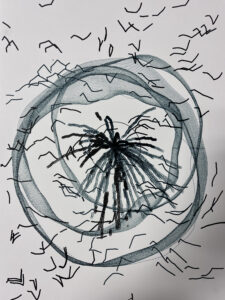
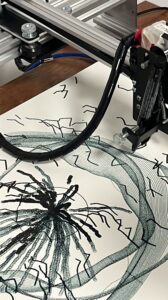
Although I had to make some adjustments, I was pretty happy with the amount of elements that I was able to keep. So afterwards, I set onto plotting my sketch on the pen plotter, which also took around two to three attempts because they kept stopping midway. Finally, for the last version, I decided to just try white paper and black pen because my sketch was pretty detailed and I didn’t want to risk eliminating those details using a white pen, which was less reliable compared to the black pens we had. It took way, way longer than I thought (two hours…), and I also had to change the pen midway because it ran out of ink, but it somehow worked and I’m very happy with the result:
Here’s a short clip of the printing process:
…and the GoPro recording: GH010649
Evolution of my sketch:
I thought it’d be cool to list all the versions of the sketch that I made till my final product!
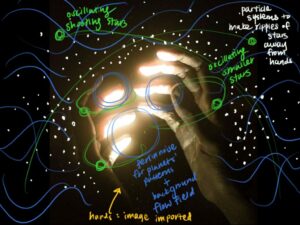
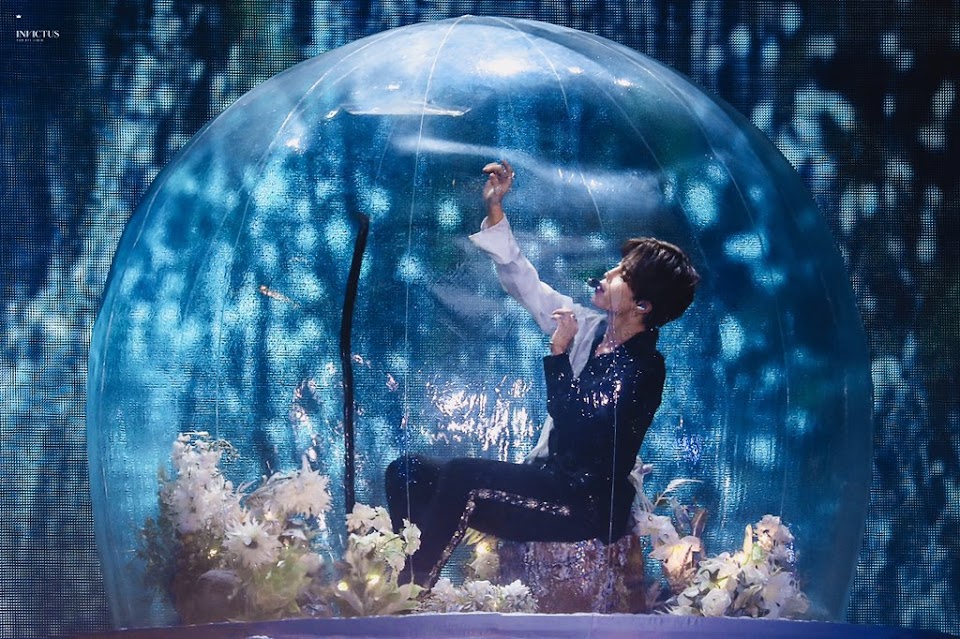
At first, I was leaning more towards the whole “universe in one’s palms” idea, hence the first sketch; however, after seeing this image from a performance, I kind of wanted to create a small “universe” that was kind of in a “bubble” with particle explosions and waves to showcase chaos that can be controlled yet randomized and unpredictable.
These are also some research/videos that I referred to throughout my project:
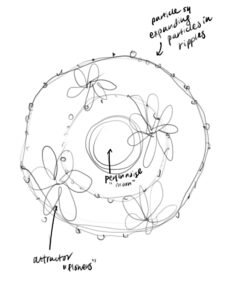
- class PerlinShape — expanding circular waves; the patterns that a black hole generates (tutorial)
- class particle — perlin noise flow field particles; symbolizes the small stars/shooting stars that we see passing by in the universe (tutorial)
- class particle1 — explosion of particles; signifies big stars exploding/being generated in space (tutorial)
- ellipse — has perlin noise pattern inside; the “moon”
Once I had this basic outline of how I wanted my sketch to look like, I was able to apply skills that I learned in class for each of them:
- using perlin noise to create the surface of the planet (ellipse)
- particle systems to make an “ripple” explosion of particles from the ellipse
- using perlin noise to create a flow field for the background
2.
Then, I played around with the flow field and perlin noise as well as the direction change at mouse click.
3.
This was when I started to form a general idea of what kind of elements I’d specifically need, what kind of final product I wanted to achieve, etc., and I added the exploding particles and perlin noise ellipse in the middle.
4.
Then I began experimenting with combining perlin noise loop and the flow field background I already had, and although my initial idea was to only create one single line of perlin noise loop, I actually ended up liking this tracing of the loop that made it look like there’s multiple lines on canvas so I kept it.
5.
Then I combined all elements together and modified some elements (expansion limit of exploding particles, how long the traces will remain on canvas, etc.) — almost there to the end sketch!
6.
Finally, this is the end result of my code, in which I simply added a hand image at the bottom of the canvas — my very first idea was to create a smaller universe within two pairs of hands, and although I gave up on the idea because I made many modifications to my sketch since then, I still wanted to try implementing an image to combine it with a randomly generated art sketch even if it was only for my code and not my SVG sketch.
Link to code: https://editor.p5js.org/Clara0424/sketches/FLpwKaMgl
Reflection:
Here are some complications that I thought were significant during my process of creating this final sketch. These struggles were all documented in my previous posts, but I just wanted to make a compilation of them in one post so that it’s easier for me to identify and present.
- Combining all elements (flow field background, perlin noise loops, perlin noise ellipse, exploding particles, hand image) and readjusting all of their positions. For example, readjusting my exploding particles to the center after adding the perlin noise loops took a long time for me to crack the code (used the code below to readjust the position).
let particle1 = new Particle1(width/2, height/2); // Set initial position of the explosion WITHIN the circle boundary
// Check if the particle has exceeded the expansion limit; controlling this elongates the ellipse boundary limit of the particles
if (dist(this.position.x*1, this.position.y*1, width/2, height/2) >= this.expansionLimit) {
  this.lifespan = 0;
}
display() {
  fill(255, this.lifespan);
  ellipse(this.position.x*1, this.position.y*1, 10, 10); // the position of the ellipse limit itself
}
2. SVG export (as mentioned above in this post) — I had many alterations, sketches, and experiments with the original code till the point where I was confused about which version is what, haha. The printing process itself was also a challenge not just because of the long hours it took but also because of the sudden pauses that disrupted my sketch from being plotted in one go.
However, I also had parts of my process/code that I was proud of, such as:
- Using function mouseReleased() to reset the noise seed every time I release the mouse. By setting the noise seed to the current millisecond value, I was able to increase the randomization, variety, and designs of my sketch for all of my elements. The snippet of code I used for this is shown below:
function mouseReleased() {
  noiseSeed(millis());
}
2. Another element of my code that I’m particularly proud of is the PerlinShape.js class, which is the class that is responsible for generating the perlin noise loops in my sketch. Initially I didn’t expect there to be multiple loop lines, but although I implemented the code for just one loop it ended up generating multiple because of the perlin noise code that I already had in my sketch code. So it traced the movement of the loop, which gave this illusion that there’s multiple loops moving around fluidly. This look was something that I wanted to achieve but gave up on earlier on when I was brainstorming what to do for my project, so I was really happy to accidentally stumble upon it and create it for my final sketch.
Final Words:
As tedious, time-consuming, and challenging this project was, I genuinely learned so much about not just p5.js coding but also about pen plotters, creating an original work, and experimenting with randomization and rolling with the knowledge that you will likely discover something completely new and unexpected that might trigger your interest midway into the process of creating it, causing you to shift your whole idea for your project. As a planner who prefers knowing what my next steps will be, this was hard to accept at first, but by the end of the project, I ended up enjoying and even anticipating the new designs that I might end up with once I implemented the next snippet of my code. It was really rewarding to see your original creation come to life not just in p5.js but also on an actual paper! 🙂