Final Project Proposal – Week 11

Concept and Inspiration: 

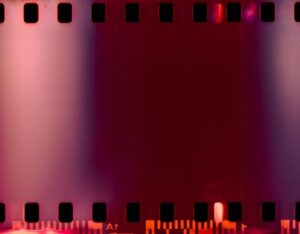
For my final project I plan on creating a sketch that is inspired by a very dear to my heart film project that I worked on last semester. The film generally revolved around the concept of memory retrieved through archival footage which is what I aim to reflect in my sketch. When I think of archival footage I immediately think of old film tapes although most of the footage retrieved for the film I created was filmed on digital cameras, and only a the photos were on tapes, there’s still something about images and videos that are recorded on old cameras and film tapes that deeply resonates with me and reflects the idea of an old archived memory for me. Hence, I want to attempt to reflect this idea of memory through a running film tape simulation that is achieved through different mechanisms to showcase the way in which archived film tapes and memories run before our eyes. I am hoping to add the element of human interactivity through the computer vision mechanism. In a way I’ll try to have the user’s image be intertwined with the running tape effect to make the experience more personalized and to accentuate the feeling of retrieving a memory and almost living through it.

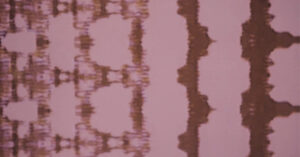
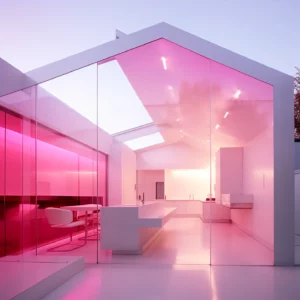
The film I made was based off of an essay that I wrote about sisterhood and memories, and the theme of that essay was the color pink. Hence, similar to the way I had manipulated the footage to make resonate with the essay and reflect the color pink, I plan on making the film tape effect be of different shades of pink.

Methodology and Application: 

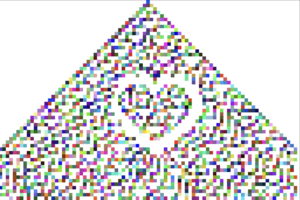
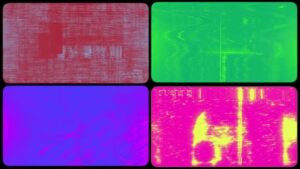
The sketch will mainly utilize mechanisms of game of life and cellular automata, but I’ll work on it in a way to have entire columns changing rather than singular cells. I plan on also including particles that could mimic the glitching effect in film tapes. These particles will have forces of attraction and repulsion to alter their movement and add more of a chaotic nonuniform feel to the sketch. Below is a rough base experimentation of what I envision my project to look like. So far, I only worked with the cellular automata rules but moving forward I will be incorporating the other elements that I discussed.

Further Ideas: 

The particles that I spoke about earlier will especially come into play when computer vision detects the presence of a user. Here, the user image will be what interferes with the consistency of the tape suggesting different interpretations of the project, whether that be the trapping of individuals in their memories, or their alteration of them, or even the way individuals observe their memories and watch them playing. Of course this will all be detailed to the user with either a welcoming menu or a brief text below the sketch. I am also considering including the voice over of the essay that I incorporated in my film to show how both projects are tied together and to also allow users to get the full experience that I am trying to deliver. These are all ideas that I am hoping for my sketch to tap into, I might be reworking certain aspects of my project as I work through it but generally I believe my concept is clear to me.

Coding Assignment – Week 11

Concept and Approach: 

For this assignment I was inspired by the snakes game we used to play as kids especially since I used to play one that grew with blocks, very similar to the way the cells look in our cellular automata sketches. I tried to initially have the cells within the snake interact with one another based on the game of life rules, but that did not depict what I was envisioning. So I decided to have the background be based on the game of life rules while the snake travels around the canvas following the mouse. I also added an element of interactivity wherein the cells die or come to life based on their condition when pressed on by the user.

The method I followed was pretty simple I created a grid of cells whose visibility (life) is determined by the condition of their neighboring cells. I followed the same methodology we did in class creating a loop that checks through all the cells in the rows and columns and then applies the rules of game of life.

For the snake, I created a class that has several functions. First of all in its constructor it has the body of the snake as an array where the length of the cells that make up the body are collected. The length is limited to 20 cells, and the cells are adapted from the ones used to make up the game of life mechanism in the background. The snake grows as it follows the mouse and remains as one single cell when the mouse is still. I used the unshift() method which I learned is a method that works on an array similar to pop() and push() except the unshift() adds new elements to the beginning of an array overwriting the original array, which is what I need to be done to have the head of the snake constantly following the mouse’s direction.

update() 
 {
   // Copy the current head position of the snake
   let head = this.body[0].copy();
   // Asssign position of the mouse in terms of board cells
   let mousePos = createVector(mouseX / cellSize, mouseY / cellSize);
   // Calculate the direction vector from the head to the mouse position and limit its magnitude to 1
   let direction = p5.Vector.sub(mousePos, head).limit(1);
   // update head position based on direction vector
   head.add(direction);
   // Add the updated head to the front of the snake's body
   this.body.unshift(head);
   // Keeping the body shorter than 20 segments
   if (this.body.length > 20) 
   {
     this.body.pop();
   }
 }

Reflection and Ideas: 

What I find interesting about this code is the element of interactivity that makes it look as though the snake is consuming the cells or leading to their explosion in some way or another. This was pretty easy to achieve but I think it could be changed to make the game look more realistic. As of now, pressing on the cells just switches their condition from alive to dead or vice versa. For future improvements I could work on making the relationship between the snake and the cells in the background seem more uniform and less separate.

Reading Response – Week 10

Neil Leach on AI & Architecture

The talk by Neil Leach interestingly sheds light on the relationship between architecture and artificial intelligence (AI) which is one I have never considered before, simply because AI was always associated with technology for me and architecture was rather something physical and more related to intricately calculated engineering mechanics. Through the talk Neil makes multiple comparisons to describe the evolution of AI. One comparison he makes is between GANs and diffusion models in their approaches to generative modeling. The difference between them marks a significant shift, emphasizing the transformative nature of the AI technologies. According to Leach AI is an “invisible super-intelligent alien species”. This statement is not an exaggeration especially after observing the examples Leach proposes in terms of AI applications in architecture. What I specifically found interesting was the leap from neural networks to diffusion models that was enabled through AI. Examples on these models are SpaceMaker and Look X which are just a few from a lot more. Leach predicts AI will add a forward-looking dimension to the world of architecture especially for how adaptable and changeable it is. He also explains that through embracing emerging platforms and adapting them to the architectural world concerns about economic shifts in the profession will doubtlessly arise. This point that he mentions I find very interesting because it opens up a conversation about the extent to which is going to take over our lives and will we as a result of AI become slowly less intelligent as a species? Overall, this talk serves as a comprehensive and insightful guide for architects navigating the ever-evolving landscape of AI, and also brings up questions generally about how much we can adapt AI into our lives and how can we have these technologies work for our advantage and not against us.

Coding Assignment – Week 10

Concept and Approach: 

In this assignment I found experimenting with matter.js somewhat challenging so I decided to have my sketch be simple. My inspiration was the few rainy days that we had on campus, and specifically the one day over fall break where it rained heavily. I remember looking at the raindrops hitting the floor and then bouncing back until there was a thin layer of water forming on the ground. Through introducing matter.js into my sketch I attempted to create a similar effect wherein the raindrops would fall and hit one another on their way down, eventually they collide with the ground and form a layer of water on it.

Knowing I wanted to create a particle falling from the sky effect I began first by just looking into how I could do that. Getting inspiration from the revolute constraints example that we did in class, I was able to create a bunch of circles falling through the canvas. I realized then that I needed to create a ground of some sort to have the raindrops land on it. This is when I came across The Nature of Code’s tutorial on matter.js. I learnt through it how to create a world based on the matter.js engine, and have this world contain all the attributes of my sketch including the ground and the raindrops.

I think what I found a bit challenging was deciding on the effects that would take place at collisions, so when the raindrops collide with one another, as well as when they collide with the ground. I decided that the effect that could possibly mimic reality would be having the raindrops become less apparent, that is, they dried out, or merged into one upon impact with one another. I did that by having their opacities decrease upon collisions. For colliding with one another I created the isColliding function which basically measures the distance between the raindrops. If they were found to be colliding then their opacities would decrease. Eventually once they fall on the ground two elements get checked, their position (on or off screen) and their opacities (<=0). If either is true the raindrops get removed.

 // Check if the particle is off the screen or has zero opacity
  isOffScreen() {
    let pos = this.body.position;
    return pos.y > height + 100 || this.opacity <= 0;
  }

  // Check if the particle is colliding with another particle
  isColliding(otherParticle) {
    let distance = dist(this.body.position.x, this.body.position.y, otherParticle.body.position.x, otherParticle.body.position.y);
    return distance < this.body.circleRadius + otherParticle.body.circleRadius;
  }
}
// Check for collisions with other particles and adjust opacity
   for (let other of otherParticles) {
     if (other !== this && this.isColliding(other)) {
       this.opacity -= 2; // Decrement opacity when it collides with other particles
     }
for (let i = particles.length - 1; i >= 0; i--) 
{
  if (particles[i].isOffScreen()) 
  {
    particles.splice(i, 1); // Remove the particle at index i
  }
}

An element that I was glad I included was the wind force. Prior to having it, the rain drops all fell in the exact same way making the sketch seem somewhat consistent and less realistic. With that said, I am still very bothered with the way they land on the ground, as the change in their opacities still does not reflect the disperse of water particles that I was looking for. I couldn’t really think of way to incorporate that though I experimented with having the raindrops change into lines upon impact, it still just looked unnatural.

// Apply wind force
   let wind = createVector(0.01, 0);
   Matter.Body.applyForce(this.body, this.body.position, wind);

Reflection and Ideas:

For future improvements I think the main thing I would work on is the issue of colliding with the ground because as of now they look like solid particles rather than liquid raindrops. I could possibly incorporate sound effects and other forces that could cause disturbances to the way raindrops fall. I think one other thing I could work on is having them bounce back a bit higher to mimic the way raindrops fall when there is already a heavy layer of water that has formed on the ground. Otherwise, I am pretty satisfied with the outcome of the sketch especially since running the matter.js engine was causing a lot of lags on my computer that made sketching any thing on the canvas a lot harder.

Coding Assignment – Week 9

Concept and Approach: 

For this assignment my approach was inspired by a game I used to play with my siblings as a child. Every time we’d go out to play under the sun, we’d come back into the house to see a bunch of lines forming in our eyes as we close them based on the rays of light that hit our eyes. The harder we rubbed our eyes the more lines would form with tiny colored dots. The lines quickly disappeared and new ones formed constantly. Turns out these lines are called phosphenes and are considered to be images of light and color seen when eyes are closed. They could be indicators of serious health conditions, but in most cases they are just results of exposure to light, and rubbing of the eyes. I tried to recreate these images using the flocking system and boids. The particles in my sketch would start off moving around in a chaotic manner on the canvas, eventually they begin colliding and decreasing in number. A while later new ones appear repeating the same manner as the previous particles. The system is constantly changing and the movement of the particles is randomized.

I applied different forces to the boids’ class to achieve the mechanism I was looking for, and then I had a number of boids be created in the flock array through which each boid could be called to run and update. Similar to what we had done previously in the semester, the boids had mechanics of position, velocity, acceleration, etc. What is interesting in this however is that the bodies get impacted by their neighbors and the physics behind them changes accordingly. Once they collide with one another, they concentrate in the same area for a while and then disperse and disappear.

This collision and concentration element was a bit more difficult to achieve because I was unsure of how to navigate the forces exactly. However, drawing inspiration from a previous assignment that I had worked on, I realized that the first step is to measure the distance between the boids, and accordingly I could apply if statements. I created a loop that runs through all the boids, measures the distance between them, and then adds the ones in close proximity to the closeBoids array. From there, if there are more than two boids close to each other, their position is updated based on the center vector, this gives the spiraling effect when they collide. The second if statement looks into creating a concentration wherein more boids collide and continue spiraling, moving to the concentration center, then disperse away from the center. Finally, the else statement looks into activateing a concentration period if there isn’t one yet.

  // Find close Boids and calculate the center of concentration
  let closeBoids = [];
  for (let i = 0; i < boids.length; i++) {
    let other = boids[i];
    if (this.position.dist(other.position) < 30 && other !== this) {
      closeBoids.push(other);
    }
  }

  if (closeBoids.length > 1) {
    let center = createVector(0, 0);
    for (let i = 0; i < closeBoids.length; i++) {
      let boid = closeBoids[i];
      center.add(boid.position);
    }
    center.div(closeBoids.length);

    if (this.concentrationCountdown > 0) {
      // If concentration countdown is active so its more than 0, move towards the concentration center
      let direction = p5.Vector.sub(center, this.position);
      direction.setMag(2);
      this.applyForce(direction);

      // Apply force away from the concentration center to simulate dispersing
      let dispersalForce = p5.Vector.sub(this.position, center);
      dispersalForce.setMag(0.5); // Adjust the strength of dispersal
      this.applyForce(dispersalForce);

      this.concentrationCountdown--;
    } else {
      // Otherwise, activate concentration for a brief period
      this.concentrationCountdown = 60;
    }
  }
}

Reflection and Ideas: 

I think this code relatively achieves what I had in mind but for future developments I could work on making the boids change their speed over time. So that when they come to disperse and disappear they start moving slowly because that is how I remember seeing them. Also, this will enhance the majestic feeling of the sketch further relating to the images of light we see when our eyes our closed. I attempted to introduce this element just through updating the velocity after dispersal, however that didn’t work. It could be a matter of introducing an entirely new vector and updating the velocity and acceleration accordingly, but that is something I could look into moving forward.

Final Project Proposal


For my final project I want to merge generative art and machine learning by employing the ml5.js library to trigger simulations based on wrist movements detected through PoseNet. By adapting cellular automaton rules and visual aesthetics, the resulting interactive experience will transform hand gestures into an interactive experience that relies on cellular automata.

This inspiration comes from my wish to explore my last assignment further, especially the sketch below. I am thinking of connecting it to the ml5js library and triggering the simulations from the points where the wrists are detected. Additionally, to make it a bit more complicated I am thinking of maybe changing the colors or CA rules when certain events occur, for example, to switch the color palette when wrists are in the same place. By such, the project should allow users to explore the boundaries between their creative input and the algorithmic generation of art.

Coding Assignment – Week #11

For this week’s assignment, I wanted to play with the different visual illustrations of the game of life. Also, I wanted to add the mouseDragged() function as an element of interaction. Here are the different versions:

  1. For this one I experimented with a different shape and background color. The circle in a square shape creates an effect like the simulation would be eating up the canvas, almost like it got infected.

2. In this one, the rules are altered a little bit which creates an interesting pattern as the simulation spreads.

3. For this one, I wanted to keep only the birth and the death of the cells. This allows to focus more on the different shapes created by the simulation, especially in the beginning.

4. This one was my favorite. Although very similar to the 3rd, the rules are different slightly which makes the simulation to die out sooner. I imagine this to be interesting to explore with real-time human movements instead of mouse dragging. Combining the game of life simulation and the body movements would make it an organic interactive experience.

The tricky part was figuring out how to connect the mousePressed() or mouseDragged() into the simulation. After a lot of thought about why it did not work, apparently, the missing piece was in the rules of the game of life. In general, the most interesting part was playing with the different rules. For instance:

// this is the 4th sketch:   
if (board[x][y].state == 1 && neighbors > 0) {
    board[x][y].state = 0;

// this is the third sketch 
if (board[x][y].state == 1 && neighbors < 0) {
    board[x][y].state = 0;

The only difference is the more or less than 0 but it creates a very different visual effect. To sum up, this assignment was an interesting exploration of the different visual possibilities of the game of life.

Final Project Concept

A concept that I’ve been thinking of is experimenting with fractals. An immediate idea that came into my mind was creating Korean traditional pattern designs using the concept of fractals, such as these:

This idea was specifically inspired by the professor’s demonstration of “building” or “growing” a tree with a mouse click during our latest lecture, and I thought I could implement the same logic using these patterns. I’ve always had a deep interest in the Korean traditional art and promoting about it, so this topic in particular intrigued me.

I was thinking of ways to make this more interactive and “complicated,” and I thought of using music as an additional element to do so — by having the screen show a person playing the gayageum, which is a Korean traditional instrument, the user can interact with the screen by pressing keys on the keyboard, which will generate different sounds as well as different patterns at the click.

For example, I’d have the key “ENTER” set as a key that plays the note “re” and builds/completes a pattern once it is pressed a certain number of times.

As the final result, I’m imagining something like this, where patterns will be drawn at different parts of the canvas with different keys playing notes:

This is a rough concept I have for now, but I’m sure it’s subjected to change as I brainstorm over the break!

Final Project update: Chaos or supermassive black hole

First Choice: Chaos in nature
Inspiration:


https://www.google.com/search?q=chaos+behaviour+in+nature&sca_esv=586549689&tbm=vid&source=lnms&sa=X&ved=2ahUKEwiwudv_kOuCAxWDaUEAHUlFDYsQ_AUoAnoECAEQBA&biw=1440&bih=737&dpr=2#fpstate=ive&vld=cid:b7cc7a50,vid:r_5shyQGIeA,st:0
Implementation plan:
1.Uncover the plan for chaos behavior
2.Try to make variance on chaotic behavior.

Concept:
Chaos behavior refers to the phenomenon observed in certain deterministic systems where even small variations in initial conditions can lead to vastly different outcomes over time. It emerges from non-linear dynamical systems, often characterized by simple rules or equations but exhibiting highly complex and seemingly random behavior. Within chaotic systems, there is a sensitive dependence on initial conditions, known as the “butterfly effect,” where a small change in the starting parameters can result in significant differences in the system’s evolution. Despite being deterministic and governed by precise mathematical rules, chaotic systems appear unpredictable and exhibit a lack of long-term predictability due to their extreme sensitivity to initial states. Chaotic behavior is often visualized through patterns like strange attractors, bifurcation diagrams, or fractals, showcasing intricate structures arising from deterministic chaos. This concept has applications across various fields, including physics, biology, economics, and even the behavior of complex systems like weather patterns or financial markets.

Second Choice: Supermassive black hole
Concept:
The motion of objects around a black hole can be described mathematically using Einstein’s theory of General Relativity. One of the key concepts related to black hole motion is the behavior of objects in the vicinity of the black hole within what is known as the event horizon.

The mathematics behind black hole motion involves understanding the geometry of spacetime as described by Einstein’s field equations. These equations relate the curvature of spacetime to the distribution of matter and energy within it.
The motion of objects around a black hole can involve various phenomena, such as orbits around the black hole, accretion disks formed by matter spiraling into the black hole, and gravitational lensing effects caused by the bending of light around the black hole.

Describing the precise mathematical motion of objects near a black hole requires solving Einstein’s equations, which can be complex and involve differential geometry. Numerical simulations and mathematical models based on these equations are used to understand and predict the behavior of objects around black holes.
Inspiration:
https://www.google.com/search?q=super+massive+black+hole+coding&sca_esv=586549689&tbm=vid&source=lnms&sa=X&ved=2ahUKEwigv-jfk-uCAxW_lP0HHegQDj4Q_AUoAnoECAEQBA#fpstate=ive&vld=cid:26179adf,vid:Iaz9TqYWUmA,st:0
Concept:
Implementation plan:
1.Uncover the simulation of blackhole
2.try to multiply the black hole and sea the variation in patterns
3.Make a painting using the code and touch interation made by player.
4.Do music interaction on the work.
5. Try to interpret the logic behind to viewers

A combination idea: paint your chaos with blackholes
Integrating chaos theory with the concept of black holes to create a visualization of chaos near black holes involves combining mathematical models representing chaotic behavior with the gravitational effects described by General Relativity. While creating a direct visualization of chaos near black holes might be challenging due to the complexity of both chaotic systems and black hole physics, you can develop a conceptual representation or simulation by following these steps:

Choose a Chaotic System: Select a simple chaotic system, like the logistic map or the Lorenz system, and simulate its behavior. Use mathematical equations representing chaos to generate data points or trajectories that showcase chaotic behavior.

Understand Black Hole Physics: Study the basic concepts of black holes in General Relativity, focusing on the Schwarzschild metric or other relevant metrics describing the geometry of spacetime around black holes. Understand how gravity affects the motion of objects and distorts spacetime.

Combine Models: Conceptually integrate the chaotic system’s behavior into the gravitational field of a black hole. You might represent this by considering trajectories or orbits influenced by both chaotic behavior and the gravitational pull of the black hole.

Develop a Visualization: Use a programming language or software that allows for 3D visualizations and simulations. You can use libraries like Three.js or WebGL for web-based visualizations or programming languages like Python with libraries such as Matplotlib or Mayavi for 3D visualizations.

Simulate and Render: Create a simulation where objects (representing the chaotic system) move or follow trajectories influenced by chaotic behavior while being affected by the gravitational field of the black hole. Visualize these trajectories, their interactions, and the distortion of space caused by the black hole’s gravity.

Add Contextual Elements: Include visual cues such as distortion of light paths, gravitational lensing effects, or the visualization of an accretion disk around the black hole to enhance the realism of the simulation.

Iterate and Refine: Adjust parameters, refine your simulation, and test different scenarios to create a compelling visualization that showcases chaotic behavior in the presence of a black hole’s gravitational field.

Week 11 Assignment — Cellular Automata

Concept:

I first wanted to do some research about the varying art pieces that I could generate using the cellular automata concept, and amongst the ones that popped up in my browser, I really liked how the pyramid ones were encompassing both creativity and simplicity; from a glance they seem like they are all similar, but once you take a closer look you realize that they are more different than you think. The general ones looked like these, which is from this link: Totalistic Cellular Automaton -- from Wolfram MathWorld

However, to me, these “cells” reminded me of the pixelated screens of the earlier televisions from the 1900s, like the one shown in the image below from this link:

Seamless pixelated tv noise texture. television signal noise grain. screen interferences glitches

Therefore, I decided to combine them so that I have a moving, colored pyramid pattern. I also referred to this video from the Coding Train before jumping into the assignment.

Process/Highlight: 

To make it interactive, I thought that it’d be fun if the user can actually modify the code sketch themselves by either subtracting/adding the colored cells onto the canvas with a mouse click.

To implement this function, I used the below snippet of code, which I consider as the highlight of my code:

function mousePressed() {
  // Toggle the state of the clicked cell
  let clickedCellX = floor(mouseX / cellSize);
  let clickedCellY = floor(mouseY / cellSize);

  if (clickedCellX >= 0 && clickedCellX < cells.length && clickedCellY >= 0 && clickedCellY < generations) {
    cells[clickedCellX][clickedCellY] = 1 - cells[clickedCellX][clickedCellY];
  }
}

I also experimented with different sizes of the cell and the canvas size, as attached below:

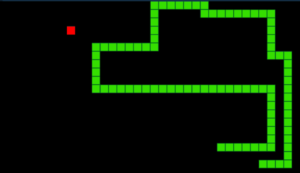
this was when cellSize = 3  this was when cellSize = 10

Although my initial vision was closest to the visuals of when the cellSize was set to 3, I wanted the users to interact with the cells by clicking on them to make them disappear/appear, and because I thought that might be harder to do when the cells were too tiny, I changed them to size 7 so that it’s still small enough to give that television’s pixelated screen effect but also big enough to be clicked on easily.

Final Sketch:

(Click on the canvas once and then you should be able to add/remove the cells from the canvas!)

Reflection:

It was really fun to use my own project to generate different patterns within the pyramid to give variations, and I attached a heart sketch I’ve made by clicking continuously on the canvas below:

This was a really fun project, and I think I might want to explore with this a bit more, whether it be my final project or on my own!