
Inspiration
I have decided to change my final idea so I decided to go with something we have all seen in cartoons or even selfie filters such and that is the animation of dizziness, love, anger etc over our head. In cartoons, we tend to see these kind of humorous animations when a character gets hurt and I have listed a few examples of what kind of animation I am thinking off.


User Interactivity
From my old idea, I want to still incorporate the use of the camera and user and have the program be able to identify the head shape. From there on, the animation of the head spinning would be in a neutral state. But as soon as another user enters the screen, both their head spaces would ‘interact’ and end up with an emotion, whether it is love, anger, or confusion.
- Neutral state – I am thinking the neutral state would be like stars or fireflies which I have loved the animation of from this semesters work
- Love – the neutral shape or state would end up having the user’s head spaces be sped up and have the
- Anger – the neutral state would end up have the user’s head space become steam images and red to show anger and both user’s headspace will try to speed up.
- sad – the neutral state would have clouds and plasters and bleu heartbreak to resemble sadness.
I think a very cute minute interaction of my idea would be that people can take selfies of my laptop or take a picture of themself with their friend.
Decoding Nature
From the class content we have gone through, I want to use particle systems, to create the head spaces as foundations.
I am also wanting to include the cellular automata movemnts around the ellipse of the headspace to give the ‘pop’ effect.
Foundation
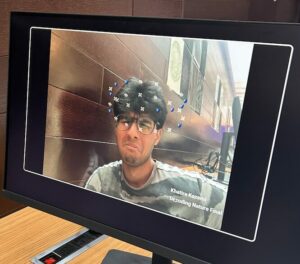
For this project, I am going to be using ml5.js and face face-api.js for the detection of emotions. face-api is an accurate and appropriate library to use as it uses certain points on the face tot detect these emotions and these movements and facial positions have proven to be the same for every human so this library will work well with all my users.
I first needed the camera set up so I used the following basic code to just have my camera initialised.
From the library of emotions, the 7 choices are: neutral, happy, angry, sad, disgusted, surprised, fearful. I only want to make use of neutral, happy, angry and sad so I can adjust the filters accordingly.
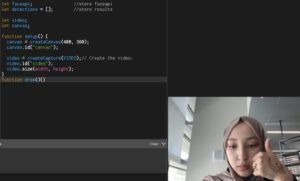
The following is my first prototype which simply reads one users face and has the emotions displayed nicely on the screen. This is also my first time using the camera in my code and originally the video was inverted and so I adjusted that with the following code. I wanted to highlight the camera and video set up.
function setup() {
  canvas = createCanvas(480, 360);
  canvas.id("canvas");

  video = createCapture(VIDEO);// Create the video:
  video.id("video");
  video.size(width, height);
  video
(please open on website to see actual prototype)
Two User implementation
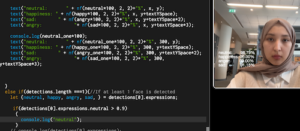
I now want to see what it would be like if more than one person was on the screen because ideally, I want the code to be used by 2 people. There were errors with my code when there was more than one person so I changed the code accordingly added some extra if-conditions.
function drawExpressions(detections, x, y, textYSpace){
  if(detections.length >1){//If at least 2 face is detected
    let {neutral, happy, sad, angry } = detections[0].expressions;
    let {neutral_one, happy_one, sad_one, angry_one} = detections[1].expressions;
    // console.log(detections[0].expressions);

    // console.log(detections[1].expressions);

    textFont('Helvetica Neue');
    textSize(14);
    noStroke();
    fill(255);

    text("neutral:       " + nf(neutral*100, 2, 2)+"%", x, y);
    text("happiness: " + nf(happy*100, 2, 2)+"%", x, y+textYSpace);
    text("sad:        " + nf(angry*100, 2, 2)+"%", x, y+textYSpace*2);
    text("angry:            "+ nf(sad*100, 2, 2)+"%", x, y+textYSpace*3);

    console.log(neutral_one*100);
    text("neutral:       " + nf(neutral_one*100, 2, 2)+"%", 300, y);
    text("happiness: " + nf(happy_one*100, 2, 2)+"%", 300, y+textYSpace);
    text("sad:        " + nf(angry_one*100, 2, 2)+"%", 300, y+textYSpace*2);
    text("angry:            "+ nf(sad_one*100, 2, 2)+"%", 300, y+textYSpace*3);


  }
  else if(detections.length ===1){//If at least 1 face is detected
    let {neutral, happy, angry, sad, } = detections[0].expressions;

    // console.log(detections[0].expressions);
    textFont('Helvetica Neue');
    textSize(14);
    noStroke();
    fill(255);

    text("neutral:       " + nf(neutral*100, 2, 2)+"%", x, y);
    text("happiness: " + nf(happy*100, 2, 2)+"%", x, y+textYSpace);
    text("anger:        " + nf(angry*100, 2, 2)+"%", x, y+textYSpace*2);
    text("sad:            "+ nf(sad*100, 2, 2)+"%", x, y+textYSpace*3);


  }
  else{//If no faces is detected:
    text("neutral: ", x, y);
    text("happiness: ", x, y + textYSpace);
    text("anger: ", x, y + textYSpace*2);
    text("sad: ", x, y + textYSpace*3);

  }
}
I added some quick console.log statements to test some if conditions, in the following example, I checked for neutral face to be detected and to output the word ‘neutral’.
For the filters and effects above the users heads, I want it have a 3D effect and recreate something similar to a solar system which has the sun as the ‘head’.
Particle / solar system
The following code makes use of 3D vectors and WEBGL which I had not use yet. After playing with some parameters, I tried to make the solar system look like 3D from the users direct point of view. In 2D, we see the solar system similar to rings around a centre piece but for my version, I want to see it from the side so it looks like a headspace on the users head.
Head detection
In this part of my code, I want to track the middle of the head, and the top part. In this following code, I have a box drawn around the head and I want to have a point for the middle top part of the box as that will be my ‘sun’ to my particle system.
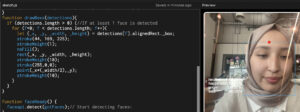
Using this point, I am able to have my particle system based around this point even when the user is moving.
Combining the camera and solar system
So now it was time to combine my two main components of the final project. After MANY attempts, I decided to not have the WEBGL 3D motion included as my text on screen, face detection was all changing to work in 3D and therefore would not stay still and it caused many errors when I could have just had the headspace in 2D.
I altered my code as following so that the headspace rotation is elliptic and have it based of the centre top part of the users face. I tried many times and also realised I wanted my elliptic offset on the X-axis to be proportional to the width of the rectangle that recognises the users face.
class Particle {
  constructor(x, y, radius, isSun = false, orbitSpeed = 0, orbitRadius = 0) {
    this.x = x;
    this.y = y;
    this.position = createVector(x, y);
    this.radius = radius;
    this.isSun = isSun;
    this.angle = random(TWO_PI);
    this.orbitSpeed = orbitSpeed;
    this.orbitRadius = orbitRadius;
    this.velocity = createVector(0, 0);
  }

  update() {
    if (this.isSun) {
      this.position.x = returnFaceX(detections);
      this.position.y = returnFaceY(detections);
    }
    if (!this.isSun) {
      this.angle += this.orbitSpeed;
      this.x =
        width -
        (returnFaceX(detections) +
          0.75 * rect_width(detections) * cos(this.angle));
      this.y = returnFaceY(detections) + 25 * sin(this.angle);
    }
  }

  display() {
    noStroke();
    if (this.isSun) {
      fill(255, 200, 0);
    } else {
      fill(255, 105, 180);
      circle(this.x, this.y, 10);
    }
  }
}
The function has the sun always move accordingly to the midpoint in this code as well.
Altering the aesthetic of the filter
I have added the following function to the code to test out the happiness emotion and have the colour of the filter change in correspondence.
function emotion(detections, feeling){

  if (detections.length > 0) {
    //If at least 2 face is detected
    let { neutral, happy, sad, angry } = detections[0].expressions;
    if(feeling==='happy' && happy > 0.9){
      return true
    }
    else return false;

}}
/////////////////////// calling the function
display() {
    noStroke();
    if (this.isSun) {
      fill(255, 200, 0);
    } else {
      if (emotion(detections, "happy")){
      fill(255, 105, 180);}

      else{
        fill(255, 0, 0);
      }
      circle(this.x, this.y, 10);
    }
  }
After testing out my code and seeing how the colours alter depending on the emotion, I know it works correctly and so I can now focus on the aesthetic of the filter themself.
Happy or Love <3
For this filter, I want to have hearts instead of the circles and so I just quickly coded the following for a rough sketch, I would of course have multiple of these hearts.
function drawHeart(x, y, size) {
  // noStroke();

  fill(255, 0, 0);
  stroke(0); // Black stroke
  strokeWeight(0.5); // Stroke thickness
  beginShape();
  vertex(x, y);
  bezierVertex(x - size / 2, y - size / 2, x - size, y + size / 3, x, y + size);
  bezierVertex(x + size, y + size / 3, x + size / 2, y - size / 2, x, y);
  endShape(CLOSE);
}

/// coding it into the program

else if (emotion(detections, "happy")) {
        drawHeart(this.x, this.y,10);

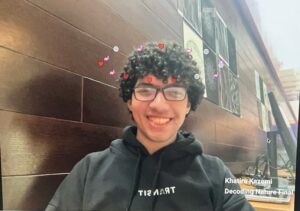
These are some inspirations of what I want my filters to look like.I adjusted the happy filter and this is what it finally looks like.


Cellular Automata around the filter
I wanted to have come cellular automata movement around my headspace to focus on more aspects of the class. The code below shows it with a blue colour and transparency value so the background images of my headspaces are not covered.
if (random() < 0.025) { //  chance to restart the life of a cell
        next[i][j] = floor(random(2)); // Randomly set to 0 or 1
        continue;
      }
By adjusting this value, the effect restarts and it should also work with the filter when the head is moved around with the functions and dynamic code.
//insert image of green rect
The image above was just for me to roughly see where the filter would be so I can have the cellular automata there. I applied the same logic on my code and had the parameters be for the rectangular area of my filter, it took a lot of calculations and flooring function but it worked nicely after. My only problem was after the head moved, the coloured cells would not be removed and just stay there so I had to add some extra code that goes over that.
let x =  (rect_width(detections) *(1.25/2))
      let y = (rect_height(detections) / 3)
      //=====================================================
      rect(this.x-x, this.y, 2*x,y);

      for (let i = 0; i < col; i++) {
    for (let j = 0; j < row; j++) {
      if (i < floor((this.x - x)/w) || i >= floor((this.x - x)/w) +( floor((2*x)/w))|| j < floor(this.y/w) || j >= floor(this.y/w)+ floor(y/w)) {
        board[i][j] = 0;
      }
    }
  }
I decreased the probability by a large amount just to make sure it didn’t clump up the cells too much. I also added a 3rd colour just for aesthetic purposes.
//insert image
I made the calculations of the pixel be when the object is the sun as its much easier to calculate the region from the suns position, but I will have it displayed on the !isSun code to change the colour depending on the emotion.
This was the following code:
else {

      for (let i = 0; i < col; i++) {
        for (let j = 0; j < row; j++) {


          if (emotion(detections, "neutral")) {
            // noFill();
            // stroke(0, 255, 0);
            // strokeWeight(1);
            // circle(this.x, this.y, 10);
            if (board[i][j] === 0) {
              noFill(); // White for dead cells
            } else if (board[i][j] === 1) {
              fill(255,255,153, 5); // yellow
            } else {
              fill(205, 5); //white
            }
            noStroke();
          square(i * w, j * w, w);
          } else if (emotion(detections, "happy")) {
            if (board[i][j] === 0) {
              noFill(); // White for dead cells
            } else if (board[i][j] === 1) {
              fill(255, 192, 203, 5); // pink
            } else {
              fill(255, 255, 255, 5); //white
            }
            noStroke();
          square(i * w, j * w, w);

            if (temp > 0.66) {
              drawHeart(this.x, this.y, 10);
            } else if (temp > 0.33) {
              // image(bubble_img, this.x, this.y, 15, 15);
              noFill();
              stroke(255);
              strokeWeight(1);
              circle(this.x, this.y, 10);
            } else {
              image(butterfly_img, this.x, this.y, 15, 15);
            }
          } else if (emotion(detections, "angry")) {
            if (board[i][j] === 0) {
              noFill(); // White for dead cells
            } else if (board[i][j] === 1) {
              fill(122, 22, 25, 5); // red
            } else {
              fill(127, 5); //grey
            }
            noStroke();
          square(i * w, j * w, w);

            if (temp > 0.66) {
              // fill(255, 0, 0);
              // circle(this.x, this.y, 10);
              image(bolt_img, this.x, this.y, 15, 15);
            } else if (temp > 0.33) {
              image(puff_img, this.x, this.y, 15, 15);
            } else {
              image(explode_img, this.x, this.y, 15, 15);
            }
          }
          else if (emotion(detections, "sad")) {
            if (board[i][j] === 0) {
              noFill(); // White for dead cells
            } else if (board[i][j] === 1) {
              fill(116, 144, 153, 5); // blue grey
            } else {
              fill(127, 5); //grey
            }
            noStroke();
          square(i * w, j * w, w);
            if (temp > 0.66) {
              image(plaster_img, this.x, this.y, 25, 25);
            } else if (temp > 0.33) {
              image(cloud_img, this.x, this.y, 25, 25);
            }

            image(blue_img, this.x, this.y, 15, 15); //blue heart image
          }

        }
      }
          board = next;
    }
Revisions
With the progress made, I decided to change some parts of my code. With the cellular automata, the code is a lot heavier as I need to calculate and go through two large 2D arrays which requires a lot of time. Therefore, this code will be for one user only.
I also want to add a screenshot feature for people to have a picture with the filters. I also want to have some personal text to highlight this final project and a signature at the bottom corner.
I also cleaned up the code like summing up my four functions that return dimensions, into one with an extra parameter. I also plan to have my Particle class in a separate file.
My main concern is that the CA is incredibly heavy and making me code work very slowly so I need to find a way to fix that. So I recreated the grid on another program and figured the dimensions of where the headspace is likely to be and limited to that region which helped the code be a LOT smoother.
function draw() {
  let currentTime = millis();

  if (currentTime - lastUpdateTime > updateInterval) {
    lastUpdateTime = currentTime;

    // Update and display sun and particles
    sun.update();
    particles.forEach(particle => {
      particle.update();
    });
  }

  // Always display the particles, but only update them based on the interval
  sun.display();
  particles.forEach(particle => {
    particle.display();
  });
}
I added this time delay in the draw function to have the user can see the filter for a few seconds before it changes.
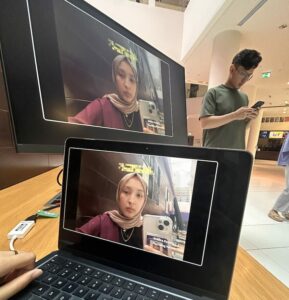
IM showcase
The following are some images that I got from user testing. I was happy to see people enjoy it and actually take pictures or screenshots so they can share.
Reflections
Next time I would love to incorporate some of my original ideas such as the 2 people interaction. My only problem with this is that there are multiple double nested for loops so with two users, that complexity will get worse.
I want to try and simplify some parts and have the timing work better so it performs smoothly. I would love more emotions to be included from the ml library.
Final product
https://editor.p5js.org/kk4827/full/ypZHWvVOb
please click on the link to access it.