Week 5- Midterm Progress 1

 Fibonacci spiral

Concept: 

I’ve always found the Fibonacci spiral fascinating. It’s a beautiful pattern that shows up in nature, like in seashells and the way leaves are arranged on plants. The spiral is created by drawing quarter-circle arcs inside squares, and the size of these squares follows the Fibonacci sequence—a series of numbers where each one is the sum of the two before it. To me, the spiral represents the balance between structure and natural growth.

For my midterm project, I’ll bring this spiral to life by making it grow and change dynamically. I’ll use moving patterns and shifting colors to give it a more organic, natural feel. The result will combine the exactness of math with slight, natural variations to create something both structured and alive.

Designing the Code

Here’s my plan for designing the Fibonacci spiral visualization:

Fibonacci Sequence Generator: I will write a function to generate the Fibonacci sequence, which will determine the side lengths of the squares. These squares will serve as the framework for the spiral’s construction.

Arc Drawing Function: I will create a function that draws quarter-circle arcs within each square. These arcs will be positioned based on rotating angles, allowing the spiral to take shape.

Dynamic Spiral Growth: I intend to animate the spiral’s growth by using oscillation to control the pace of arc creation. This will give the artwork a sense of life as the spiral grows dynamically on the canvas.

Color Gradients: I will integrate shifting color gradients, ensuring each new arc or section of the spiral has a slightly different hue, reflecting continuous growth and change over time.

Perlin Noise for Organic Variation: Lastly, I will add subtle randomness using Perlin noise to slightly alter the placement and shape of the arcs, which will give the spiral a more natural, organic feel.

Tackling the Most Complex Part
The most challenging aspect of this project will be integrating Perlin noise without disrupting the geometric accuracy of the Fibonacci spiral. To reduce this risk, I will write a test program to explore how noise affects the arcs. By fine-tuning the noise parameters early on, I will ensure that the randomness enhances rather than detracts from the overall design.

Sketch – Week 5

Concept 

For my midterm, I wanted to work with the concept of identity. Using techniques we learned in class, I want to create intricate, morphing shapes. Identities are defined in numerous ways, such as fingerprints, phenotypes, and personality. I want to create shapes that morph and change when mouse is pressed.

So far, I have made a pattern on p5.js. It changes when mouse is pressed, but I haven’t made the transition seamless yet. I think the hardest part of my project will be creating the shapes for the different identities that I have in mind, and well as successfully making the transitions.

Sketch in Progress

Week 5: MidTerm Project Progress

Concept

The project’s main idea is to create a particle system with different interactive features. The generated art is still abstract to me right now. I was inspired by Memo Akten’s work which contains a particle system-like feature. Right now the project is still in its early stages but hopefully, I will find a more solid version of the visualization by the end of this week.

Features

The features I want this generative visualization to have include:

  • Movement in the direction of the mouse
  • Line connections
  • Random motion
  • Concentric polygon arrangements
  • Particle system features: lifetime and individual particle motion

Current Progress

Currently, I have done some of the features of this visual system. However, Maintaining a line connection when the arrangement of particles is changing is a bit difficult because the line connection creates a random motion. You can test this in the draft visualization provided below.

Press 1:  to create a random motion
Press 2: to create line connections
Prees 4: to create a circular arrangement
Press 5: to create a triangular arrangement

Reflection and Improvement

So far what I have looks okay but I want to add interactivity with a mouse and also add tails to the particles. Still, the most important thing I have to figure out is to maintain the arrangement when there is a line connection.

Week #5 – Midterm Report #1

Concept & Design

For the midterm, I had various ideas. Although, most of them were a variation from week 4’s assignment. The brainstorming process was one that took me time, since I was thinking to myself: “How do I blend everything that we have learned so far?”. And this is where a bit of a realization came to me.

In my last week assignment, I commented how I wanted to create like a “face”, composed by two eyes represented as a spiral of key caps. Although, the end result would have been weird. Still, with this idea, I continued brainstorming until I realized the following draft:

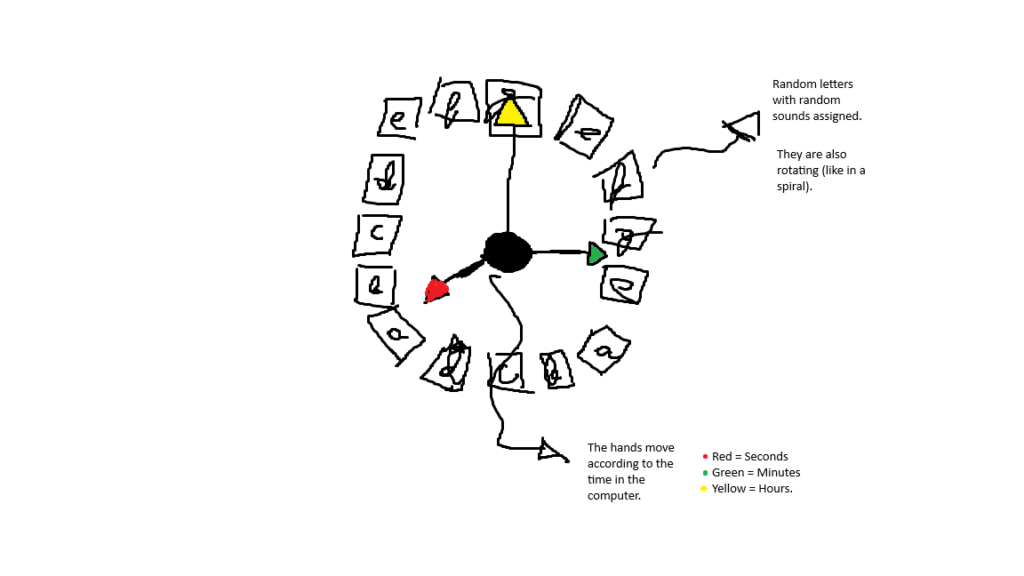
Quick sketch of an analog clock composed of key caps.
Figure 1. Quick sketch of an analog clock composed of key caps.

Basically, my idea is to create an analog clock, composed of multiple hands that indicate time, as well as being surrounded by key caps that will define most of the features and interactions for this generative art. So, once I arrived with the idea, it was time to develop it and determine the key features.

Key features

      1. Time accurate: The clock seen in the Canva is accurate to the time present in the computer.
      2. Sound: As seen in my week 4’s assignment, I will integrate sound into this project to complement the experience. It will be triggered once the keycaps touch any of the hands from the analog clock. While I am still thinking about this feature, what is clear is that it will be mainly composed of mechanical keyboard sounds.
      3. Physics: I have not yet defined how physics will play a mayor role in this sketch, but what I want to feature the most is key caps falling and disappearing with a proper particle system.
      4. Magnetism: Using the mouse as an attractor, I plan to make the key caps falling be collected with the mouse if it is pressed.
      5. Perlin noise for color: This is yet another feature I am thinking how it will be integrated, but it could be for all the entities in the canva. In other words, according to their position, the color will change smoothly.

Current Progress

Here is my current progress:

Frightening parts

At the moment, the most frightening parts are the interaction with the key caps and sound. This is due to the nature of this code: The key caps move too fast, and it will overlap the sounds.

Another frightening part, although it is already done, was the integration of the system’s time with the Canva. This was done using the JavaScript default class Date and its functions and adjusting the value of theta via the function map();

Here is the feature code of the moving hands, of the analog clock, which took me the most time:

update(hours, minutes, seconds, milliseconds){
        // Convert polar to cartesian  (Taken from an example from class).
        this.position = p5.Vector.fromAngle(this.theta);
        this.position.mult(this.r);

        if (this.type_of_hand == "hours"){
            this.theta = map(hours, 0, 390, -51.8, 51.8);   //-51.8 seems to be the value to simulate a clock.

        } else if (this.type_of_hand == "minutes"){
            this.theta = map(minutes, 0, 1000, -51.8, 51.8);
        }

        else if (this.type_of_hand == "seconds"){
            this.theta = map(seconds, 0, 1000, -51.8, 51.8);
        }
        
        else if (this.type_of_hand == "milliseconds"){
            this.theta = map(milliseconds, 0, 15800, -51.8, 51.8);
        }
    }

Finding the correct values to map each hand took a lot of time since, most attempts, resulted in the hands being desynchronized with the system’s time.

Reducing risks

To avoid delivering an uncompleted midterm project, I plan to do the following:

      • If a certain part of the code is too hard to develop, I will refer to the class material as well as the multiple examples in order to understand how something works.
      • If there are some unclear details in how to proceed, I should arrange office hours with the professor.
      • Spend between 1–2 hours a day developing the key features.

Future improvements

I would like to improve this sketch by doing the following:

      • Adding better aesthetics and with a more of a “generative” touch. Like, for example, if a key cap is touch then generate a series of letters around it following Perlin noise.
      • Add the mechanical keyboard sound.
      • Develop a background and not from an external source.
      • Define better what kind of interaction will the user have with the mouse.

Used sources

      1. How to get current time in JavaScript by geeksforgeeks

Week 5 – Painterize by Dachi

Sketch:  (can’t work without my server for now so just pasting for code and demonstration purposes)

Image based on prompt “Designing interactive media project about art generation” with Van Gogh effect.

Concept Inspiration

As a technology enthusiast with a keen interest in machine learning, I’ve been fascinated by the recent advancements in generative AI, particularly in the realm of image generation. While I don’t have the expertise to create a generative AI model from scratch, I saw an exciting opportunity to explore the possibilities of generative art by incorporating existing AI image generation tools.

My goal was to create a smooth, integrated experience that combines the power of AI-generated images with classic artistic styles. The idea of applying different painter themes to AI-generated images came to mind as a way to blend cutting-edge technology with traditional art forms. For my initial experiment, I chose to focus on the distinctive style of Vincent van Gogh, known for his bold colors and expressive brushstrokes.

Development Process

The development process consisted of two main components:

  1. Backend Development: A Node.js server using Express was created to handle communication with the StarryAI API. This server receives requests from the frontend, interacts with the API to generate images, and serves these images back to the client.
  2. Frontend Development: The user interface and image processing were implemented using p5.js. This includes the input form for text prompts, display of generated images, and application of the Van Gogh effect.

Initially, I attempted to implement everything in p5.js, but API security constraints necessitated the creation of a separate backend.

Implementation Details

The application works as follows:

  1. The user enters a text prompt in the web interface.
  2. The frontend sends a request to the Node.js server.
  3. The server communicates with the StarryAI API to generate an image.
  4. The generated image is saved on the server and its path is sent back to the frontend.
  5. The frontend displays the generated image.
  6. The user can apply the Van Gogh effect, which uses a custom algorithm to create a painterly style.

A key component of the project is the Van Gogh effect algorithm:


// Function to apply the Van Gogh effect to the generated image
function applyVanGoghEffect() {
  if (!generatedImage) {
    statusText.html('Please generate an image first');
    return;
  }

  vanGoghEffect = true;
  statusText.html('Applying Van Gogh effect...');

  // Prepare the image for processing
  generatedImage.loadPixels();

  // Create Poisson disc sampler and line objects
  poisson = new PoissonDiscSampler();
  lines = new LineMom(poisson.ordered);

  // Set up canvas for drawing the effect
  background(model.backgroundbrightness);
  strokeWeight(model.linewidth);
  noFill();

  redraw();  // Force a redraw to apply the effect

  statusText.html('Van Gogh effect applied');
}

This function applies a custom effect that mimics Van Gogh’s style using Poisson disc sampling and a swirling line algorithm.

Challenges

The main challenges encountered during this project were:

  1. Implementing secure API communication: API security constraints led to the development of a separate backend, which added complexity to the project architecture.
  2. Managing asynchronous operations in the image generation process: The AI image generation process is not instantaneous, which required implementing a waiting mechanism in the backend. Here’s how it works:
    • When the server receives a request to generate an image, it initiates the process with the StarryAI API.
    • The API responds with a creation ID, but the image isn’t ready immediately.
    • The server then enters a polling loop, repeatedly checking the status of the image generation process:

    • This loop continues until the image is ready or an error occurs.
    • Once the image is ready, it’s downloaded and saved on the server.
    • Finally, the image path is sent back to the frontend.
    • This process ensures that the frontend doesn’t hang while waiting for the image, but it also means managing potential timeout issues and providing appropriate feedback to the user.

3. Integrating the AI image generation with the Van Gogh effect seamlessly: Ensuring that the generated image could be smoothly processed by the Van Gogh effect algorithm required careful handling of image data.

4. Ensuring smooth user experience: Managing the state of the application across image generation and styling and providing appropriate feedback to the user during potentially long wait times, was crucial for a good user experience.

Reflection

This project provided valuable experience in several areas:

  1. Working with external APIs and handling asynchronous operations
  2. Developing full-stack applications with Node.js and p5.js
  3. Integrating different technologies (AI image generation and artistic styling) into a cohesive application

While the result is a functional prototype rather than a polished product, it successfully demonstrates the concept of combining AI-generated images with artistic post-processing.

Future Improvements

Potential areas for future development include:

  1. Implementing additional artistic styles
  2. Refining the user interface for a better user experience
  3. Adding functionality to save generated artworks
  4. Optimizing the integration between image generation and styling for better performance
  5. Allowing user customization of effect parameters

These improvements could enhance the application’s functionality and user engagement.

References:

Coding Train

p5.js Web Editor | curl flowfield lineobjects image (p5js.org)

Midterm Progress – Julia Set

Concept:

While researching randomly generated methods to implement in my code, I came across the Julia Set. A Julia Set is a set of complex numbers that do not converge to any limit when a given mapping is repeatedly applied to them. The primary purpose of this code is to provide an engaging way to explore the fascinating world of fractals and complex dynamics through visual art. It allows for a deeper appreciation of mathematical concepts by transforming them into a dynamic visual experience. This kind of interactive art can be used for educational purposes, artistic expression, or simply as a fun visual experiment (although it is extremely difficult).

Understanding Julia and Mandelbrot Sets

Code Highlight:
class JuliaSet {
  constructor(cRe, cIm) {
    this.cRe = cRe; // Real part of the Julia constant
    this.cIm = cIm; // Imaginary part of the Julia constant
  }

  // Create particles based on the Julia set
  createParticles() {
    for (let i = 0; i < numParticles; i++) {
      // Random position for each particle
      let x = random(width);
      let y = random(height);
      let zx = map(x, 0, width, -2, 2);
      let zy = map(y, 0, height, -2, 2);
      let iter = 0;

      // Check if the point is in the Julia set
      while (zx * zx + zy * zy < 4 && iter < maxIterations) {
        let tmp = zx * zx - zy * zy + this.cRe;
        zy = 2 * zx * zy + this.cIm;
        zx = tmp;
        iter++;
      }

      // Create particles based on whether they are in the Julia set
      let brightness = iter < maxIterations ? 50 : map(iter, 0, maxIterations, 0, 255);
      particles.push(new Particle(x, y, brightness));
    }
  }
}


Key Components
  1. Particle System: An array called particles stores instances of Particle, representing individual points that are displayed on the canvas..
  2. Mapping Mouse Movement: The cRe and cIm variables are calculated using the map() function, which transforms the mouse’s x and y positions to a range suitable for generating the Julia set (between -1.5 and 1.5).
  3. Julia Set Creation: A JuliaSet object is created with the mapped constants, and its createParticles() method generates particles based on whether points fall within the Julia set.
  4. Each point on the canvas is tested using an iterative algorithm to see if it remains bounded (within a circle of radius 2) when applying the Julia set’s equation. If it does not escape, it belongs to the set.
  5. Particle Behavior: Each Particle is updated every frame using Perlin noise (noise()) to create smooth, organic movements. The angle of movement is determined by the noise value, leading to a natural, swirling motion.
  6. Particles are checked to see if they are within the canvas boundaries; if they exit, they are randomly repositioned.
  7. Brightness Calculation: The brightness of each particle is determined based on the number of iterations it took to escape the set. If the point escapes before reaching the maximum number of iterations, it is assigned a low brightness. Otherwise, its brightness is scaled based on how quickly it escaped.
Sketch:

Edit:   https://editor.p5js.org/mariamalkhoori/sketches/M0NHDl7zU
Next Steps:

I want to expand the Julia set to take on a fuller shape across my canvas. So far, this is not what I had in mind at all, but working with such a new concept has been challenging, so I will pause here for now.

  • Work on the generative aspect further.
  • Refine the particle system, as I still feel it doesn’t meet the design I envision.

Advanced Mathematical Exploration:

  • Different Constants: Allow users to explore different Julia constants (e.g., c values) by letting them input values directly or select from a preset list.
  • Mandelbrot Set Comparison: Implement a feature to compare the Julia set with its corresponding Mandelbrot set, illustrating their relationship.


References

https://thecodingtrain.com/challenges/22-julia-set

https://paulbourke.net/fractals/juliaset/

https://fractalsaco.weebly.com/julia-set.html

Midterm Progress – Khalifa Alshamsi

Concept and Design of Generative Art

The concept for “Evolving Horizons” revolves around the interplay of natural elements in a living landscape. The goal is to create a serene visual experience that captures the passage of time, from dawn to dusk, through smooth transitions of light and shadow. I was inspired by how light can transform landscapes, especially during sunrise and sunset when shadows grow longer, and the colors in the sky shift dramatically.

Key elements in the landscape:

  • Sun: Moves across the sky and influences light and shadows.
  • Hills: Roll across the landscape, with their shadows changing based on the sun’s position.
  • Trees: Stand tall on the hills, casting shadows and swaying gently.
  • Sky: Changes color throughout the day, creating a peaceful and immersive environment.

Sketch

Code

let sun;
let hills = [];
let trees = [];
let numHills = 5;
let numTrees = 30;

function setup() {
  createCanvas(800, 600);
  
  // Create the sun starting at the morning position
  sun = new Sun(100, 100);
  
  // Generate random hills
  for (let i = 0; i < numHills; i++) {
    hills.push(new Hill(random(0, width), random(200, 400), random(100, 200)));
  }
  
  // Generate random trees on the hills
  for (let i = 0; i < numTrees; i++) {
    let hillIndex = floor(random(hills.length));
    trees.push(new Tree(hills[hillIndex].x + random(-50, 50), hills[hillIndex].y - hills[hillIndex].height));
  }
}

function draw() {
  background(135, 206, 235); // Sky blue
  
  // Change the sky color based on sun position
  changeSkyColor(sun.y);
  
  // Move and draw the sun
  sun.moveSun();
  sun.display();
  
  // Draw hills with shadows
  for (let hill of hills) {
    hill.display();
    hill.castShadow(sun);
  }
  
  // Draw trees with shadows
  for (let tree of trees) {
    tree.display();
    tree.castShadow(sun);
  }
}

// Sun class
class Sun {
  constructor(x, y) {
    this.x = x;
    this.y = y;
    this.diameter = 80;
  }
  
  moveSun() {
    // Sun moves in a circular path from morning to night
    this.x = width / 2 + cos(frameCount * 0.01) * 400;
    this.y = height / 2 + sin(frameCount * 0.01) * 200;
  }
  
  display() {
    fill(255, 204, 0); // Yellow sun
    noStroke();
    ellipse(this.x, this.y, this.diameter);
  }
}

// Hill class
class Hill {
  constructor(x, y, height) {
    this.x = x;
    this.y = y;
    this.height = height;
  }
  
  display() {
    fill(34, 139, 34); // Green hills
    noStroke();
    beginShape();
    vertex(this.x - 100, this.y);
    bezierVertex(this.x, this.y - this.height, this.x + 100, this.y - this.height / 2, this.x + 200, this.y);
    vertex(this.x + 200, this.y);
    endShape(CLOSE);
  }
  
  castShadow(sun) {
    let shadowLength = map(sun.y, 0, height, 100, 400);
    fill(0, 0, 0, 50); // Transparent shadow
    noStroke();
    beginShape();
    vertex(this.x - 100, this.y);
    vertex(this.x - 100 + shadowLength, this.y + shadowLength);
    vertex(this.x + 200 + shadowLength, this.y + shadowLength);
    vertex(this.x + 200, this.y);
    endShape(CLOSE);
  }
}

// Tree class
class Tree {
  constructor(x, y) {
    this.x = x;
    this.y = y;
    this.trunkHeight = random(40, 80);
    this.trunkWidth = 10;
    this.leafSize = random(30, 50);
  }
  
  display() {
    // Draw tree trunk
    fill(139, 69, 19); // Brown trunk
    noStroke();
    rect(this.x, this.y, this.trunkWidth, -this.trunkHeight);
    
    // Draw leaves
    fill(34, 139, 34); // Green leaves
    ellipse(this.x + this.trunkWidth / 2, this.y - this.trunkHeight, this.leafSize);
  }
  
  castShadow(sun) {
    let shadowLength = map(sun.y, 0, height, 50, 200);
    fill(0, 0, 0, 50); // Transparent shadow
    noStroke();
    beginShape();
    vertex(this.x, this.y);
    vertex(this.x + shadowLength, this.y + shadowLength);
    vertex(this.x + shadowLength + this.trunkWidth, this.y + shadowLength);
    vertex(this.x + this.trunkWidth, this.y);
    endShape(CLOSE);
  }
}

// Change sky color based on sun's height
function changeSkyColor(sunY) {
  let morning = color(135, 206, 235); // Morning sky
  let dusk = color(255, 99, 71);      // Dusk sky
  let t = map(sunY, 0, height, 0, 1);
  let skyColor = lerpColor(morning, dusk, t);
  background(skyColor);
}

Designing the Code: Functions, Classes, and Interactivity

To break the project into manageable parts, I designed the following core components:

Classes:

  • Sun: The sun manages its position and movement across the sky. The sun also affects the length of shadows.
  • Hill: Represents rolling hills with a bezier curve that gives each hill a natural shape. The hill class also handles the casting of shadows.
  • Tree: Trees are placed on the hills, swaying slightly to simulate a breeze, and casting their own shadows based on the sun’s position.

Functions:

  • movesun(): Moves the sun in a circular motion across the sky. The position of the sun changes dynamically with each frame, mimicking the progression of time.
  • castShadow(): Calculates the length of shadows based on the sun’s position in the sky. This adds realism by changing the shape and size of shadows as the sun moves.
  • changeSkyColor(): Shifts the sky color gradually throughout the day, using the lerpColor() function to transition smoothly from morning to dusk.

Interactivity:

  • Time of Day: I’m considering adding controls where users can manually change the time of day by dragging the sun or pressing a key to speed up the passage of time. This would allow users to explore the landscape at different times of the day and see how light and shadows behave.

The combination of these functions creates a seamless, flowing environment where every aspect of the landscape interacts with the light in real-time.

Identifying Complexities and Minimizing Risks

The most complex part of this project was implementing the shadow-casting algorithm. Calculating shadows based on the sun’s position required careful mapping of angles and distances. I needed to ensure that the shadows grew longer as the sun lowered in the sky and became shorter when the sun was overhead.

Steps to Reduce Risk:

To tackle this complexity, I isolated the problem by writing a simple test sketch that calculated shadow lengths based on different sun positions. I used the map() function in p5.js to dynamically adjust shadow length relative to the sun’s y position. By experimenting with this small feature, I was able to fine-tune the shadow casting before incorporating it into the full project.

Additionally, the sky color transitions were another challenge. I experimented with lerpColor() to create smooth transitions from morning to dusk, ensuring the visual experience was gradual and not abrupt.

Next Steps:

Now that the core features are working, I plan to:

  • Fix the positioning of the trees that are randomly generated.
  • Implement wind simulation for the trees, making them sway in response to virtual wind.
  • Enhance user interactivity by allowing users to manipulate the sun’s position, controlling the time of day directly.
  • To make the scene feel more immersive, add finer details to the landscape, such as moving clouds and birds.
Midterm Progress

Concept

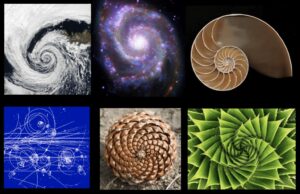
While experimenting with different functions and colors, I saw how different iterations of the sketch produced different visuals. I would say it kind of looks like a spanish-looking dress/skirt flowing or a japanese fan, both rotating clockwise and anti-clockwise.

Sketch

Interactivity

For an improved user experience, I have a few ideas but still unsure which one of them I will be going for.

  • Change of color
  • Changing speed
  • Changing angles

This will be done either by mouse press or button press.

Reducing Risks

I want to ensure a smooth transition when the states of the sketch are changed. For that, I will make sure that the states change gradually.

Midterm Draft #1 – Stefania Petre

Concept:
The Dynamic Spirals project creates an engaging visual experience through the generation of spiraling lines that react to user input. The spirals dynamically change in size, color, and motion based on the mouse position, creating a captivating display of colors and forms.

First Draft:


Design:

  • Spirals: The sketch generates multiple spirals whose radii are modulated by a sine function, resulting in smooth wave-like motions. Each spiral is drawn around the center of the canvas, enhancing the visual symmetry.
  • Color Palette: Colors are assigned based on the index of each spiral, producing a gradient effect across the spirals. This choice aims to evoke a sense of depth and movement.
  • Interactivity: The maximum radius of the spirals varies according to the mouse’s X position. This feature adds a layer of interactivity, allowing users to influence the visual output directly.

States and Variations:
The sketch can exhibit different states based on user interaction:

  • The number of spirals can be adjusted to create a more dense or sparse visual.
  • Modifying the angleOffset value can lead to variations in the spirals’ animations, resulting in different visual patterns.
  • Introducing additional mouse interactions (e.g., controlling color or speed) can further diversify the visual experience.

Identified Risks:
One of the more complex aspects of this project is managing the performance and responsiveness of the visual output, especially with a larger number of spirals. Ensuring the sketch runs smoothly without lag is essential for a good user experience.

Risk Reduction Strategies:
To minimize potential risks:

  • The number of spirals is set to a manageable level (10) to maintain performance.
  • The use of noFill() and strokeWeight() is applied to enhance rendering efficiency while preserving visual quality.
  • Performance will be tested across different devices to ensure responsiveness, and adjustments will be made based on testing results.

Next Steps

  • Explore the introduction of additional interactive elements, such as changing spiral behavior with keyboard inputs or varying the colors dynamically based on user actions.
  • Experiment with adding background patterns or effects to enhance visual depth.
  • Document findings and user feedback to improve the generative art experience continuously.

Midterm Draft 1 – Branches of Motion

Concept

For my midterm project, I chose to create a generative art piece based on a fractal tree. I’ve always found fractal patterns in nature really interesting, like how trees branch out or how veins spread in a leaf. Each part of a fractal reflects the whole, which is something I wanted to explore in this project. I also wanted the tree to feel interactive so that users can control how the branches grow and move, making it feel more personal and engaging. The mouse controls the angle of the branches, which adds an element of real-time interaction.

Design

The design focuses on creating a tree that changes based on user input. By moving the mouse horizontally, the user can adjust the angle of the branches, which directly influences how the tree grows and branches out. This makes the experience interactive and unique to the user’s movement.

The main function in the code is branch(), which uses recursion to draw the tree. It takes the length of the current branch, draws it, and then calls itself to draw smaller branches at an angle. The recursion stops once the branch length is small enough, and the angle of the branches is tied to the position of the mouse on the screen. This creates a dynamic, interactive system where the tree’s structure shifts as the mouse moves.

Code
For now, I have a basic draft that lays the foundation for the project. Here’s the current code:

let angle = 0; // Initialize the angle variable, which will be controlled by mouse movement

function setup() {
  createCanvas(640, 360); // Set up a canvas of 640 by 360 pixels
}

function draw() {
  background(0); // Set the background to black each frame to clear the previous drawing
  angle = map(mouseX, 0, width, 0, TWO_PI); // Map the mouse's X position to an angle between 0 and TWO_PI (full circle)
  
  stroke(255); // Set the stroke color to white
  strokeWeight(2); // Set the stroke thickness to 2 pixels

  translate(width * 0.5, height); // Move the origin to the bottom center of the canvas
  
  branch(100); // Call the branch function to start drawing the tree with an initial length of 100
}

// Recursive function to draw the branches
function branch(len) {
  line(0, 0, 0, -len); // Draw a vertical line representing the current branch

  translate(0, -len); // Move the origin to the end of the current branch
  
  // If the current branch length is greater than 4, keep drawing smaller branches
  if (len > 4) {
    push(); // Save the current state of the drawing
    rotate(angle); // Rotate by the current angle (controlled by the mouse)
    branch(len * 0.67); // Call the branch function recursively, reducing the length by 67%
    pop(); // Restore the original state

    push(); // Save the current state again for the other branch
    rotate(-angle); // Rotate in the opposite direction by the current angle
    branch(len * 0.67); // Call the branch function for the opposite branch
    pop(); // Restore the original state
  }
}

This code creates a simple tree that responds to the mouse’s horizontal position. The tree grows and splits into smaller branches as the user moves the mouse. This serves as the base for the more complex features I will add later.

Embedded Sketch

Identified Risk and How I Reduced It
The part of the project that worried me the most was making sure the interaction with the mouse felt smooth and natural. I was concerned that the tree would shake too much when the mouse moved quickly, which would make the experience less enjoyable. To deal with this, I focused on carefully mapping the angles using the mouseX position to ensure the tree’s motion stays smooth and doesn’t jitter too much. I also tested the recursive function separately to make sure the branches don’t overlap or become cluttered.

Possible Future Additions
While this is the current draft, there are a few features I am considering for future versions, though these are not finalized yet:

  • Colors: I might add color gradients or change the color of the branches based on their depth or size to make the tree more visually interesting.
  • Animations: Animations can be added to make the tree grow over time or sway in the wind to make the piece feel more dynamic.
  • More Trees: Adding multiple trees on the canvas could create a forest-like scene, where each tree is slightly different in shape or size.

draft 2 for now: https://editor.p5js.org/maryamalmatrooshi/sketches/K0YQElaqm