
Sketch: (won’t work without my server, explained later in code)
Timelapse:
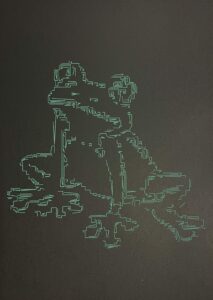
SVG Print:
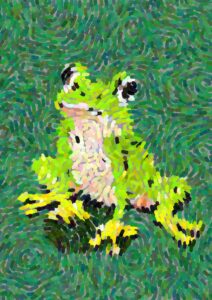
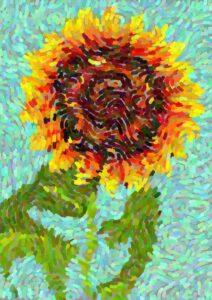
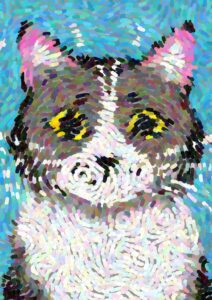
Digital Prints:
(This one is same as SVG version without edge detecting algorithm and simplification)

Concept Inspiration
As a technology enthusiast with a keen interest in machine learning, I’ve been fascinated by the recent advancements in generative AI, particularly in the realm of image generation. While I don’t have the expertise nor timeframe to create a generative AI model from scratch, I saw an exciting opportunity to explore the possibilities of generative art by incorporating existing AI image generation tools.
My goal was to create a smooth, integrated experience that combines the power of AI-generated images with classic artistic styles. The idea of applying different painter theme to AI-generated images came to mind as a way to blend cutting-edge technology with traditional art forms. For my initial experiment, I chose to focus on the distinctive style of Vincent van Gogh, known for his bold colors and expressive brushstrokes.
Development Process
The development process consisted of two main components:
- Backend Development: A Node.js server using Express was created to handle communication with the AI API. This server receives requests from the frontend, interacts with the API to generate images, and serves these images back to the client.
- Frontend Development: The user interface and image processing were implemented using p5.js. This includes the input form for text prompts, display of generated images, application of the Van Gogh effect, and SVG extraction based on edge detection algorithm.
Initially, I attempted to implement everything in p5.js, but API security constraints necessitated the creation of a separate backend.
Implementation Details
The application works as follows:
- The user enters a text prompt in the web interface.
- The frontend sends a request to the Node.js server.
- The server communicates with the StarryAI API to generate an image.
- The generated image is saved on the server and its path is sent back to the frontend.
- The frontend displays the generated image.
- The user can apply the Van Gogh effect, which uses a custom algorithm to create a painterly style.
- User is able to export the image in PNG format with or without Van Gogh effect
- User is also able to export two different kinds of SVG (simplified and even more simplified)
- Version of SVG extraction for Pen Plotting is done through edge detection algorithm of which the user is able to calibrate sensitivity.
A key component of the project is the Van Gogh effect algorithm:
This function applies a custom effect that mimics Van Gogh’s style using Poisson disc sampling and a swirling line algorithm. Here is significant code:
// Class for Poisson disc sampling
class PoissonDiscSampler {
  constructor() {
    this.r = model.pointr;
    this.k = 50;  // Number of attempts to find a valid sample before rejecting
    this.grid = [];
    this.w = this.r / Math.sqrt(2);  // Cell size for spatial subdivision
    this.active = [];  // List of active samples
    this.ordered = [];  // List of all samples in order of creation

    // Use image dimensions instead of canvas dimensions
    this.cols = floor(generatedImage.width / this.w);
    this.rows = floor(generatedImage.height / this.w);

    // Initialize grid
    for (let i = 0; i < this.cols * this.rows; i++) {
      this.grid[i] = undefined;
    }

    // Add the first sample point (center of the image)
    let x = generatedImage.width / 2;
    let y = generatedImage.height / 2;
    let i = floor(x / this.w);
    let j = floor(y / this.w);
    let pos = createVector(x, y);
    this.grid[i + j * this.cols] = pos;
    this.active.push(pos);
    this.ordered.push(pos);

    // Generate samples
    while (this.ordered.length < model.pointcount && this.active.length > 0) {
      let randIndex = floor(random(this.active.length));
      pos = this.active[randIndex];
      let found = false;
      for (let n = 0; n < this.k; n++) {
        // Generate a random sample point
        let sample = p5.Vector.random2D();
        let m = random(this.r, 2 * this.r);
        sample.setMag(m);
        sample.add(pos);

        let col = floor(sample.x / this.w);
        let row = floor(sample.y / this.w);

        // Check if the sample is within the image boundaries
        if (col > -1 && row > -1 && col < this.cols && row < this.rows &&
            sample.x >= 0 && sample.x < generatedImage.width &&
            sample.y >= 0 && sample.y < generatedImage.height &&
            !this.grid[col + row * this.cols]) {
          let ok = true;
          // Check neighboring cells for proximity
          for (let i = -1; i <= 1; i++) {
            for (let j = -1; j <= 1; j++) {
              let index = (col + i) + (row + j) * this.cols;
              let neighbor = this.grid[index];
              if (neighbor) {
                let d = p5.Vector.dist(sample, neighbor);
                if (d < this.r) {
                  ok = false;
                  break;
                }
              }
            }
            if (!ok) break;
          }
          if (ok) {
            found = true;
            this.grid[col + row * this.cols] = sample;
            this.active.push(sample);
            this.ordered.push(sample);
            break;
          }
        }
      }
      if (!found) {
        this.active.splice(randIndex, 1);
      }

      // Stop if we've reached the desired point count
      if (this.ordered.length >= model.pointcount) {
        break;
      }
    }
  }
}

// LineMom class for managing line objects
class LineMom {
  constructor(pointcloud) {
    this.lineObjects = [];
    this.lineCount = pointcloud.length;
    this.randomZ = random(10000);
    for (let i = 0; i < pointcloud.length; i++) {
      if (pointcloud[i].x < -model.linelength || pointcloud[i].y < -model.linelength ||
          pointcloud[i].x > width + model.linelength || pointcloud[i].y > height + model.linelength) {
        continue;
      }
      this.lineObjects[i] = new LineObject(pointcloud[i], this.randomZ);
    }
  }

  render(canvas) {
    for (let i = 0; i < this.lineCount; i++) {
      if (this.lineObjects[i]) {
        this.lineObjects[i].render(canvas);
      }
    }
  }
}
Another key component of the project was SVG extraction based on edge detection.
- The image is downscaled for faster processing.
- Edge detection is performed on the image using a simple algorithm that compares the brightness of each pixel to the average brightness of its 3×3 neighborhood. If the difference is above a threshold, the pixel is considered an edge.
- The algorithm traces paths along the edges by starting at an unvisited edge pixel and following the edges until no more unvisited edge pixels are found or the path becomes too long.
- The traced paths are simplified using the Ramer-Douglas-Peucker algorithm, which removes points that don’t contribute significantly to the overall shape while preserving the most important points.
- The simplified paths are converted into SVG path elements and combined into a complete SVG document.
- The SVG is saved as a file that can be used for plotting or further editing.
This approach extracts the main outlines and features of the image as a simplified SVG representation.
// Function to export a simplified SVG based on edge detection
function exportSimpleSVG() {
  if (!generatedImage) {
    console.error('No image generated yet');
    return;
  }

  // Downscale the image for faster processing
  let scaleFactor = 0.5;
  let img = createImage(generatedImage.width * scaleFactor, generatedImage.height * scaleFactor);
  img.copy(generatedImage, 0, 0, generatedImage.width, generatedImage.height, 0, 0, img.width, img.height);

  // Detect edges in the image
  let edges = detectEdges(img);
  edges.loadPixels();

  let paths = [];
  let visited = new Array(img.width * img.height).fill(false);

  // Trace paths along the edges
  for (let x = 0; x < img.width; x++) {
    for (let y = 0; y < img.height; y++) {
      if (!visited[y * img.width + x] && brightness(edges.get(x, y)) > 0) {
        let path = tracePath(edges, x, y, visited);
        if (path.length > 5) { // Ignore very short paths
          paths.push(simplifyPath(path, 1)); // Simplify the path
        }
      }
    }
  }
// Function to detect edges in an image
function detectEdges(img) {
  img.loadPixels(); //load pixels of input image
  let edges = createImage(img.width, img.height); //new image for storing
  edges.loadPixels();

  // Simple edge detection algorithm
  for (let x = 1; x < img.width - 1; x++) { //for each pixel exlcuding broder
    for (let y = 1; y < img.height - 1; y++) {
      let sum = 0;
      for (let dx = -1; dx <= 1; dx++) {
        for (let dy = -1; dy <= 1; dy++) {
          let idx = 4 * ((y + dy) * img.width + (x + dx));
          sum += img.pixels[idx];
        }
      }
      let avg = sum / 9; //calculate avg brightness of 3x3 neighborhood
      let idx = 4 * (y * img.width + x);
      edges.pixels[idx] = edges.pixels[idx + 1] = edges.pixels[idx + 2] =
        abs(img.pixels[idx] - avg) > 1 ? 255 : 0; //change this
      edges.pixels[idx + 3] = 255; //if difference between pixel brightness and average is above 3 its considered an edge. result is binary image where edges are white and none edges are black
    }
  }
  edges.updatePixels();
  return edges;
}

// Function to trace a path along edges
function tracePath(edges, startX, startY, visited) {
  let path = [];
  let x = startX;
  let y = startY;
  let direction = 0; // 0: right, 1: down, 2: left, 3: up

  while (true) {
    path.push({x, y});
    visited[y * edges.width + x] = true;

    let found = false;
    for (let i = 0; i < 4; i++) { //It continues tracing until it can't find an unvisited edge pixel
      let newDirection = (direction + i) % 4;
      let [dx, dy] = [[1, 0], [0, 1], [-1, 0], [0, -1]][newDirection];
      let newX = x + dx;
      let newY = y + dy;

      if (newX >= 0 && newX < edges.width && newY >= 0 && newY < edges.height &&
          !visited[newY * edges.width + newX] && brightness(edges.get(newX, newY)) > 0) {
        x = newX;
        y = newY;
        direction = newDirection;
        found = true;
        break;
      }
    }

    if (!found || path.length > 500) break; // Stop if no unvisited neighbors or path is too long
  }

  return path;
}

//Function to simplify a path using the Ramer-Douglas-Peucker algorithm The key idea behind this algorithm is that it preserves the most important points of the path (those that deviate the most from a straight line) while removing points that don't contribute significantly to the overall shape.
function simplifyPath(path, tolerance) {
  if (path.length < 3) return path; //If the path has fewer than 3 points, it can't be simplified further, so we return it as is.

  function pointLineDistance(point, lineStart, lineEnd) { //This function calculates the perpendicular distance from a point to a line segment. It's used to determine how far a point is from the line formed by the start and end points of the current path segment.
    let dx = lineEnd.x - lineStart.x;
    let dy = lineEnd.y - lineStart.y;
    let u = ((point.x - lineStart.x) * dx + (point.y - lineStart.y) * dy) / (dx * dx + dy * dy);
    u = constrain(u, 0, 1);
    let x = lineStart.x + u * dx;
    let y = lineStart.y + u * dy;
    return dist(point.x, point.y, x, y);
  }

  //This loop iterates through all points (except the first and last) to find the point that's farthest from the line formed by the first and last points of the path.
  let maxDistance = 0;
  let index = 0;
  for (let i = 1; i < path.length - 1; i++) {
    let distance = pointLineDistance(path[i], path[0], path[path.length - 1]);
    if (distance > maxDistance) {
      index = i;
      maxDistance = distance;
    }
  }

  if (maxDistance > tolerance) { //split and recursively simplify each
    let leftPath = simplifyPath(path.slice(0, index + 1), tolerance);
    let rightPath = simplifyPath(path.slice(index), tolerance);
    return leftPath.slice(0, -1).concat(rightPath);
  } else {
    return [path[0], path[path.length - 1]];
  }
}
Challenges
The main challenges encountered during this project were:
- Implementing secure API communication: API security constraints led to the development of a separate backend, which added complexity to the project architecture.
- Managing asynchronous operations in the image generation process: The AI image generation process is not instantaneous, which required implementing a waiting mechanism in the backend. (Promised base) Here’s how it works:
- When the server receives a request to generate an image, it initiates the process with the StarryAI API.
- The API responds with a creation ID, but the image isn’t ready immediately.
- The server then enters a polling loop, repeatedly checking the status of the image generation process:
-
- This loop continues until the image is ready or an error occurs.
- Once the image is ready, it’s downloaded and saved on the server.
- Finally, the image path is sent back to the frontend.
- This process ensures that the frontend doesn’t hang while waiting for the image, but it also means managing potential timeout issues and providing appropriate feedback to the user.
- Integrating the AI image generation with the Van Gogh effect seamlessly: Ensuring that the generated image could be smoothly processed by the Van Gogh effect algorithm required careful handling of image data.
- Ensuring smooth user experience: Managing the state of the application across image generation and styling and providing appropriate feedback to the user during potentially long wait times, was crucial for a good user experience.
- Developing an edge detection algorithm for pen plotting:
- Adjusting the threshold value for edge detection was important, as it affects the level of detail captured in the resulting SVG file. Setting the threshold too low would result in an overly complex SVG, while setting it too high would oversimplify the image.
- Ensuring that the custom edge detection algorithm produced satisfactory results across different input images was also a consideration, as images vary in contrast and detail. Initially, I had problem with edge pixels but later excluded them.
- Integrating the edge detection algorithm seamlessly into the existing image processing pipeline and ensuring compatibility with the path simplification step (Ramer-Douglas-Peucker algorithm) was another challenge that required careful design and testing.
- Image generation, I experimented with different image generation models provided by StarryAI. From default to fantasy to anime. Eventually I settled down for detailed Illustration model which is perfect for svg extraction as it provides more distinct lines based on cartoonish appearance and also works well for Van Gogh effect due to its bold colors and more simplified nature compared to more realistic images.
Reflection
This project provided valuable experience in several areas:
- Working with external APIs and handling asynchronous operations
- Working with full-stack approach with Node.js and p5.js
- Integrating different technologies (AI image generation and artistic styling) into a cohesive application
- Implementing algorithms for edge detection.
I am quite happy with the result and plotted image also works well stylistically although it is different from initial painter effect, it provides another physical dimension to the project which is just as important.
Future Improvements:
- Implementing additional artistic styles
- Refining the user interface for a better user experience
- Combining art styles with edge detection for more customizable SVG extraction.
- Hosting site online to keep project running without my interference. This would also require me to have some kind of subscription for Image generation API because current one is capped at around 100 requests for current model.