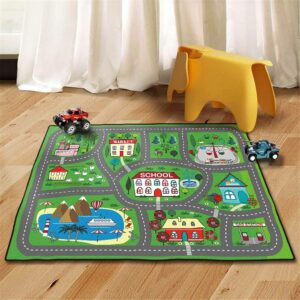
Concept
The goal was to make a virtual version of that beloved city rug, where a digital car can drive across different sections of the map, seamlessly moving from one side to the other. The two-part background gives the feel of exploring a bigger city, with distinct areas to travel through, just like on those old playmats.

Code Structure
- Main Components:
- The project relies on three key files: sketch.js, space.js, and vehicle.js
- sketch.js initializes the canvas, loads images, and manages the primary simulation loop.
- space.js defines the space class responsible for displaying the background image and wrapping the car’s position when it exits the visible canvas.
- vehicle.js includes the vehicle class, which controls the car’s movement and behaviors.
- Images and Background:
- I used two images for the playmat, playmate0.jpg, and playmate1.jpg, representing the right and left sides of the digital rug. These images are loaded in the preload() function of sketch.js and displayed conditionally based on the car’s position on the canvas.
- Vehicle Movement:
- The car has a random wandering behavior, simulating the playful movement of a child’s toy car on a mat.
- The wrap() method in space.js ensures the car stays within the canvas bounds by wrapping it around horizontally and vertically if it moves out of view.
- Dynamic Background Switching:
- The show() method in space.js dynamically changes the displayed background image based on the car’s location on the canvas. This method ensures that only one background is visible at a time, creating a realistic effect as the car transitions from one side of the playmat to the other.
Code Highlights
Here’s a snippet of how the show() function in space.js was set up to handle dynamic background switching based on the car’s position:
class Space {
    constructor(sectorWidth, sectorHeight) {
        this.sectorWidth = sectorWidth / 2;
    }

    show(vehicle) {
        let sectorIndex = vehicle.pos.x < this.sectorWidth ? 0 : 1;

        if (map[sectorIndex]) {
            image(map[sectorIndex], 0, 0, width, height);
        }

        fill(255);
        textSize(20);
        textAlign(CENTER, CENTER);
        let sideName = sectorIndex === 0 ? "Left Side" : "Right Side";
        text(sideName, vehicle.pos.x, vehicle.pos.y - 20);
    }

    wrap(vehicle) {
        if (vehicle.pos.x < 0) vehicle.pos.x = width;
        else if (vehicle.pos.x > width) vehicle.pos.x = 0;

        if (vehicle.pos.y < 0) vehicle.pos.y = height;
        else if (vehicle.pos.y > height) vehicle.pos.y = 0;
    }
}
This structure allows the playmat simulation to function smoothly, with the car wrapping around the canvas edges and triggering the appropriate background based on its location.
Embedded Sketch
Challenges and Solutions
- Image Loading Issues: Initially, there were problems loading the images due to incorrect file paths. By ensuring the correct file names and paths, I resolved these loading errors.
- Ensuring Proper Wrapping: The most complex aspect was achieving seamless wrapping of the car’s position without creating visual artifacts or making both images appear simultaneously. I refined the wrap() and show() functions in space.js to ensure that only the relevant background image is displayed as the car moves.
Looking Back and Forward
This project captures a slice of childhood by turning a traditional playmat into an interactive digital experience. Seeing the car navigate from one side to the other, transitioning between different parts of the city, really brings back memories of those endless games with toy cars.
In the future, it would be fun to add more interactivity, like giving users control over the car’s direction or adding sound effects to simulate the familiar hum of toy car wheels on the carpet.
Source: The Coding Train – Nature of Code Series
