Final Project – Pacman’s EcoSim

Inspiration:

The inspiration for this project was the concept of an ecosystem simulation. The idea was to create a dynamic environment where different entities interact with each other and evolve. The entities in this ecosystem are Boids, Pacmen, and Ghosts, each with their own behaviors and attributes. The user can be the decider of how these creatures evolve by adjusting these attributes using sliders.

Why Pacman?

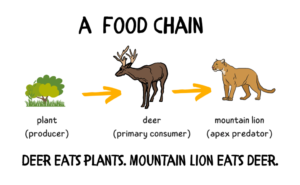
The Pacman theme was chosen for this project due to its familiarity, aesthetics, and game dynamics. It’s a well-known game, making the ecosystem simulation easy to understand. The bright colors and simple shapes enhance the user experience, and the game’s chase and evade mechanics effectively illustrate predator-prey relationships in nature.

First Iteration:


The first iteration of the project involved setting up the basic structure of the ecosystem. These vehicles exhibit behaviors similar to those of living organisms, such as seeking food, avoiding poison, and reproducing. The main idea is to create a basic system that I can build on top of for my next iteration. I set up the foundational functions, such as seeking and reproduction.

Next Steps:

Fleeing Behavior: Fleeing behavior for the boids was added, which is triggered when a predator or apex predator is nearby. This made the simulation more realistic and dynamic.

Introduction of Apex Predators: Apex predators were introduced into the ecosystem. These entities hunt both boids and predators, adding another layer of complexity to the simulation.

User Controls Added: More user controls were added to the simulation. This included sliders to adjust the speed, reproduction rate, and lifespan of each entity type. This allows users to experiment with different settings and observe how they affect the ecosystem.

Pacman Theme: The visuals of the simulation were improved by using images instead of simple shapes for the entities. This made the simulation more visually appealing and engaging.

Performance Optimized: As the complexity of the simulation increased, the code was optimized to ensure that it ran smoothly. This involved techniques such as quadtree optimization for collision detection

Code that I am proud of:

seek(target) {
  let desired = p5.Vector.sub(target, this.position);
  desired.setMag(this.maxSpeed);
  let steer = p5.Vector.sub(desired, this.velocity);
  steer.limit(this.maxForce);
  this.applyForce(steer);
}

The seek() function in the ApexPredator class is used to move the apex predator towards a target. It calculates a desired velocity vector pointing from the apex predator to the target, sets its magnitude to the maximum speed of the apex predator, and then calculates a steering force to apply to the apex predator to move it towards the target.

flee(target) {
  let desired = p5.Vector.sub(this.position, target);
  desired.setMag(this.maxSpeed);
  let steer = p5.Vector.sub(desired, this.velocity);
  steer.limit(this.maxForce);
  this.applyForce(steer);
}

The flee() function in the Boid class is used to move the boid away from a target. It calculates a desired velocity vector pointing from the target to the boid, sets its magnitude to the maximum speed of the boid, and then calculates a steering force to apply to the boid to move it away from the target.

function changePlaySpeed(){
  if (playSpeed === 1) {
    playSpeed = 2;
  } else if (playSpeed === 2) {
    playSpeed = 4;
  } else if (playSpeed === 4) {
    playSpeed = 8;
  } else if (playSpeed === 8) {
    playSpeed = 1;
  }
  playSpeedButton.html('Play Speed:' + playSpeed + 'x');
}

The changePlaySpeed() function is used to cycle through different play speeds each time it is called. The play speed is displayed on a button in the user interface.

Challenges:

Autonomous Agent Logic

Implementing autonomous agent logic was a significant challenge. This involved creating behaviors for the boids, pacmen, and ghosts in the ecosystem. Each entity needed to have its own set of behaviors and interactions with other entities, which required a deep understanding of vectors, forces, and steering behaviors.

Slider Range Balancing

Balancing the range of the sliders was another challenge. The sliders control various attributes of the entities, such as speed, force, and reproduction rate. Finding a range that provided meaningful changes without causing extreme behaviors was a delicate balancing act.

Performance Management

Managing performance was a critical challenge. With potentially hundreds of entities on the screen at once, each with its own set of behaviors and interactions, the simulation could easily become slow and unresponsive. Optimizing the code to handle this complexity while still running smoothly was a significant part of the project.

Final Touches:

The final steps of the project involved refining the behaviors of the entities and improving the user interface. This included adding a button for generating the next generation of entities, and creating a screen for displaying the sliders that control the attributes of the entities.

Final Sketch:

Possible Future Improvements:

– Adding more entity types: The ecosystem could be made even more complex and interesting by adding more types of entities, such as plants or other types of animals.
– Implementing genetic algorithms: The entities could be made to evolve over time using genetic algorithms, with the most successful entities passing on their traits to the next generation.

-Special Creature Abilities: A possible improvement could be adding new abilities that the creatures can occasionally use to grow their numbers and recover from the brink of extinction.

IM Showcase:

The IM showcase was a success, and many people were stopping by to check out the class’s projects. The learning curve on the simulation was quite high for visitors and it took a while for them to get the hang of the game.

I also decided to showcase my midterm project, which actually caught the eyes of more people because it was more visually interesting.
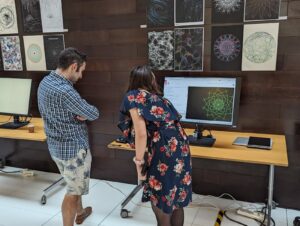
Final Thoughts:

The journey of this project, from its initial conception to its final iteration, has been a testament to the iterative nature of design. It presented several challenges, but also provided the opportunity to learn and apply new concepts. The end result is a dynamic ecosystem simulation that is visually interesting to interact with. I still think however there is a lot more room for improvements in the future which I would like to explore.

Final Project Update

Concept

The project is a simulation of an ecosystem featuring three types of entities: boids, predators, and apex predators. The goal is to maintain balance in the ecosystem by adjusting the attributes of these entities. The simulation allows the user to influence the survival and evolution of the creatures.

Sketch

Mechanics

Each entity type has its own behaviors and attributes:

– Boids: These are the prey in the ecosystem. They flock together and reproduce.
– Predators: These entities seek out and consume boids. They also reproduce.
– Apex Predators: The top of the food chain. They seek out and consume predators and also reproduce.

Stats

The entities inhabit a 2D space. The user can interact with the simulation by adjusting the attributes of the entities using sliders. These attributes include speed, maximum force, and reproduction rate. Each entity type has a reproduction method. When an entity reproduces, a new entity of the same type is added to the ecosystem.

Expected Challenges

– Balancing: The main challenge is to maintain balance in the ecosystem. If the predators are too strong, the boids might die out. If the boids reproduce too quickly, they might overpopulate the ecosystem. This is the users objective to find the right balance between the stats, however, the sliders need to have the appropriate ranges of values to make sense in the context of the enviornment. This requires further experimentation to find the ranges.

Next Steps

– Improve User Interaction: Allow the user to adjust more attributes of the entities. This could include things like the lifespan of the entities, the rate at which they get hungry.
– Visual Improvements: Make the UI more finalized and polished as will as the creatures.

Assignment Week #10 – Bacterial Game of Life

Concept

In this assignment, I tried to use Conway’s Game of Life to emulate how a bacterial colony grows in a petri dish. The aim was to blend the classic algorithm with a twist, introducing alternating rulesets based on iterations and a hexagonal pattern. This would allow the sketch to resemble a bacterial colony growing and dying out, leading to an ever-evolving and visually appealing display.

Sketch

User Interaction

  1. The user can spawn new living cells by holding down the mouse button and moving it around.
  2. There is a slider at the bottom that alters the framerate/speed of the sketch

Code

  1. Creating the Hexagonal Grid
function drawHexagon(x, y, size) {
    beginShape();
    for (let i = 0; i < 6; i++) {
        let angle = TWO_PI / 6 * i;
        let vx = x + cos(angle) * size;
        let vy = y + sin(angle) * size;
        vertex(vx, vy);
    }
    endShape(CLOSE);
}

This function draws a hexagon on the canvas. It starts by creating a shape and iterates six times (once for each side of the hexagon). In each iteration, it calculates the vertex coordinates using trigonometric functions (cos and sin) and then adds these vertices to the shape. Finally, the shape is closed to complete the hexagon.

  1. Updating the Grid State
function updateGrid() {
    for (let col = 0; col < cols; col++) {
        for (let gridRow = 0; gridRow < rows; gridRow++) {
            let neighbors = calculateNeighbors(col, gridRow);
            let newCellState = calculateNewCellState(grid[col][gridRow], neighbors);
            nextGrid[col][gridRow] = newCellState;
        }
    }
    // Swap grids for next iteration
    let temp = grid;
    grid = nextGrid;
    nextGrid = temp.map(gridRow => [...gridRow]);
}

The updateGrid function is the core of the simulation. It loops through each cell in the grid and determines its next state (alive or dead) based on the current state and the number of neighbors. This is done by calling calculateNeighbors to count living neighbors and calculateNewCellState to apply the Game of Life rules. After calculating the new states for all cells, the function swaps the current and next grids, preparing for the next iteration.

  1. Calculating Neighboring Cells
function calculateNeighbors(col, gridRow) {
    let count = 0;
    let neighborPositions = col % 2 === 0 ? 
        [[-1, 0], [0, -1], [1, -1], [-1, 1], [0, 1], [1, 0]] : 
        [[-1, -1], [0, -1], [1, 0], [-1, 1], [0, 1], [1, -1]];

    neighborPositions.forEach(pos => {
        let newCol = col + pos[0];
        let newRow = gridRow + pos[1];
        if (newCol >= 0 && newCol < cols && newRow >= 0 && newRow < rows) {
            count += grid[newCol][newRow];
        }
    });

    return count;
}

This function calculates the number of living neighbors for a given cell in a hexagonal grid. It first determines the relative positions of neighboring cells, which differ based on the row being even or odd (due to the staggered nature of the hexagonal grid). It then iterates through these positions, checking each neighboring cell’s state and counting how many are alive. Implementation

  • Hexagonal Grid: The simulation uses a hexagonal grid, offering a twist to the traditional square cells, which influences the pattern formations and interactions.
  • Ruleset Alternation: The game alternates between two rulesets based on the number of iterations. This variation introduces new dynamics and allows the bacterial colonies to regrow and continue the cycle.
  • Color Dynamics: To enhance visual interest, each cell changes color depending on its state, adding a layer of visual complexity to the simulation.

Challenges

  • Hexagonal Logic: Implementing the Game of Life on a hexagonal grid presented unique challenges, particularly in calculating neighbors and defining rules specific to the hexagonal arrangement.
  • Ruleset Implementation: Crafting the logic for alternating rulesets while maintaining a coherent and continuous simulation required alot of trial and error.

Future Improvements

  • User-Controlled Variables: Allowing users to adjust parameters like the iteration count for ruleset changes or the rules themselves could offer a more interactive and customizable experience.
  • Advanced Interactions: Implementing additional interactions, such as dragging to create multiple cells or using gestures to influence the simulation, could enhance user engagement.
  • Enhanced Aesthetics: Further refinement of the visual elements, such as gradient color transitions or adding background animations, could make the simulation even more captivating.

Final Project Proposal

Concept

The concept of this sketch revolves around simulating a dynamic ecosystem where virtual entities, referred to as “Vehicles”, interact with their environment. These Vehicles exhibit behaviors akin to living organisms, such as seeking food, avoiding poison, and reproducing. The core idea is to create a system that demonstrates basic principles of life, such as survival, adaptation, and reproduction, in a controlled digital setting.

Sketch

Implementation

Mechanics

The Vehicles are programmed with various attributes controlling their motion and decision-making processes:

  • Motion: Defined by velocity, acceleration, and steering behaviors.
  • Energy: Acts as a life resource, gained by consuming food and lost by ingesting poison or over time.
  • Intelligence (Intel): Influences decisions, such as prioritizing food over poison.

Environment

The Vehicles inhabit a space with two primary elements:

  • Food: Beneficial items that increase a Vehicle’s energy.
  • Poison: Harmful items that decrease energy and can lead to death.

Reproduction

Vehicles reproduce upon reaching a certain energy threshold. Offspring inherit traits from their parents, allowing for the potential evolution of more adapted Vehicles over time.Expected Challenges

  • Balancing: Ensuring a stable ecosystem where Vehicles neither overpopulate nor die out quickly.
  • Performance: Managing computational load, especially as the number of Vehicles increases.
  • Adaptation: Fine-tuning the evolution mechanism so that beneficial traits are meaningfully passed on to offspring.

Next Steps

  • Stats: Adding certain stats to each species like energy, hunger, and evolution.
  • Diversity: Introducing different types of Vehicles with unique characteristics. The goal is to add 3 new species: prey, predator, and apex predator.
  • User Interaction: At certain time intervals, the user is given an option between 2 modifiers for the species, and must pick between them to try and keep the ecosystem alive

Reading Response Week #10

After hearing Prof. Neil’s talk, I’m both excited for and wary of artificial intelligence. It has the potential to make the design process more efficient. People see the addition of AI as a natural step forward in technology, one that will lead to more creative designs. It makes the act of performing menial and laborious tasks obsolete, and people can focus more on creative tasks.

However, I’m also worried about what might happen when AI gets smart enough to also take care of creative tasks. It worries me to think that AI could one day replace human designers. I think the biggest question that will need to be answered in the next few years is the following: How do we balance the efficiency and innovation brought by AI in design with the preservation of human creativity and the unique value of human designers in the design process?

Assignment Week #10 – Interactive Ball and Platform Simulation

Concept

In this assignment, I wanted to simulate a dynamic environment filled with free-moving, colorful balls. The core idea was to blend the principles of physics using MatterJS with an engaging visual display, creating an environment where these balls react to generated obstacles, exhibiting a blend of expressiveness and structured behavior.

Implementation

  • Ball Behavior: Each ball follows the basic laws of physics, including gravity and collision response, giving it a natural and fluid movement within the canvas.
  • Dynamic Interaction: The balls respond to user input, where pressing the spacebar removes the latest added obstacle, offering a degree of control over the environment. Furthermore, the user can click on two points on the canvas to create a line, which serves as an obstacle for the balls.
  • Obstacle Interaction: The balls dynamically detect and react to line obstacles, changing their trajectory upon collision, thereby enhancing the realism of their movement patterns.
  • Visual Aesthetics: To create a visually captivating display, each ball changes its color based on its vertical position within the canvas, offering a vibrant and ever-changing visual experience.

Instructions

  • Creating Platforms: Click once on the canvas to set the starting point of a platform. Click a second time to set its endpoint and create the platform. The platform will appear as a line between these two points.  Once a platform is created, it acts as an obstacle in the environment. You can create multiple platforms by repeating the click process.
  • Removing Platforms: Press the spacebar to remove the most recently created platform. Each press of the spacebar will remove the latest platform, one at a time.
  • Spawning Balls: Balls are automatically spawned at regular intervals at the top center of the canvas. They interact with gravity and the platforms, showcasing the physics simulation.

Sketch

Code

function mousePressed() {
    if (!currentPlatform) {
        currentPlatform = { start: createVector(mouseX, mouseY), end: null, body: null };
    } else if (!currentPlatform.end) {
        currentPlatform.end = createVector(mouseX, mouseY);
        createPlatform(currentPlatform);
        platforms.push(currentPlatform);
        currentPlatform = null;
    }
}

On the first click, it records the starting point of a new platform. On the second click, it sets the platform’s endpoint, creates the platform using these points, and adds it to an array of platforms. The process then resets, allowing for the creation of additional platforms with further clicks.

function createPlatform(platform) {
    let centerX = (platform.start.x + platform.end.x) / 2;
    let centerY = (platform.start.y + platform.end.y) / 2;
    let length = dist(platform.start.x, platform.start.y, platform.end.x, platform.end.y);
    let angle = atan2(platform.end.y - platform.start.y, platform.end.x - platform.start.x);

    platform.body = Matter.Bodies.rectangle(centerX, centerY, length, 10, { isStatic: true });
    Matter.Body.setAngle(platform.body, angle);
    World.add(world, platform.body);

    platform.width = length;
}
  1. Calculate Platform’s Center and Angle: It finds the midpoint (centerX, centerY) and angle (angle) between two points specified by the user. This determines where and how the platform will be positioned and oriented.
  2. Create Matter.js Body for the Platform: A static rectangle (Matter.Bodies.rectangle) representing the platform is created at the calculated center with the specified length and a fixed height of 10 pixels.
  3. Add Platform to the World: The platform is then added to the Matter.js world (World.add) and its width is stored, making it part of the physical simulation and visible in the canvas.

The following code snippet demonstrates how each ball’s color is determined by its vertical position:

balls.forEach(ball => {
    // Map y position to hue
    let hue = map(ball.position.y, 0, height, 0, 360) % 360;

    // Set color
    fill(360-hue, 100, hue);
    noStroke();

    // Draw the ball with fixed size
    ellipse(ball.position.x, ball.position.y, ball.circleRadius * 2, ball.circleRadius * 2);
});

Challenges

  • Rendering Challenges: One of the main challenges in this project was ensuring that the rendering of the balls and obstacles accurately matched their physical simulations. Achieving a seamless visual representation that aligns with the physics engine’s calculations required meticulous adjustments, particularly in synchronizing the balls’ movement and obstacle interactions within the canvas.
  • Platform Creation Logic: Crafting the logic for creating and positioning platforms dynamically based on user input presented its own set of challenges. It involved calculating the correct placement and orientation of each platform to behave as expected within the physics environment.

Future Improvements

  • Enhanced User Interaction: Future iterations could explore more intricate user interactions, such as enabling users to modify the direction and strength of gravity or interactively change the properties of the balls.
  • Dynamic Obstacles and Environment: Introducing elements like moving obstacles or zones with different gravitational pulls could add more layers of complexity and engagement to the simulation.
  • Implementing Sounds during collisions: Adding sounds to the balls when colliding with the platforms can add another dimension to the sketch. Especially if the sounds played are somehow linked to the position of the platform, which will turn the sketch into a visual music maker.

Assignment Week #9 – Flocking Simulation with Obstacle Avoidance

Concept:

In this project, I aimed to create an immersive simulation that showcases the collective behavior of a group of boids, as they navigate through an environment that can be filled with obstacles. The focus was to mimic the natural flocking behavior observed in birds or fish, incorporating obstacle avoidance to enhance the realism of their movement.

Implementation:

  • Boid Behavior: Each boid follows three primary rules – alignment, cohesion, and separation – to simulate natural flocking behavior.
  • Dynamic Interaction: Boids react to user input, moving towards the mouse pointer when a specific key is pressed. Pressing ‘a’ makes the boids get attracted toward the cursor. In addition, when clicking on two points on the canvas, it spawns a line that acts as an obstacle for the boids.
  • Obstacle Avoidance: Boids dynamically detect and steer clear of line obstacles in their environment, enhancing the realism of their movement patterns.
  • Visual Aesthetics: The boids change colors dynamically, creating a visually captivating display that reflects their speed and movement.

Sketch:


Code:

display() {
  // Calculate the size based on velocity
  let speed = this.velocity.mag();
  let size = map(speed, 0, this.maxSpeed, 2, 10); // Map speed to a reasonable size range

  // Calculate hue for color
  let time = millis() / 1000;
  let timeFactor = (sin(time + this.color) + 1) / 2;
  let velFactor = speed / this.maxSpeed;
  let hue = (this.color + 360 * timeFactor + 180 * velFactor) % 360;

  // Set color and size
  colorMode(HSB, 360, 100, 100);
  stroke(hue, 80, 90);
  strokeWeight(size);

  // Draw the boid
  push();
  translate(this.position.x, this.position.y);
  point(0, 0);
  pop();

  colorMode(RGB, 255);
}
  • The steering forces that direct the boids’ movement towards alignment, cohesion, and separation as well as additional forces for obstacle avoidance and attraction towards the mouse pointer.
avoidObstacles(obstacles) {
  let steer = createVector(0, 0);
  let count = 0;
  let safeDistance = 30; // Increase safe distance for early avoidance

  obstacles.forEach(obstacle => {
    let closestPoint = this.closestPointOnLine(this.position, obstacle.start, obstacle.end);
    let d = p5.Vector.dist(this.position, closestPoint);

    if (d < safeDistance) {
      let diff = p5.Vector.sub(this.position, closestPoint);
      diff.normalize();
      diff.div(d); // Stronger weighting by distance
      steer.add(diff);
      count++;
    }
  });

  if (count > 0) {
    steer.div(count);
    steer.setMag(this.maxSpeed * 1.5); // Increase the magnitude of the steering force
    steer.sub(this.velocity);
    steer.limit(this.maxForce * 1.5); // Increase the maximum force limit
  }

  return steer;
}
  • Obstacles are represented as lines, and a specialized algorithm calculates the closest point on these lines to each boid, triggering avoidance maneuvers.

Challenges:

  • Obstacle Avoidance Algorithm: Crafting an effective method for boids to avoid line-shaped obstacles requires careful consideration of the forces required to allow the boids to avoid obstacles properly.

Future Improvements:

  • Enhanced User Interaction: Exploring more complex user interactions, such as allowing users to create and modify obstacles in real time. making the obstacles possibly move or experience forces.
  • Environmental Complexity: Adding more environmental elements like varying wind currents or areas of attraction and repulsion could create more dynamic scenarios for the boids.

Assignment Week #8 – Predator Prey Simulation

Predator-Prey simulation

For this assignment, I wanted to recreate an underwater chase scene. My goal was to show simulation through autonomous agents, like a single predatory shark chasing a school of fish. The fish reacts to the shark’s actions by fleeing. Each agent has its own set of rules and behaviors that it follows in their 2D ocean.

Implementation:

  • The Shark’s Path: To control the shark’s movement, I used a Perlin noise algorithm. This created a smooth, random path that mimics how unpredictable a real shark’s patrol through the water is.
  • Fish Fleeing:  In this state, their behavior changes dramatically. They prioritize moving away from the shark over any other actions they might be taking, such as wandering 
  • Boundary Constraints: I coded the fish to wrap around the edges of the canvas so they stay in the canvas
  • Shark Movement: Instead of being directly controlled, the shark follows a path made by perlin noise. I’ve tuned this function to keep the shark from moving randomly and give its hunt a bit of randomness. Also, the shark slows down when it gets closer to its target.

Sketch:

Code: 

The following is the function for sharks seeking their target which is calculated by Perlin noise.

class Shark {
  
  seek(target) {
    let desired = p5.Vector.sub(target, this.position);
    let distance = desired.mag();
    desired.normalize();
    if (distance < 100) {
      let m = map(distance, 0, 100, 0, this.maxSpeed);
      desired.mult(m); // Slow down as it gets closer to the target
    } else {
      desired.mult(this.maxSpeed);
    }
    let steer = p5.Vector.sub(desired, this.velocity);
    steer.limit(this.maxForce);
    this.applyForce(steer);
  }
  
}
  • The seek method in the Shark class steers the shark towards a target.
  • It calculates the direction to the target and if the shark is within 100 pixels, it slows down proportionally to the distance to avoid overshooting.
  • The map function adjusts the shark’s speed dynamically, allowing for a gradual stop as it reaches the target.
  • This prevents the shark from ‘spazzing’ or jittering when it gets close to where it wants to go.

The following is the function for fish fleeing the shark

class Fish {  
  flee(predator) {
    let desired = p5.Vector.sub(this.position, predator.position);
    let d = desired.mag();
    if (d < 100) { // If the shark is within 100 pixels
      desired.setMag(this.maxSpeed); // Set maximum speed
      let steer = p5.Vector.sub(desired, this.velocity);
      steer.limit(this.maxForce); // Limit the force to be applied
      this.applyForce(steer);
    }
  }
  
}
  • The flee function in the Fish class calculates the escape direction from the shark.
  • If the shark is within a certain range, the fish accelerates to its top speed away from the shark.
  • This quick response mimics a fish’s instinct to escape predators.

Challenges: 

  • Precision in Shark Movement: Improving the shark’s movement to stop it from “spazzing” as it gets to its target was a difficult job that required slowing the velocity as it got closer to the target.
  • Fish Behavior Realism: Making flocking behavior was hard to implement because you had to find a fine balance between random movement and organized group dynamics. After a shark chase, there were difficulties getting the fish to gather back into a proper formation. I think this aspect still needs some work to make it more realistic.

Future Improvements: 

  • User Interaction Features: I want to look into ways for users to connect more directly with the simulation, such as using different inputs to change the path of the shark or the fish.
  • Ecosystem Development: I like the idea of adding more species and environmental features, like currents or obstacles, to make the experience more interesting.
  • Develop Flocking Behavior: To make the fish’s reaction seem real, the flocking and evasion algorithms have to be tweaked to match how fish move naturally.

Midterm Project – Symmetric Serenity

Inspiration:

My original inspiration for this project was Mandalas, they are intricate geometric designs that radiate out from a central point. In many cultures, they’re used for spiritual symbols, meditation aids, or just as beautiful artworks. Mandalas fascinate me with their mix of complexity and simplicity, order and chaos. Through this project, my goal was to merge generative art with Mandalas. I aimed to create an entrancing and visually aesthetic piece of generative art.

First Iteration:

I had really wanted to use the WEBGL library to create 3D sketches. My first attempt at this idea was to overlay many geometric shapes on top of each other in a 3D environment, while zooming in and out of the center, and manipulating the depth between the layers to create an infinite tunnel effect simulating a mandala. 

Challenges in SVG Adaptation:

Adapting the original WEBGL 3D sketch to SVG for printing presented some difficult challenges. There’s an incompatibility between the WEBGL and SVG libraries as the field used for SVG in Createcanvas() was also occupied by WEBGL so it was impossible to capture SVG through p5. Even attempting a workaround, such as converting a screenshot of the sketch from PNG to SVG, proved unsuccessful. The intricate details, especially in the inner sections of the design, were lost and impossible to capture using this method. So I decided to create a 2D variation that incorporated similar concepts to the original which was the creation of mandalas using predefined shapes which were randomly picked and overlaid on top of each other.

While this method did yield usable SVG files, they were not satisfying creatively. I felt that I did not utilize any generative concepts in my project. So I decided to start over again and make a new sketch.

Pivoting from the Original Sketches:

My initial design was based on predefined shapes, which limited the generative potential. I did some more research into how to recreate mandalas in p5js and discovered the concept of axes of symmetry in combination with Perlin noise and Vectors which we took in class, both of which opened up a lot more possibilities for the project.

Research Sources: 

Code that I am proud of:

class Flower {
  constructor(x, y) {
    this.pos = createVector(x, y);
    this.symmetry = int(random(maxaxis, maxaxis+1));
    this.angle = 360 / this.symmetry;
    this.xoff = random(0, 1000);
    this.yoff = this.xoff + offset;
    this.mx = map(noise(this.xoff), 0, 1, -width*0.6, width*0.6);
    this.my = map(noise(this.yoff), 0, 1, -height*0.6, height*0.6);
    this.px = this.mx;
    this.py = this.my;
    this.timer = 0;
  }

  update() {
    this.px = this.mx;
    this.py = this.my;
    this.mx = map(noise(this.xoff), 0, 1, -width*0.8, width*0.8);
    this.my = map(noise(this.yoff), 0, 1, -height*0.8, height*0.8);
    this.xoff += increment;
    this.yoff += increment;
    this.timer++;

    if (this.timer % 100 === 0) {
      increment = random(0.01, 0.02);
      this.symmetry = int(random(maxaxis, maxaxis+1));
      this.angle = 360 / this.symmetry;
    }
  }

The X and Y  axis movement is gotten from Perlin noise. An offset value is required to be added to x or y offset so that the output is a straight line. The timer variable is used in the SVG sketch to stop the drawing so that it can be saved as an SVG. In update() it saves the previous x and y positions so that a line can be drawn between the current and previous points. x and y offset is then incremented to continue moving the line.

let sw = 2;
strokeWeight(sw);
for (let i = 0; i < this.symmetry; i++) {
  rotate(this.angle);
  line(this.mx, this.my, this.px, this.py);
  push();
  scale(1, -1);
  line(this.mx, this.my, this.px, this.py);
  pop();
}
pop();

This loop runs for each axis of symmetry. With each iteration of the loop, it rotates the canvas by this angle, ensuring that the lines are drawn evenly spaced around the central point. scale() then flips the y-coordinate for mirroring.

Incorporating all of these elements allowed for more dynamic and unpredictable patterns, while still maintaining the structured, symmetric essence of Mandalas.

The following is the SVG version of the Sketch:

This worked well for the pen plotter and yielded a very cool and intricate-looking pen plot:


Final Steps:

While the initial SVG version yielded very cool results for the pen plotter, it still lacked that entrancing effect that I was seeking to create in the original sketch. So I decided to experiment with the parameters of the sketch. Instead of the timer being used to stop the drawing, I repurposed it to change the axes of symmetry and other variables such as the offset and color.

From my experimentation, the offset dictates how flowy and smooth the lines are. If the offset is high then the lines become more rigid and geometric. By playing around with the ranges of these values, I managed to create a very immersive experience:

To add a final twist to the sketch I decided to add audio into the sketch. My pick was the track named “Can you hear the music” from the movie “Oppenheimer”. The reason I picked this track was because of its gradually increasing tempo and volume which I felt would be ideal to complement the entrancing effect of the sketch. In addition to this track, I again, modified the values and ranges to be based on the volume of the track being played. 

let level = amplitude.getLevel();
minaxis = round(map(level, 0, 1, 4, 30))
maxaxis = max(minaxis,maxaxis);
increment = map(level*0.8, 0, 1, 0.0008, 0.3);  // Adjust the range as necessary
offset = map(level, 0, 1, 0, 1000);

By getting the level of amplitude, I can use it to adjust all the values such as the number of axes of symmetry, increment (speed of the lines), and offset (smoothness).

FINAL SKETCH:

FOR FULL EXPERIENCE VIEW THROUGH THIS LINK: GH010625https://editor.p5js.org/mi1171/full/FjZl–Yy4


Possible Future Improvements:

  • VR: Due to the nature of this sketch I think that it would be very interesting to port it to VR. I think that It would really enhance the experience and take it to the next level.
  • User Interactivity: To make the experience more engaging, we could introduce interactive elements where users can adjust parameters in real time. For example, allowing them to modify the axes of symmetry and color gradients.

Final Thoughts:

The journey of this project, from its initial conception to its final iteration, has been a testament to the iterative nature of design. With each hurdle, I adapted and refined my design, merging traditional Mandalas with modern generative techniques.  Each challenge and pivot brought about new insights and perspectives, ultimately leading to a richer, more dynamic end product and I am very happy with how it ended up looking.

Midterm Progress #2

Concept:

I had decided to switch from my previous sketch as I felt having predefined shapes was too constraining and would not make it generative enough. However, I have still managed to keep it within the same topic as Mandalas. Instead of using predefined shapes, I decided to combine Perlin noise for the randomness and axes of symmetry to create interesting and unique patterns. By lowering the axes of symmetry to 6 or lower, the mandalas begin looking like flowers.

This gave me an idea for the final sketch of the project. I will be making flower objects the same as the below sketch, but spawning them on generated branches, which are also made using Perlin noise.

Sketch:

The current sketch is designed specifically for the pen plotter.


SVGs:


Pen plot:

Next Steps:

I still need to implement the different modes. I’m thinking of offering a simple UI for adjusting the number of axes of symmetry, offsets, and colors of the sketch. This way I would have a high number of combinations a user can achieve with a few sliders. 

  • Develop the random branches that will hold the flowers
  • Figure out which points the flowers will spawn on
  • Add audio