Neon Doodle World – Final Project

Concept

The inspiration for Neon Doodle World came from my fascination with interactive media and real-time creativity. Initially inspired by a project at the IM show that used a webcam for puzzle-based interaction, I wanted to expand on the idea by enabling freehand drawing using hand gestures. The goal was to create an intuitive and engaging platform where users could unleash their creativity through dynamic drawing features.

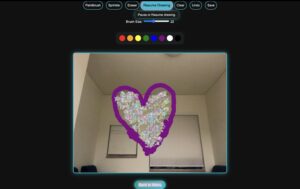
Neon Doodle World lets users draw directly on a digital canvas using their hands, with options for paintbrush strokes, playful sprinkle trails, color customization, and more. The neon-themed interface enhances the visual experience, creating an immersive environment for artistic expression.

Interaction Methodology

The project uses MediaPipe Hands for real-time hand tracking. The webcam detects the user’s hand movements, focusing on key points like the index finger, to map gestures onto the canvas. Here’s how users interact with the system:

  • Multi-Hand Support: Users can now draw freely using both hands simultaneously, doubling the creative possibilities.
  • Paintbrush Mode: Draw clean, solid lines in any color by moving your index finger.
  • Sprinkle Trail Mode: Generate dynamic sprinkle/particle effects for playful, animated drawings.
  • Eraser Mode: Remove specific parts of your drawing with precision.

Toolbar Options:

      • Clear: Wipe the entire canvas.
      • Undo: Remove the last action for greater control.
      • Pause/Resume: Temporarily disable or resume drawing.
      • Save: Capture and save your creation along with the webcam feed.
  • Hover Tooltips: Each toolbar button displays clear instructions when hovered over, making the interface user-friendly for all experience levels.
  • Brush Size Adjustment: A slider allows users to adjust brush size, enabling detailed or bold strokes depending on their creative needs.

The webcam feed is mirrored horizontally to make interactions feel natural, ensuring seamless mapping between gestures and canvas movements. A dynamic toolbar and hover instructions simplify the interface, ensuring accessibility and ease of use.

Images of my Sketch
How the Implementation Works

The application uses p5.js and MediaPipe for its core functionalities:

  • Hand Tracking: MediaPipe detects up to two hands simultaneously, updating their positions to control canvas actions.
  • Drawing Logic: Depending on the selected mode, the system renders strokes, particles, or erases sections in the drawing layer.
  • Undo and Redraw: All actions are stored in a stack, allowing users to undo changes by redrawing the canvas without the last action.
  • Color Palette: A scrollable palette lets users easily switch between vibrant neon colors.
  • Brush Size Adjustment: Users can control the size of their brush using a slider, displayed dynamically for feedback.
  • Save Feature: Combines the live webcam feed and the drawing layer into a single image file.

Code Highlight

One of the standout features is the Undo Functionality. Here’s how it’s implemented:

function undoLastAction() {
  if (actionsStack.length > 0) {
    actionsStack.pop(); // Remove the last action
    redrawCanvas(); // Redraw the canvas to reflect changes
  }
}

function redrawCanvas() {
  drawingLayer.clear(); // Clear the drawing layer
  actionsStack.forEach((action) => {
    if (action.type === "ellipse") {
      // Redraw ellipses
      drawingLayer.noStroke();
      drawingLayer.fill(action.color);
      drawingLayer.ellipse(action.x, action.y, action.size, action.size);
    } else if (action.type === "sprinkle") {
      // Redraw sprinkle trails
      action.particles.forEach((particle) => {
        drawingLayer.fill(random(100, 255), random(100, 255), random(100, 255), 150);
        drawingLayer.noStroke();
        drawingLayer.ellipse(particle.x, particle.y, random(5, 10));
      });
    }
  });
}

Embedded Sketch


User Testing 

I asked my friend to test out the sketch, and she enjoyed the freedom of drawing with hand gestures. She decided to draw the UAE flag as a tribute to National Day, appreciating the vibrant color palette and smooth interaction that made it easy to bring her idea to life. Here’s the testing clip:

Reflection

Creating Neon Doodle World has been an incredible learning journey. I’m particularly proud of the following aspects:

  • Hover Instructions: These made the interface more accessible and beginner-friendly.
  • Adjustable Brush Size: This feature added a new dimension of control for users.
  • The Neon-Themed Interface: This enhances user immersion with vibrant visuals.
  • Added Features: Undo, save, and dynamic color selection significantly improved the final experience.

However, there are always areas to improve:

  • Adding gesture-based controls for even more intuitive interactions (e.g., using a hand gesture to clear the canvas).
  • Expanding the drawing modes with advanced brush effects or textured strokes.
  • Introducing background effects, such as gradients or animated visuals, to add depth to the canvas and enhance user engagement.

Challenges and Overcoming Them

Some key challenges I faced:

  1. Multi-Hand Implementation: Tracking and rendering independent actions for two hands required a flexible system to handle simultaneous inputs.
  2. Hover Tooltips: Designing tooltips that provide clear information without cluttering the interface was a balancing act.
  3. Brush Size Slider: Ensuring the slider dynamically updated both brush size and its display required careful synchronization.

Resources

https://emiguerra.github.io/p5MediaPipe/

https://github.com/mekiii/P5-Particle-Handtracking

https://www.youtube.com/watch?v=BX8ibqq0MJU

https://editor.p5js.org/shinjia168/sketches/NXUrGxzye

IM Show Documentation
At the IM Show, I showcased Neon Doodle World to students and faculty. It was exciting to see people interact with the sketch, experimenting with features like the particle trails and color palette. I also shared the project with my former professors, Evi Mansor and Aya Riad, and the head of Interactive Media, Michael Shiloh, who all gave positive feedback. Here’s a video of people testing and enjoying the sketch:

Neon Doodle World – Final Project Draft 2

Progress Made
In this version, I made several improvements to enhance the sketch’s usability and interactivity. Here’s what has been implemented so far:

  • Color Palette: Users can now select specific colors from a palette instead of cycling through them randomly.
  • Toolbar Buttons: The interface now includes clear, save, and toggle drawing buttons, making interactions more intuitive.
  • Pause and Resume Drawing: The toggle drawing button lets users stop and resume drawing as needed.
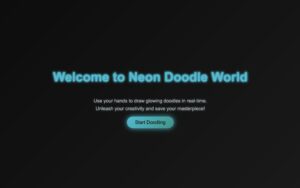
  • Improved Introduction Page: I added an intro page that welcomes users and explains the sketch’s functionality before they start.

These updates make the project more polished and user-friendly compared to the first draft. The toolbar and the color palette, in particular, provide users with better control over their drawing experience.

Embedded Sketch

Next Steps for the Final Version
For the final version, I plan to focus on:

  • Undo Feature: Adding a way for users to undo their last drawing action for better control.
  • Save with Webcam Overlay: Enhancing the save functionality to include both the webcam feed and the doodle layer in the output.
  • Neon-Themed UI: Updating the interface with a neon design for a more visually engaging experience.

These improvements will further refine the project, making it more interactive and visually appealing.

Neon Doodle World – Final Project Draft 1

Design Concept and Artistic Direction
Last year, during the Interactive Media (IM) show, I remember engaging with a fascinating sketch by another student. Their project used a webcam to capture a photo, which was then transformed into a shuffled grid puzzle for users to solve. I was inspired by the creative use of the webcam and wanted to recreate something similar, but with a different level of complexity and interaction. After brainstorming, I shifted the idea toward using a webcam not just to capture but to enable free drawing with hand gestures. This led to the concept of Neon Doodle World, where users could draw vibrant doodles with their fingers in real-time.

To make the experience even more engaging, I incorporated features inspired by concepts we learned in class. In addition to a standard paintbrush mode, I added a particle trail drawing mode for dynamic, animated effects. Users can also clear the sketch at any time, ensuring the canvas remains a space for unrestricted creativity.

Interaction Methodology
The interaction design leverages MediaPipe Hands, a library for real-time hand-tracking. The webcam detects hand landmarks, allowing users to control the drawing with simple gestures:

  • Paintbrush Mode: Users draw strokes in a chosen color. A pinch gesture (bringing the thumb and index finger close) changes the color dynamically.
  • Particle Trail Mode: A more playful drawing style where colorful, randomized particles trail the user’s hand movements.
  • Clear Canvas: Users can clear the drawings with a single click, resetting the canvas for a fresh start.

The key interaction focus was to make the experience intuitive. By mapping hand coordinates to the canvas, users can freely draw without needing a mouse or keyboard. The pinch gesture ensures seamless control of color switching, and the modes allow creative exploration.

Canvas Design and Interaction Plan
The canvas is divided into two main components: the video feed and the drawing layer. The webcam feed is mirrored horizontally, ensuring the gestures feel natural and intuitive. The drawing layer exists as an overlay, maintaining a clear separation between the user’s input and the video feed.

Above the canvas, simple buttons control the modes and functionalities. Users can easily toggle between paintbrush and particle trail modes, clear the canvas, and change drawing styles. This clean and straightforward layout ensures accessibility while minimizing distractions from the creative process.

Base p5 Sketch and Initial Explorations
The Draft 1 sketch built the basic functionality of the project:

  • It uses MediaPipe Hands to track hand movements and map them to the canvas.
  • The paintbrush mode lets users draw smooth, colorful lines.
    The particle trail mode creates fun, animated effects with random bursts of color.
  • A clear canvas button resets the drawing layer without touching the webcam feed.

Here’s an example of how the particle trail mode works:

 } else if (mode === "particle-trail") {
// Create particle effects around the finger position
for (let i = 0; i < 5; i++) {
let particleX = x + random(-10, 10); // Random x-offset for particles
let particleY = y + random(-10, 10); // Random y-offset for particles
drawingLayer.fill(random(100, 255), random(100, 255), random(100, 255), 150); // Random color with transparency
drawingLayer.noStroke();
drawingLayer.ellipse(particleX, particleY, random(5, 10)); // Draw a small particle
}
}

Current Sketch

Next Steps and Expansions
Building on the Draft 1 sketch, the project will be expanded with several new features to improve interaction and enhance the user experience:

  • Introduction Page: A new page will be added at the beginning to introduce the project, setting the tone and providing users with context about the experience they are about to have.
  • Color Palette: A palette will be added to allow users to select specific colors for drawing, instead of cycling through preset options. This will make the experience more customizable.
  • Undo Feature: Functionality will be introduced to undo the last drawing action, giving users more control and flexibility while drawing.
  • Save Feature: Users will be able to save their creations as images, including both the drawings and the webcam overlay.
  • Pause/Resume Drawing: A pause button will be added, allowing users to stop and resume drawing as needed.

These additions will make the project more interactive, user-friendly, and visually appealing, while staying true to the original concept of creating a dynamic, webcam-based drawing experience.

Interactive Forest Simulation – Week 11

Concept

This sketch is a forest simulation where you can interact with the environment and change how the forest grows. The forest is shown as a grid, and you can make the grid bigger or smaller before starting. During the simulation, you can pause and start it again whenever you want. You can set trees on fire and watch the fire spread, or use water to turn empty land into grass. Once there is grass, you can plant trees to grow the forest. Each action you take changes the forest, and you can experiment with how fire, water, and trees affect it. It’s a fun way to see how the forest grows and recovers over time.

Code Highlight

One part of the code I’m particularly proud of is the updateGrid function, which handles how each cell evolves based on its current state and neighbors. Here’s the snippet:

function updateGrid() {
  let newGrid = grid.map((col) => col.slice()); // Copy the current grid

  for (let x = 0; x < cols; x++) {
    for (let y = 0; y < rows; y++) {
      let state = grid[x][y];
      let neighbors = getNeighbors(x, y); // Get neighboring cells

      if (state === 3) {
        // Fire burns out into barren land
        newGrid[x][y] = 0;
      } else if (state === 2) {
        // Tree catches fire if near fire
        if (neighbors.includes(3)) {
          if (random(1) < 0.6 + 0.2 * windDirection) newGrid[x][y] = 3;
        }
      } else if (state === 1) {
        // Grass grows into a tree if surrounded by trees
        if (neighbors.filter((n) => n === 2).length > 2) {
          newGrid[x][y] = 2;
        }
      }
    }
  }

  grid = newGrid; // Update the grid
}

This function applies the rules of the automaton in a straightforward way:

  • Fire turns into barren land after burning.
  • Trees can catch fire if they’re near a burning cell.
  • Grass grows into trees when surrounded by enough trees.

Embedded Sketch

Reflection and Future Ideas

I’m happy with how the sketch turned out, as it creates an engaging way to explore the balance between growth and destruction in a forest. Watching the fire spread and the forest recover with water and trees is satisfying and makes the simulation feel alive. However, there is room for improvement. The interface could be designed to look more visually appealing to attract users and make the experience more immersive. Adding better visuals, like smoother transitions between states or animated effects for fire and water, could enhance the overall presentation. Another idea is to include sound effects for the different features, such as a crackling sound for fire or a soft splash when using water. These small additions could make the simulation more engaging and enjoyable for users, turning it into a more polished and interactive experience.

References

https://editor.p5js.org/yadlra/sketches/B3TTmi_3F

https://ahmadhamze.github.io/posts/cellular-automata/cellular-automata/

Jump Game with Matter.js Library – Week 10

Concept
This week’s sketch is all about creating a simple platform game using the Matter.js physics library. The game involves controlling a ball that jumps from platform to platform, trying to reach new heights. The ball collects points as it climbs higher, and the goal is to score as much as possible before falling off the screen. This sketch explores gravity, jumping mechanics, and collision detection, creating a fun game where timing and precision matter.

Code Highlight
One of the main parts of this code is the handleCollision function, which checks when the ball lands on a platform. When the ball hits a platform, it enables jumping again, letting the player continue their ascent. Here’s a snippet of how this works:

function handleCollision(event) {
  for (let pair of event.pairs) {
    const { bodyA, bodyB } = pair; // Get the bodies in collision
    // Check if ball collides with any platform
    if (
      (bodyA === ball && platforms.includes(bodyB)) ||
      (bodyB === ball && platforms.includes(bodyA))
    ) {
      if (ball.velocity.y > 0) { // Allow jump if ball is moving downward
        canJump = true;
      }
    }
  }
}

In this function, each time the ball collides with a platform, the canJump variable is set to true if the ball is moving downwards. This allows the player to jump again, making the gameplay smooth and responsive. This function is essential because it controls when the player can jump, ensuring the ball only jumps after touching a platform.

Embedded Sketch


Reflection and Future Ideas
I’m happy with how this game turned out! The ball’s movement and simple controls make it easy to pick up and play, and the scoring system adds a fun challenge. Watching the ball jump from platform to platform is satisfying, especially with the smooth collision detection and responsive jumping mechanics. Setting up the collision events in Matter.js was a new experience, and it was exciting to see how different forces and gravity values could create realistic movement in the game.

In the future, I’d like to explore more ideas to make the game more dynamic. Adding different platform types, like moving or disappearing ones, would introduce an extra layer of difficulty and variety to the gameplay. Visually, adding effects like particle trails for jumps or enhancing the ball’s design would make the game feel more polished. Another improvement would be adding sound effects for actions like jumping and landing, which would make the game more immersive and engaging.


References

https://editor.p5js.org/hinatahave91/sketches/G91aWNP_9

https://github.com/jakewarrenblack/p5.js-ball-game


Underwater Dance: A School of Fish in Motion – Week 9

Concept 

This week’s sketch is all about the movement of a school of fish. I wanted to show how they can swim in different patterns and scatter around, just like real fish do in the ocean. The main idea is to create a fun and lively underwater scene where the fish either swim together in formations or move freely, giving a sense of both community and individuality.

Code Highlight

One cool part of my code is the generateFormationPoints function. This function creates different shapes for the fish to follow, allowing for variety in their movement. Here’s a snippet of how it works:

function generateFormationPoints() {
  targetPoints = []; // Reset the target points array
  let shape = random(['doubleSpiral', 'wave', 'school', 'dna', 'vortex', 'shoal']); // Randomly select a formation shape
  let centerX = width / 2; // Calculate the center x position
  let centerY = height / 2; // Calculate the center y position
  let size = min(width, height) * 0.3; // Determine the size of the formation

  switch(shape) {
    case 'doubleSpiral':
      // Generate points for a double spiral formation
      // Logic for creating double spiral points...
      break;
    case 'wave':
      // Generate points for a wave formation
      // Logic for creating wave points...
      break;
    // Additional cases for other shapes...
  }
}

In this function, the fish can follow different patterns, like spirals, waves, or even formations resembling a DNA strand. Each time the function runs, it randomly picks a shape for the fish to follow. This keeps the scene dynamic and adds a layer of excitement to the simulation, as the fish move together in beautiful formations.

Embedded Sketch

Reflection and Future Ideas
I really like how this sketch turned out! The way the fish swim together creates a beautiful underwater scene that feels lively and realistic. The switch between swimming in formation and scattering around adds a fun element to the animation, making it engaging for viewers. I especially enjoyed seeing how the fish react to the different target points and how smoothly they transition between formations.

For the future, I see many ways to improve this project. I’d love to add more complex behaviors, like introducing a predator that chases the fish. This would add tension and excitement to the simulation, showcasing how the fish react to threats and change their behavior to survive.

Additionally, I could enhance the visuals by adding more details to the fish, creating different types and colors to represent various species. Improving the background with coral reefs or underwater plants could also make the scene more immersive. Sound effects, like bubbling water or gentle waves, could enhance the experience, making it feel like you’re truly underwater.


A Chase on the Road: Exploring Vehicle Behaviors – Week 8

Concept

This weeks sketch is a fun, interactive scene where a police car chases a robber car, and the user controls the robber car’s movement. While the user moves the robber car around the screen, the police car automatically chases it, creating an exciting dynamic. Ordinary cars also drive randomly across the road, adding to the lively atmosphere of the chase.

Code Highlight
One part of the code that I’m really proud of is the chase function in the Car class. This function helps the police car determine how to move toward the robber car:

chase(target) {
  let force = p5.Vector.sub(target, this.pos); // Calculate direction to the target
  force.setMag(this.maxSpeed); // Set the force's magnitude to max speed
  force.sub(this.vel); // Adjust force based on current velocity
  force.limit(this.maxForce); // Limit the force to max steering
  return force; // Return the calculated force
}

This function uses math to calculate the direction the police car should go to catch the robber car. It ensures that the police car moves smoothly and quickly toward its target, making the chase feel realistic.

Embedded Sketch

Reflection and Future Ideas
I really liked how this project turned out! The chase between the police car and the robber car feels dynamic and engaging. However, there is always room for improvement. In the future, I could add more complicated steering behaviors, like making the ordinary cars avoid the police car or work together. I could also include obstacles on the road or change the weather to make it more challenging.

Another idea is to add a score system based on how long the police car can chase the robber or how many collisions happen, adding some competition to the game. I’d love to make the visuals more interesting too, with animated cars and a detailed background.

Guest Lecture Reflection

I really enjoyed the guest lecture by Aaron Sherwood and Kiori Kawai from Purring Tiger. They shared their project, MuJo, which mixes art and technology in an exciting way. One interesting part of their talk was how they began with interactive installations in cities before moving to the desert. They used projections on the sand dunes to create a unique experience, showing how nature can inspire art.

Aaron mentioned how he often discovers cool ideas by accident while coding. He talked about experimenting with different algorithms, which sometimes led to unexpected and beautiful results. This idea of “happy accidents” really resonated with me. It shows that creativity can come from trying new things, even when things don’t go as planned.

The theme of impermanence was also important in their work. They explained how both the art and the sand dunes change over time, which reflects the idea that nothing stays the same. I liked how they connected this concept to storytelling, showing how every performance is like a journey with its own beginning, middle, and end. Overall, the lecture opened my eyes to new ways of thinking about art and design. I left feeling excited to explore my creativity and connect my work to the world around me, just as they have done with MuJo.

Midterm Project – Branches of Motion

Concept and Artistic Vision
For my midterm project, I wanted to explore how trees grow and branch out, which led me to create a generative art piece inspired by fractals in nature. Fractals are patterns that repeat themselves on smaller scales, like how branches grow from a tree trunk or veins spread in a leaf. This idea of repeating structures fascinated me, and I thought it would be fun to create a digital version of it.

My goal was to make the tree interactive, allowing users to control how the branches form in real-time. By moving the mouse, users can change the angle of the branches, making each tree unique based on their input. The inspiration for this project came from my curiosity about natural patterns and how I could recreate them using code. I researched fractal geometry and recursion, which are mathematical concepts often found in nature, and used this knowledge to guide my design.

Embedded Sketch and Link

https://editor.p5js.org/maryamalmatrooshi/sketches/GuKtOJDRf

Coding Translation and Logic
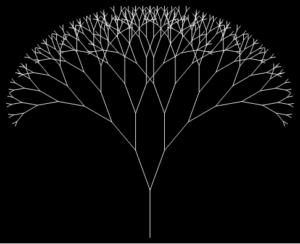
To create the tree, I used a recursive function, which is a function that calls itself to repeat the same process multiple times. This method was perfect for drawing a fractal tree because the branches of a tree naturally split into smaller and smaller branches. The main function that drives the sketch is branch(), which takes the current branch length, draws it, and then calls itself to draw smaller branches at an angle. The recursion stops when the branches become too small. This allowed me to create a natural branching structure with only a few lines of code.

The logic behind the tree’s growth is connected to the user’s mouse movements. I mapped the mouse’s X position to the angle of the branches, so when you move the mouse left or right, the branches change their direction. This made the tree feel interactive and dynamic. From class, I applied concepts of randomness and noise to slightly change how the branches grow, which gave the tree a more organic, natural feel. I also used vector transformations, like translate() and rotate(), to position and rotate each branch correctly on the canvas.

Parts I Am Proud Of and Challenges Overcome
One part of the project I’m really proud of is how smoothly the tree responds to mouse movement. I wanted the interaction to feel natural, without any jittering or sharp movements, which can be tricky when working with recursion. By carefully mapping the mouseX position to the branch angle, I made sure the transitions between the branches are smooth, even when the mouse is moved quickly. This adds to the overall experience, making the tree feel more alive.

One of the main challenges I faced was getting the recursion right without creating overlapping branches or cluttered patterns. When working with recursive functions like branch(), there’s a risk that the drawing can become messy if the angles or lengths aren’t carefully controlled. I solved this by setting a minimum branch length and adjusting the angle based on the mouse position, so the branches only grow within a controlled range.

Here’s a snippet of the code that handles the recursion for the branches:

function branch(len) {
  line(0, 0, 0, -len);  // Draw the current branch
  translate(0, -len);  // Move to the end of the branch

  if (len > 8) {  // Only keep branching if the length is greater than 8
    push();  // Save the current state
    rotate(angle);  // Rotate based on mouse position
    branch(len * 0.67);  // Recursively draw a smaller branch
    pop();  // Restore the state

    push();  // Save the state again for the opposite branch
    rotate(-angle);  // Rotate in the opposite direction
    branch(len * 0.67);  // Recursively draw the other branch
    pop();  // Restore the state
  }
}

Overcoming these challenges made the project more rewarding and taught me how to refine recursive logic for smoother results.

Pen Plotting Process
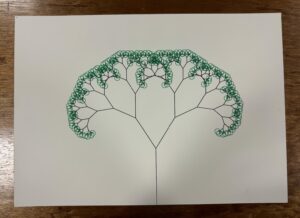
For the pen plotting process, I used my second draft sketch, which was a simplified version of the tree without user interaction. In this version, the tree grows and sways left and right, as if blown by the wind, with the branches and leaves already attached. To prepare it for plotting, I saved a specific moment of the sketch as an SVG file. I then imported the file into Inkscape for further editing.

In Inkscape, I layered the different parts of the tree to make it easier to plot in multiple colors. Specifically, I grouped all the branches and leaves together on one layer, and the stem on a separate layer. This allowed me to plot the stem first in black and then the branches and leaves in green. Using layers was crucial to make sure each part of the tree was plotted clearly without overlapping or messy transitions between colors.

This process of layering and color separation helped me create a clean, visually striking pen plot, where the black stem contrasts with the green branches and leaves.

Link to my second draft for reference: https://editor.p5js.org/maryamalmatrooshi/sketches/K0YQElaqm

Pen Plotted Photograph and Sped up Video

Areas for Improvement and Future Work
One improvement I wanted to add to my sketch was background music that plays while the user interacts with the tree. I think adding a calming, nature-inspired sound would make the experience feel even more alive and immersive. This would enhance the interaction, making it feel like the tree is part of a more natural, dynamic environment.

Regarding the pen plotting process, I faced a challenge with the way the leaves are drawn. In my sketch, the leaves are represented as ellipses that are filled in. However, the plotter only draws strokes, which means my leaves were outlined ellipses instead of being filled in. I’d like to improve this by experimenting with different leaf shapes that work better with the plotter. For example, I could create custom leaf shapes that are more suitable for stroke-only plotting, ensuring the final result looks more like natural leaves.

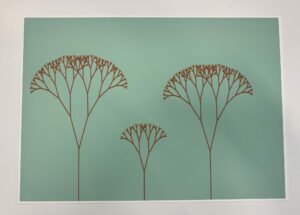
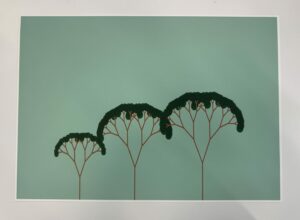
Two A3 Printed Images

References

https://editor.p5js.org/YuanHau/sketches/ByvYWs9yM

https://github.com/latamaosadi/p5-Fractal-Tree

https://github.com/adi868/Fractal-Trees

https://stackoverflow.com/questions/77929395/fractal-tree-in-p5-js

Midterm Draft 1 – Branches of Motion

Concept

For my midterm project, I chose to create a generative art piece based on a fractal tree. I’ve always found fractal patterns in nature really interesting, like how trees branch out or how veins spread in a leaf. Each part of a fractal reflects the whole, which is something I wanted to explore in this project. I also wanted the tree to feel interactive so that users can control how the branches grow and move, making it feel more personal and engaging. The mouse controls the angle of the branches, which adds an element of real-time interaction.

Design

The design focuses on creating a tree that changes based on user input. By moving the mouse horizontally, the user can adjust the angle of the branches, which directly influences how the tree grows and branches out. This makes the experience interactive and unique to the user’s movement.

The main function in the code is branch(), which uses recursion to draw the tree. It takes the length of the current branch, draws it, and then calls itself to draw smaller branches at an angle. The recursion stops once the branch length is small enough, and the angle of the branches is tied to the position of the mouse on the screen. This creates a dynamic, interactive system where the tree’s structure shifts as the mouse moves.

Code
For now, I have a basic draft that lays the foundation for the project. Here’s the current code:

let angle = 0; // Initialize the angle variable, which will be controlled by mouse movement

function setup() {
  createCanvas(640, 360); // Set up a canvas of 640 by 360 pixels
}

function draw() {
  background(0); // Set the background to black each frame to clear the previous drawing
  angle = map(mouseX, 0, width, 0, TWO_PI); // Map the mouse's X position to an angle between 0 and TWO_PI (full circle)
  
  stroke(255); // Set the stroke color to white
  strokeWeight(2); // Set the stroke thickness to 2 pixels

  translate(width * 0.5, height); // Move the origin to the bottom center of the canvas
  
  branch(100); // Call the branch function to start drawing the tree with an initial length of 100
}

// Recursive function to draw the branches
function branch(len) {
  line(0, 0, 0, -len); // Draw a vertical line representing the current branch

  translate(0, -len); // Move the origin to the end of the current branch
  
  // If the current branch length is greater than 4, keep drawing smaller branches
  if (len > 4) {
    push(); // Save the current state of the drawing
    rotate(angle); // Rotate by the current angle (controlled by the mouse)
    branch(len * 0.67); // Call the branch function recursively, reducing the length by 67%
    pop(); // Restore the original state

    push(); // Save the current state again for the other branch
    rotate(-angle); // Rotate in the opposite direction by the current angle
    branch(len * 0.67); // Call the branch function for the opposite branch
    pop(); // Restore the original state
  }
}

This code creates a simple tree that responds to the mouse’s horizontal position. The tree grows and splits into smaller branches as the user moves the mouse. This serves as the base for the more complex features I will add later.

Embedded Sketch

Identified Risk and How I Reduced It
The part of the project that worried me the most was making sure the interaction with the mouse felt smooth and natural. I was concerned that the tree would shake too much when the mouse moved quickly, which would make the experience less enjoyable. To deal with this, I focused on carefully mapping the angles using the mouseX position to ensure the tree’s motion stays smooth and doesn’t jitter too much. I also tested the recursive function separately to make sure the branches don’t overlap or become cluttered.

Possible Future Additions
While this is the current draft, there are a few features I am considering for future versions, though these are not finalized yet:

  • Colors: I might add color gradients or change the color of the branches based on their depth or size to make the tree more visually interesting.
  • Animations: Animations can be added to make the tree grow over time or sway in the wind to make the piece feel more dynamic.
  • More Trees: Adding multiple trees on the canvas could create a forest-like scene, where each tree is slightly different in shape or size.

draft 2 for now: https://editor.p5js.org/maryamalmatrooshi/sketches/K0YQElaqm