Coding assignment – week #3 – the random rainbow

My inspiration was also from my last assignment. I mentioned how I really wanted to implement something in the future for that code to have the bee be attracted to something but in this example, I wanted it to repel strongly this time. I wanted the repel force to be really strong in this case and still have the flow look natural – I hope to include these concepts in my final project.

Here are some images from me playing around with the number of movers and the multiplier force.

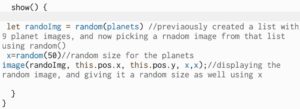
In this image, I made the movers towards the South East.

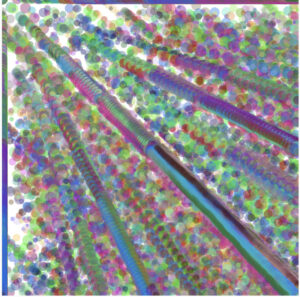
In this image, I made it go up to the North East but because all areas of the canvas are covered, it looks more natural but the repelent force from the mouse coordinates is not visible enough.

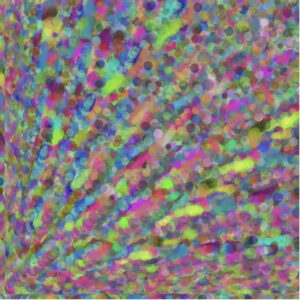
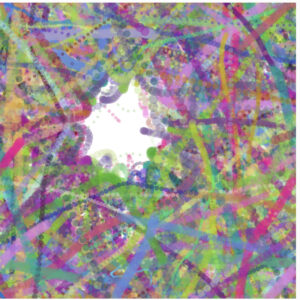
In this image, I made the repel force stronger and we can visibly see that in this image.

I was proud of the following code because these parts of code are what made the randomness yes repel force visible. It took me a while to understand why the repel force was not that visible so when I figured out why, it made a lot more sense.

if (dMouse < 100) {
        let force = p5.Vector.sub(mover.position, mouseAttractor);
        force.normalize();
        force.div(dMouse);
        force.mult(120);       //repel force multiplier
        repulsion.add(force);
      }

I also wanted to learn more about time management within p5.js so I made the screen stop after 8 seconds resulting in a still image that looks completely natural.

// time calculation
  let elapsedTime = millis() - startTime;

  // check 15 secs
  if (elapsedTime < 8000) ...

How can I improve

I want to apply it to a real life situation such as a solar system or the movements of electrons in atoms. I also want the movers to come back naturally instead of having to wrap around the screen.

Final code

<

https://editor.p5js.org/kk4827/sketches/DOZfEQyaP

Coding Assignment – Week #3

For this week’s assignment, I was inspired by the Planar Choreographies, especially this simulation: https://personalpages.manchester.ac.uk/staff/j.montaldi/Choreographies/

The concept of planar symmetry was utterly new to me, however, I found it really fascinating (and a bit addictive even). Here is my own attempt and my sketch:

Apparently, what turned out of the sketch is a system of particles with mutual gravitational attraction. This type of system is chaotic and sensitive to initial conditions, that is why I set all the parameters manually in the code (the positions and velocities of movers and attractors). Even small changes in the starting positions or velocities of the particles lead to significant differences in the long-term behavior of the system. That is how I got to learn that the sensitivity to initial conditions is a characteristic of chaotic systems.

What seemed really interesting to me is that in the beginning the system appears organized, or in more official terms – symmetrical. However, after a while, the system becomes imbalanced and progresses to develop more chaotic qualities. The reason for that is the design of the system. As time progresses, the particles continuously influence each other due to gravity. Small disruptions in their positions or velocities accumulate over time and lead to significant deviations from the initial state.

An additional upgrade that I added was the force of repulsion. Here is how I implemented it in code:

for (let other of movers) {
      // Checking if the current 'mover' (outer loop) is different from the       current 'other' (inner loop)
      if (mover !== other) {
        // Calculating the vector pointing from 'other' to 'mover' and its           distance
        let repulsion = p5.Vector.sub(mover.pos, other.pos); 
        let distance = repulsion.mag();
        // Defining a minimum distance for repulsion and a maximum repulsion           force
        let minDistance = 50; 
        let maxForce = 0.5; 

        // Apply repulsion force if particles are too close
        if (distance < minDistance) {
          repulsion.setMag(map(distance, 0, minDistance, 0, maxForce));
          mover.applyForce(repulsion);
        }
        mover.attract(other);

To calculate the repulsion force, I subtracted the position of ‘other’ from the ‘mover’ to obtain a vector pointing from ‘other’ to ‘mover’, and then  computed the distance between them. I then set a minimum distance that determines when repulsion should occur and a maximum repulsion force to control the strength of the repulsion effect.If the distance between ‘mover’ and ‘other’ falls below the specified minimum distance,  I mapped the repulsion force by scaling the ‘repulsion’ vector based on the distance and the maximum force. This ensures that particles t experience a repulsive force based on the distance at which they encounter each other. Finally, I applied this repulsion force to the ‘mover. This force counteracts the gravitational attraction, preventing particles from getting too close and adding a repulsive behavior to the simulation.

For further improvements, I would be interested to experiment with more movers and attractors placed in various positions. It would be exciting to attempt to create a more stable choreography, make it appear 3D or perhaps to add some additional visual effects, like color changes or to play around with connecting lines.


Week 3 Assignment

Concept

The “2D Simulation of 3D Object with Attractors and Movers” is a P5.js project that explores the behavior of a simulated 3D object within a 2D plane. The core concept involves creating an illusion of three-dimensionality through the interaction of attractors and movers in a confined space. Here’s how the concept breaks down:

  • Attractors: The project begins by introducing invisible attractors, positioned at the four vertices of a square. These attractors act as gravitational centers, exerting forces on nearby objects.
  • Movers: Movers are dynamic entities with mass and radius. They are introduced into the scene and interact with the attractors and each other. The movers are attracted to the invisible attractors, simulating gravitational forces. Additionally, movers attract each other, contributing to the complex dynamics of the simulation.
  • Initial Direction: To establish an organized start, the movers’ initial velocity vectors are set to be perpendicular to their position vectors. This arrangement ensures that all movers begin moving in the same direction.
  • Visual Illusion: The project employs lines connecting each pair of movers, creating a visual effect resembling a rotating 3D object. This illusion is achieved in a 2D plane, as P5.js primarily supports 2D graphics.
  • Boundary Constraints: To introduce chaos and turbulence into the simulation, movers are constrained by the boundaries of the canvas. When a mover reaches the boundary, it reverses its velocity, contributing to the overall dynamics and eventual chaos of the system.

Inspiration

The inspiration for this project likely draws from the desire to replicate the complex and chaotic movements of objects in a 3D space using the capabilities of P5.js, a 2D graphics library. The concept of simulating gravity and interactions between objects is a common theme in physics simulations and computational art.

Demo

Link to code

Reflection

The project successfully achieves its goal of creating a visually intriguing simulation of a 3D object’s behavior within a 2D plane. It demonstrates the dynamic interplay between attractors and movers and how this interaction can lead to chaotic and unpredictable motion.

Ideas for Future Work or Improvements

  1. Enhanced Visualization: Exploring ways to improve the visual representation of the rotating 3D object. This could involve using different shapes or rendering techniques to make the illusion more convincing.
  2. User Interaction: Adding user controls to manipulate the attractors or introduce new movers during runtime, allowing users to interact with and influence the simulation.
  3. Realistic Physics: Experimenting with more advanced physics simulations, such as introducing damping, or elastic collisions between movers.
  4. Performance Optimization: Optimizing the code to handle a larger number of movers and attractors without sacrificing performance. Techniques like quad trees for collision detection can be beneficial.


Coding assignment – week 3

For this assignment I focused on making changes and tweaking the last sketch you showed us in class; the one with many white translucent movers orbiting aroung a pink attractor. I also had an image in mind I wanted to recreate. I wanted to make a retro serene generative art screensaver, that progressively get more complex. Below is my inspirations.

Lightspeed Screen Saver - Download & Review


The first things I did was change the design of the movers. I found myself experimenting will all sorts of shapes and dimensions, but finally settled on lines connecting the movers to attractor. I really liked the simplistic, yet instrictate designs being formed over time. I also continuously played around with constants and variables to emulate the calm atmosphere I desired.

After settling on an aesthetic I was happy with I moved on to applying turbulence to the attractor. I wanted to do this since any force applied to the attractor will in turn affect the movers as well because of the way they are coded. This way, the turbulence would make a profound effect on the whole sketch. I coded the turbulence to be random vectors that would affect the attractor at all times, hence making the attractor similar to the walkers we made in earlier classes.

let turbulence = p5.Vector.random2D();
  turbulence.mult(0.15);
  attractor.applyForce(turbulence);
  attractor.update();
  attractor.checkEdges();

The above code is what creates the turbulence for the attractor.

I also wanted to add a level of interactivity to the sketch. To achieve this, I made sure the attractor would teleport to the mouse coordinates with every mouse click.

Lastly, I added check controls to make sure the attractor remains in the canvas.

Below is my final design


I also made a more color version below


Challenges:

I wanted to create a design that incorporated more depth, to give it a 3D look. But I wasn’t make increase the complexity of the sketch in time.

Week #2 Assignment – Hungry Ants by Abdelrahman Mallasi

Concept

This project is titled Hungry Ants. It represents the collaborative quality that ants exhibit in nature, especially when there’s food around. It illustrates the teamwork ants undergo towards the common goal of satiability! On the mouse cursor, there’s a yellow circle which represents the targeted piece of food (a block of cheese, perhaps). A group of ants appear as soon as the program is run and they all rush towards the food. The user is free to move the cursor/food around which the ants would follow. The army of ants will keep moving until they reach their target, after which they’ll stop to enjoy their meal. Click here for the inspiration behind this project.

A highlight of some code that you’re particularly proud of

update() {
    let food = createVector(mouseX, mouseY);
    let foodDirection = p5.Vector.sub(food, this.position);
    let distanceToFood = foodDirection.mag();

    
    // if the ants reach/are close to the food, they stop
    if (distanceToFood < 18) {
      this.velocity.x=0;
      this.velocity.y=0;
      this.acceleration.x=0;
      this.acceleration.y=0;
    } 
    
    //if not, they keep following the food/mouse
    else {
      foodDirection.normalize();
      foodDirection.mult(0.01);
      this.acceleration = foodDirection;
      this.velocity.add(this.acceleration);
      this.velocity.limit(1.5);
      this.position.add(this.velocity);
    }
  }

This is the update method of the Ant class. I’m particularly proud of the distanceToFood calculation and the conditional statement following it to cause the ants to stop once they reach the food.

Embedded sketch

Link to Sketch: https://editor.p5js.org/ahm9979/sketches/sQgG7I0Ir

Reflection and ideas for future work or improvements

– It would’ve been cool to have the piece of food to shrink the more time the ants spend on it. Then, another piece of food would regenerate and the process would repeat
– It was very convenient discovering the arrays method of creating a group of objects. It would’ve been time-consuming if I had to create each ant manually as a separate object of the Ant class.
– I don’t like how clumped up the ants look once they stop for the food. Even after the food moves again, the ants move in their clump to follow it. It would look better if they separated again without having the run the program from the beginning.

Week 3 Assignment

Concept

While looking through the examples that we went over class, I was reminded of how planets orbit in the space, which has always been something I was interested in. So I thought it’d be fun to trace the lines of the orbit without showing the actual attractor (in this case this would be the planet), so that they will look almost like flowers that bloomed in space. I got inspired by the Korean traditional flower patterns, which is shown below, and wanted to recreate something similar to it but in a much simpler outline and with a space background.

Process/Highlight

Taking professor Aya’s advice, I first made sure to watch these two tutorials (1, 2) from the Coding Train before beginning my project, during which I learned a few core rules such as:

  • establishing universal gravitational constant (written as G in the code), which is a property of attractor itself. It’s a way to tune the world to have  stronger/weaker gravitational attraction forces.
  • you need direction (vector, use sub() function) and magnitude when calculating the force.

Keeping these information in mind, the vision that I had was creating a total of 3-5 different flower patterns that were different in sizes, so I created a total of 3 individual attractors and movers and varied elements such as ellipse and this.vel.mult(); for each attractor and mover. I also varied the colors for each of them in order to make the canvas more vibrant.

Something that I had trouble with for a while was adjusting/movign the position of the mover3, but after trying out various combinations of numbers, I realized that I needed to edit this part of the code in order to move the position of the mover:

  show() {
    stroke(255,100); 
    strokeWeight(2);
    fill(255, 20);//adjust color
    ellipse(this.pos.x / 0.63, this.pos.y / 0.63, this.r * 2);
  }
}

And as for the attractor3, I also adjusted this part below in order to move its location:

  show() {
    noStroke();
    fill(255, 0, 100);
    ellipse(this.pos.x * 1.6, this.pos.y * 1.6, this.r * 2);
  }
}

Then I just hid all the attractor.show(); functions in order to make them invisible, and changed the colors and transparency of each mover and added a background image. I also added Daniel’s particle code so that it will act like stars in the background. I tried running it multiple times for variation, and I got 3-4 different versions.

Here’s the final sketch.

Reflection

Some possible rooms for improvement are:

  • setting the sketch so that it will stop drawing once it hits a certain number of repetition so that the movers’ traces won’t look so clumped together in the end.
  • limiting the freedom of randomized designs (sometimes the movers were moving in an unruly way so the pattern looked a little off).

I also couldn’t figure out how to add turbulance/resistance with the particles, because my original idea was to have the particles repel away from the movers. This is also something I’d like to work on next time.

Week 3 Assignment – Elyazia Abbas

Concept and Inspiration:

Our task this week was to use invisible attractors and visible movers to create a pattern from the objects moving around attractors. I immediately imaged planets and orbital motion when thinking of this concept. Although the attractor in this case would be the sun, which is not invisible, in my implementation, I used a thin outline of a white circle just for reference and to easily track the orbital motion.

Something new that I was interested in while writing this program, was randomly picking a randomly sized image of a planet from a list to display in orbit, which I will further explain later. Every time the program is started the attractor is placed on a random spot on the screen through using random coordinates, and the user can use the mouse in order to drag the attractor top different spots, and the movers will continue to move around the allocated spot.

Code Snippet:

In the sketch file I created a list of 8 images of planets in our galaxy, and used this new function I learned by watching this video on youtube on how to randomly generate images on p5 https://www.youtube.com/watch?v=hxjEl-pun7o. I also made sure to randomly size the images as well to make it look more natural.

Trial Sketches before the final Product:

These were just a few trials to experiment before finishing my program:

Assignment Week #3 – MAGNETS

Concept:

My idea was to simulate a magnetic field by making attractors and movers. Attractors pull objects towards them and repel if they are too close and they also attract other attractors, while movers navigate this field of forces. The movers when in motion look like a visual representation of what a magnetic field would look like

Implementation:

  1. Attractors: These are objects that exert attractive forces on nearby movers. They are represented as red points on the canvas and move randomly. Attractors demonstrate the concept of attraction within the simulation.
  2. Movers: These are objects that are affected by the forces exerted by attractors and other movers. Each mover experiences both attraction and repulsion forces. These forces influence the motion and behavior of the movers.
  3. Turbulence: To add an extra layer of complexity and randomness, turbulence forces are applied to the movers. This turbulence causes the movers to exhibit unpredictable behavior.

Sketch:

https://editor.p5js.org/mi1171/full/TP9sdc9VE

Code:

function applyRepulsionFromAttractors(mover) {
  for (let attractor of attractors) {
    let force = attractor.copy().sub(mover.pos);
    let distance = force.mag();
    
    if (distance < repelDistance) {
      let strength = -repelStrength / (distance * distance);
      force.setMag(strength);
      mover.applyForce(force);
    } else if (distance < attractionDistance) {
      let strength = 5000 / (distance * distance);
      force.setMag(strength);
      mover.applyForce(force);
    }
  }
}

function applyRepulsionFromMouse(mover) {
  if (attractToMouse && mouseIsPressed) {
    let mouseForce = createVector(mouseX, mouseY).sub(mover.pos);
    let mouseDistance = mouseForce.mag();
    
    if (mouseDistance < repelDistance) {
      let mouseStrength = -repelStrength / (mouseDistance * mouseDistance);
      mouseForce.setMag(mouseStrength);
      mover.applyForce(mouseForce);
    }
  }
}

function applyRepulsionBetweenMovers(mover) {
  for (let j = 0; j < movers.length; j++) {
    if (mover !== movers[j]) {
      let otherMover = movers[j];
      let force = otherMover.pos.copy().sub(mover.pos);
      let distance = force.mag();
      
      if (distance < moverRepelDistance) {
        let strength = -moverRepelStrength / (distance * distance);
        force.setMag(strength);
        mover.applyForce(force);
      }
    }
  }
}

function applyAttractionToMouse(mover) {
  if (attractToMouse && mouseIsPressed) {
    let mouseAttraction = createVector(mouseX, mouseY).sub(mover.pos);
    let mouseAttractionDistance = mouseAttraction.mag();
    let mouseAttractionStrength = 500 / (mouseAttractionDistance * mouseAttractionDistance);
    mouseAttraction.setMag(mouseAttractionStrength);
    mover.applyForce(mouseAttraction);
  }
}

function applyTurbulence(mover) {
  let turbulence = createVector(random(-1, 1), random(-1, 1));
  turbulence.mult(0.1);
  mover.applyForce(turbulence);
}

function applyAttractionBetweenAttractors() {
  for (let i = 0; i < attractors.length; i++) {
    for (let j = i + 1; j < attractors.length; j++) {
      let force = attractors[j].copy().sub(attractors[i]);
      let distance = force.mag();
      if (distance < attractionDistance) {
        let strength = attractionStrength / (distance * distance);
        force.setMag(strength);
        attractors[i].add(force);
        attractors[j].sub(force);
      }
    }
  }
}

These are the functions behind the forces that are in play in the simulation:

  • applyRepulsionFromAttractors(mover): Computes forces that repel a “mover” from nearby “attractors.”
  • applyRepulsionFromMouse(mover): Calculates repulsion forces on a “mover” from the mouse cursor when a certain condition is met, simulating user interaction.
  • applyRepulsionBetweenMovers(mover): Computes repulsion forces between different “mover” objects, preventing them from getting too close.
  • applyAttractionToMouse(mover): Applies an attraction force from the mouse cursor to a “mover” when another condition is satisfied, allowing users to pull objects toward the cursor.
  • applyTurbulence(mover): Adds random turbulence forces to create unpredictable, jittery motion in the “mover” objects.
  • applyAttractionBetweenAttractors(): Calculates attraction forces between pairs of “attractor” objects, simulating magnetic attraction.

Challenges:

– Force Calculation: Calculating and applying the correct forces to achieve realistic attraction and repulsion between objects.

Future Improvements:

Some potential future improvements include:

– Additional Forces: Experiment with different types of forces, such as gravitational forces or custom-defined force fields, to create diverse and intriguing simulations.

– User Controls: Implement sliders or input fields to allow users to adjust parameters like attraction and repulsion strengths, turbulence intensity, or the number of objects in the simulation.

– Visual Effects: Incorporate visual effects like trails, color variations, or particle-like representations to add depth and visual appeal to the simulation.

Week 2 Assignment

Concept

The inspiration came out of nowhere when my friends and I were telling a running joke about how we can each be a character in the Ratatouille movie over our dinner, and it struck me that it’d be fun to create a mouse chasing its cheese for this assignment.

Highlight

I thought it’d be fun to have the mouse be the “cheese” by linking an image to it and another so the first thing I set to watch was this video about acceleration towards the mouse. Then I set onto creating my canvas, uploading images, and so on.

For the images I used these cute clip arts of cheese and mouse.

Something that I struggled with in this assignment was trying to get the mouse image to be portrayed on top of the cheese image, because it looked a little weird when it was vice versa — it was almost as if the cheese was eating the mouse, not the other way around. I tried searching up solutions for it, but I still couldn’t figure out the answer in the end.

Despite this complication, I managed to add the elements of velocity, acceleration, etc. correctly in a way such that the object (mouse) will move towards the cursor (cheese), thus tracking its movement — this part of the code is shown below:

class Mickey {
  constructor(x, y) {
    this.pos = createVector(x, y);
    this.vel = p5.Vector.random2D();
    this.vel.mult(random(3));
  }

  update() {
    let mouse = createVector(mouseX, mouseY);
    this.acc = p5.Vector.sub(mouse, this.pos);
    this.acc.setMag(1);

    this.vel.add(this.acc);
    this.vel.limit(5);

    this.pos.add(this.vel);
  }


Embedded sketch

I ended up adding a maze background to make this look a little more fun and exciting, which I drew inspiration from this image.

And here’s the final sketch.

Reflection

I think this could become much better after revisions, such as figuring out how to overlay the mouse image over the cheese image as well as setting edges to work for the right side’s x and y values of the canvas — for some reason, it seemed like only the left side of the canvas’ edges were working. I also thought it’d be fun to potentially turn this into a game similar to the concept of the good old Packman game!

Week #2 Coding Assignment, Cairo Skyline

https://editor.p5js.org/oae233/sketches/JMRwbzGgE

Concept

For this assignment I wanted to simulate the movement of a flock of pigeons and the way they fly in unison, mainly inspired by the Cairo skyline and its pigeon towers. I found a lot of information about how exactly to do this online, one beneficial resource was Craig Reynolds’s blog on the topic, and I found a tutorial by Daniel Schiffman on how exactly to implement this. The tutorial made a 2D flocking simulation, I applied the same principles to 3D, added some stylistic choices, and adjusted values so that the most reminiscent of the pigeon flock movement.

Some Code I’m Proud Of

class pigeonTower {
  constructor() {
    // Define the size and corners of the pigeon tower
    this.size = createVector(200, 100);
    this.tlcorner = createVector(-this.size.x / 2, -this.size.y / 2);
    this.blcorner = createVector(-this.size.x / 2, this.size.y / 2);
    this.trcorner = createVector(this.size.x / 2, -this.size.y / 2);
    this.brcorner = createVector(this.size.x / 2, this.size.y / 2);
    this.maincolor = [38, 141, 0];// Main color for the tower
    this.secondarycolor = [190, 180, 80]; // Secondary color for the tower
  }
  render() {
    push();
    translate(width / 2, height / 2);
    stroke(0);
    strokeWeight(1);
    // Draw the main body of the tower
    fill(this.maincolor);
    rect(-this.size.x / 2, -this.size.y / 2, this.size.x, this.size.y);
    
    fill(this.secondarycolor);
    triangle(
      this.tlcorner.x,
      this.tlcorner.y,
      this.blcorner.x,
      this.blcorner.y,
      -30,
      0
    );
    triangle(
      this.trcorner.x,
      this.trcorner.y,
      this.brcorner.x,
      this.brcorner.y,
      30,
      0
    );
    push();
    rotate(0.785);
    rect(-22.5, -22.5, 45, 45);
    pop();
    fill(19, 71, 0);
    rect(this.blcorner.x, this.blcorner.y, 10, 200);
    rect(this.brcorner.x, this.brcorner.y, -10, 200);
    push();
    rotate(-1);
    rect(this.blcorner.x, this.blcorner.y - 98, 10, 220);
    rotate(2);
    rect(this.brcorner.x, this.brcorner.y - 98, -10, 220);
    pop();
    push();
    fill(0, 110, 149);
    triangle(-20, this.blcorner.y, 20, this.brcorner.y, 0, 30);
    triangle(-20, -this.blcorner.y, 20, -this.brcorner.y, 0, -30);
    translate(40, 0);
    triangle(-20, this.blcorner.y, 20, this.brcorner.y, 0, 35);
    triangle(-20, -this.blcorner.y, 20, -this.brcorner.y, 0, -30);
    translate(-80, 0);
    triangle(-20, this.blcorner.y, 20, this.brcorner.y, 0, 35);
    triangle(-20, -this.blcorner.y, 20, -this.brcorner.y, 0, -30);
    pop();
    fill(50, 170, 150);

    pop();
  }
}

In this part, I hard-coded the drawing of the pigeon tower. I know hard coding isn’t as exciting as drawing something adaptable or dynamic, but I genuinely enjoy drawing things with code using simple shapes, and making this pigeon tower was nice. I actually coded it on my phone on a bus ride because I was curious to see if p5.js works on Safari / mobile browsers, and it does!

Reflection & ideas for future work

I really really wanted to figure out some way to make the pigeons look more like pigeons in flight, I had a couple of different ideas on how I might do that. I also wished that the program could handle more pigeons and that I could’ve implemented the rule of pigeons not being directly behind eachother so that their line of sight is not blocked. However, right now my code only spawns about 200 pigeons and it barely gives me the effect I want, so optimising the code is first on the list of improvements that I’d love to make. I’m pretty sure the most computing-intensive thing is calculating the distances between each boid so I might have to think of a smarter way to do that.