Week #11 – Creative Bankruptcy

The concept

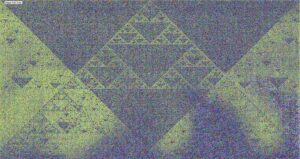
As the titles indicates, this sketch is about being creatively bankrupt. Why creatively bankrupt, might you ask? This mental state involves a constant black and white noise (as those seen in TV when there is no signal). It is a state in which no ideas flow, where ideas are not as good as you thought. Frustrating to say the least. Nevertheless, creative bankruptcy itself can be expressed as art.

Anybody remember rubbing your hand across the TV screen static? : r/nostalgia
Figure 1. CRT filled with static noise.

With this concept in mind, I wanted to do something similar with cellular automata. Therefore, I present you my newest sketch: “Creative Bankruptcy”

Controls:

Mouse Click: Start music.
Moving mouse while pressed: Rotate through the X, Y and Z axis.
Z key: Start from the beginning with a new rule value (new pattern).
X key: Stop generating scan lines
C key: Clear background.

Full-screen version: Creative Bankruptcy

Brief explanation of the code

The code work in the following manner:

1. Since we are working with cellular automata, a system needs to be in place in order to work. The vision I was seeking for required for me to create an array that hosts multiple classes for every cellular automata. So, the idea is to store multiple classes inside the array and then use the custom function of prepare() with each one of them.

//Prepare celular spawners.
//Parameters for spawning a celular spawner: (ruleValue, w, y, direction).
cells.push(new CelularSpawner(int(random(255)), 5, 0, 0));

//Prepare the celular automata spawners.
for (let i = 0; i < cells.length; i++) {
  cells[i].prepare();
}

The function prepare() prepares the cellular automata spawner by analyzing the total width of the canvas and then filling each cell by the establish width in the parameters to properly fill it out and follow the pattern with calculateState(a, b, c):

prepare() {
  this.ruleSet = this.ruleValue.toString(2).padStart(8, "0");

  let total = width / this.w;
  for (let i = 0; i < total; i++) {
    this.cells[i] = 0;
  }
  this.cells[floor(total / 2)] = 1;
}
calculateState(a, b, c) {
  let ruleset_length = this.ruleSet.length;

  let neighborhood = "" + a + b + c;
  let value = ruleset_length - 1 - parseInt(neighborhood, 2);
  return parseInt(this.ruleSet[value]);
}

2. For reasons I will explain later, I decided to use WEBGL to generate a different effect on the canvas. This is due to the fact that, since the canvas was seeking to transmit a feeling of watching it on CRT, the shader support was limited to only WEBGL. Despite shaders not being used for this sketch, the rotation of it to generate different patterns was left with the function orbitControl(1,1,1).

3. Being inspired by “Following Uncertainty”, I decided to implement, again, audio spectrum visualizer. Although, this one is represented through an image that increases its sizes accordingly through a plane.

The creative bankruptcy behind it (A self reflection and what I could be proud of)

This section is more of a self-reflection on why this assignment was so hard for me, despite my other sketches being more complex. It seems that, at the end of the semester, the burnout catches up. It is frustrating since I had many ideas that I wanted to explore in this sketch:

      1. Boxes with physics done by matter.js that each location is generated by the patterns of cellular automata.
      2. A CRT like canvas done with the use of shaders.
      3. An image being filled by the patterns generated by cellular automata.
      4. An album like done with four sections divided in the screen that are filled by cellular automata.

All of these ideas (kind of) eventually arrived into one. Despite having artistic qualities, it is still not as creative as I wanted it to be. It is frustrating to not being able to implement new ideas due to the aforementioned creative bankruptcy. But as everything in life, we will not get the results we want in one try, and in my case, I should have tried more in other to get a more proper system going on.

For the final project, I will revise all of my previous ideas into something interesting. All of this knowledge I have accumulated into the class will not go unused.

Used sources:

1. Aesela. “𝒀𝒗𝒆𝒔 𝑻𝒖𝒎𝒐𝒓 • 𝑳𝒊𝒎𝒆𝒓𝒆𝒏𝒄𝒆 • 𝑨𝒏𝒈𝒆𝒍𝒊𝒄 𝑽𝒆𝒓𝒔𝒊𝒐𝒏.” YouTube, 24 Apr. 2022, www.youtube.com/watch?v=FfQoshkVChk. Accessed 22 Nov. 2024.

2. “Animated GIFs by Kjhollen -P5.Js Web Editor.” P5js.org, 2024, editor.p5js.org/kjhollen/sketches/S1bVzeF8Z. Accessed 22 Nov. 2024.

3. “CreateImage.” P5js.org, 2024, p5js.org/reference/p5/createImage/. Accessed 22 Nov. 2024.

4. “ShaderToy CRT by Keithohara -P5.Js Web Editor.” P5js.org, 2024, editor.p5js.org/keithohara/sketches/xGU1a8ty-. Accessed 22 Nov. 2024.

5. Tenor.com, 2024, media.tenor.com/88dnH_mHRLAAAAAM/static-tv-static.gif. Accessed 22 Nov. 2024.

6. The Coding Train. “Coding Challenge 179: Elementary Cellular Automata.” YouTube, 9 Jan. 2024, www.youtube.com/watch?v=Ggxt06qSAe4.

Neon Doodle World – Final Project Draft 1

Design Concept and Artistic Direction
Last year, during the Interactive Media (IM) show, I remember engaging with a fascinating sketch by another student. Their project used a webcam to capture a photo, which was then transformed into a shuffled grid puzzle for users to solve. I was inspired by the creative use of the webcam and wanted to recreate something similar, but with a different level of complexity and interaction. After brainstorming, I shifted the idea toward using a webcam not just to capture but to enable free drawing with hand gestures. This led to the concept of Neon Doodle World, where users could draw vibrant doodles with their fingers in real-time.

To make the experience even more engaging, I incorporated features inspired by concepts we learned in class. In addition to a standard paintbrush mode, I added a particle trail drawing mode for dynamic, animated effects. Users can also clear the sketch at any time, ensuring the canvas remains a space for unrestricted creativity.

Interaction Methodology
The interaction design leverages MediaPipe Hands, a library for real-time hand-tracking. The webcam detects hand landmarks, allowing users to control the drawing with simple gestures:

  • Paintbrush Mode: Users draw strokes in a chosen color. A pinch gesture (bringing the thumb and index finger close) changes the color dynamically.
  • Particle Trail Mode: A more playful drawing style where colorful, randomized particles trail the user’s hand movements.
  • Clear Canvas: Users can clear the drawings with a single click, resetting the canvas for a fresh start.

The key interaction focus was to make the experience intuitive. By mapping hand coordinates to the canvas, users can freely draw without needing a mouse or keyboard. The pinch gesture ensures seamless control of color switching, and the modes allow creative exploration.

Canvas Design and Interaction Plan
The canvas is divided into two main components: the video feed and the drawing layer. The webcam feed is mirrored horizontally, ensuring the gestures feel natural and intuitive. The drawing layer exists as an overlay, maintaining a clear separation between the user’s input and the video feed.

Above the canvas, simple buttons control the modes and functionalities. Users can easily toggle between paintbrush and particle trail modes, clear the canvas, and change drawing styles. This clean and straightforward layout ensures accessibility while minimizing distractions from the creative process.

Base p5 Sketch and Initial Explorations
The Draft 1 sketch built the basic functionality of the project:

  • It uses MediaPipe Hands to track hand movements and map them to the canvas.
  • The paintbrush mode lets users draw smooth, colorful lines.
    The particle trail mode creates fun, animated effects with random bursts of color.
  • A clear canvas button resets the drawing layer without touching the webcam feed.

Here’s an example of how the particle trail mode works:

 } else if (mode === "particle-trail") {
// Create particle effects around the finger position
for (let i = 0; i < 5; i++) {
let particleX = x + random(-10, 10); // Random x-offset for particles
let particleY = y + random(-10, 10); // Random y-offset for particles
drawingLayer.fill(random(100, 255), random(100, 255), random(100, 255), 150); // Random color with transparency
drawingLayer.noStroke();
drawingLayer.ellipse(particleX, particleY, random(5, 10)); // Draw a small particle
}
}

Current Sketch

Next Steps and Expansions
Building on the Draft 1 sketch, the project will be expanded with several new features to improve interaction and enhance the user experience:

  • Introduction Page: A new page will be added at the beginning to introduce the project, setting the tone and providing users with context about the experience they are about to have.
  • Color Palette: A palette will be added to allow users to select specific colors for drawing, instead of cycling through preset options. This will make the experience more customizable.
  • Undo Feature: Functionality will be introduced to undo the last drawing action, giving users more control and flexibility while drawing.
  • Save Feature: Users will be able to save their creations as images, including both the drawings and the webcam overlay.
  • Pause/Resume Drawing: A pause button will be added, allowing users to stop and resume drawing as needed.

These additions will make the project more interactive, user-friendly, and visually appealing, while staying true to the original concept of creating a dynamic, webcam-based drawing experience.

Interactive Forest Simulation – Week 11

Concept

This sketch is a forest simulation where you can interact with the environment and change how the forest grows. The forest is shown as a grid, and you can make the grid bigger or smaller before starting. During the simulation, you can pause and start it again whenever you want. You can set trees on fire and watch the fire spread, or use water to turn empty land into grass. Once there is grass, you can plant trees to grow the forest. Each action you take changes the forest, and you can experiment with how fire, water, and trees affect it. It’s a fun way to see how the forest grows and recovers over time.

Code Highlight

One part of the code I’m particularly proud of is the updateGrid function, which handles how each cell evolves based on its current state and neighbors. Here’s the snippet:

function updateGrid() {
  let newGrid = grid.map((col) => col.slice()); // Copy the current grid

  for (let x = 0; x < cols; x++) {
    for (let y = 0; y < rows; y++) {
      let state = grid[x][y];
      let neighbors = getNeighbors(x, y); // Get neighboring cells

      if (state === 3) {
        // Fire burns out into barren land
        newGrid[x][y] = 0;
      } else if (state === 2) {
        // Tree catches fire if near fire
        if (neighbors.includes(3)) {
          if (random(1) < 0.6 + 0.2 * windDirection) newGrid[x][y] = 3;
        }
      } else if (state === 1) {
        // Grass grows into a tree if surrounded by trees
        if (neighbors.filter((n) => n === 2).length > 2) {
          newGrid[x][y] = 2;
        }
      }
    }
  }

  grid = newGrid; // Update the grid
}

This function applies the rules of the automaton in a straightforward way:

  • Fire turns into barren land after burning.
  • Trees can catch fire if they’re near a burning cell.
  • Grass grows into trees when surrounded by enough trees.

Embedded Sketch

Reflection and Future Ideas

I’m happy with how the sketch turned out, as it creates an engaging way to explore the balance between growth and destruction in a forest. Watching the fire spread and the forest recover with water and trees is satisfying and makes the simulation feel alive. However, there is room for improvement. The interface could be designed to look more visually appealing to attract users and make the experience more immersive. Adding better visuals, like smoother transitions between states or animated effects for fire and water, could enhance the overall presentation. Another idea is to include sound effects for the different features, such as a crackling sound for fire or a soft splash when using water. These small additions could make the simulation more engaging and enjoyable for users, turning it into a more polished and interactive experience.

References

https://editor.p5js.org/yadlra/sketches/B3TTmi_3F

https://ahmadhamze.github.io/posts/cellular-automata/cellular-automata/

Week 11: Honeycomb

Concept:

For this week’s assignment, I created an interactive honeycomb, where the mouse acts as a bee and the honeycomb swaps its color on hover.

Sketch:

Code Snippet & Challenges:

// Check if mouse is over the hexagon
if (isMouseOverHexagon(x, y, w)) {
  // Swap the color (state)
  board[i][j] = 1 - board[i][j];
}

This is the part of code that was the most challenging where I had to check if the mouse is over the hexagon and change the color of it.

Future Improvements:

I would add a bee in the place of the mouse to make it look nicer visually and more realistic.

Game of Life +

The Concept

I created an interactive implementation of Conway’s Game of Life with customizable rules and real-time editing capabilities. What makes this version special is its focus on experimentation and accessibility – users can modify the simulation rules while it’s running or pause to edit patterns directly. The interface is designed to be intuitive while offering deep customization options.

Code Highlight

I’m particularly proud of the updateGrid() function, which handles the core cellular automaton logic:

javascript
function updateGrid() {
for (let i = 0; i < cols; i++) {
for (let j = 0; j < rows; j++) {
let neighbors = countNeighbors(grid, i, j);
let state = grid[i][j];
// Apply rules
if (state === 0 && neighbors === rules.birthRule) {
nextGrid[i][j] = 1;
} else if (state === 1 && (neighbors >= rules.survivalMin && neighbors <= rules.survivalMax)) {
nextGrid[i][j] = 1;
} else {
nextGrid[i][j] = 0;
}
}
}
}

This code is elegant in its simplicity while being highly flexible. Instead of hardcoding Conway’s traditional rules (birth on 3 neighbors, survival on 2 or 3), it uses variables for birth and survival conditions. This allows users to experiment with different rule sets and discover new patterns. The clean separation between rule checking and grid updating also makes it easy to modify or extend the behavior.

The Sketch

The sketch provides a full-featured cellular automata playground with:

  • Real-time rule modification
  • Custom color selection
  • Variable brush sizes for drawing
  • Grid visualization when paused
  • Clear and random pattern generation
  • A reset button to restore default settings
  • Numerical feedback for all parameters

Reflections and Future Improvements

Working on this project revealed several interesting possibilities for future enhancements:

  1. Pattern Library
    • Add ability to save and load interesting patterns
    • Include a collection of classic Game of Life patterns (gliders, spaceships, etc.)
    • Allow users to share patterns with others
  2. Enhanced Visualization
    • Add cell age visualization (cells could change color based on how long they’ve been alive)
    • Include heat maps showing areas of high activity
    • Add trail effects to show pattern movement
  3. Extended Controls
    • Add speed control for the simulation
    • Implement step-by-step mode for analyzing pattern evolution
    • Add undo/redo functionality for drawing
    • Allow custom grid sizes
  4. Analysis Features
    • Add population graphs showing cell count over time
    • Include pattern detection to identify common structures
    • Add statistics about pattern stability and periodicity

The current implementation provides a solid foundation for exploring cellular automata, but there’s still much room for expansion. The modular design makes it easy to add these features incrementally while maintaining the core functionality.

The most interesting potential improvement would be adding pattern analysis tools. Being able to track population changes and identify stable structures could help users understand how different rules affect pattern evolution. This could make the sketch not just a creative tool, but also a valuable educational resource for studying emergent behavior in cellular automata.

Week 11- Snake Game with Dynamic Obstacles

Concept:

When I first read the assignment to use Cellular Automata to create dynamic and interesting patterns, I had no idea what to do. I was stuck for a while. Then, I remembered the classic Snake game I used to play and thought, “What if I could make it more exciting?”

I decided to add obstacles that change over time, making the grid feel alive and unpredictable. Using Cellular Automata, the obstacles evolve and move during the game, creating a challenge that grows as the game progresses. This small twist made the game much more engaging and fun.

Embedded Sketch:

Logic of the Code:

In my game, Cellular Automata is used to generate dynamic and evolving obstacles. Here’s how it works step by step:

  • Starting Grid: The grid starts with some random cells marked as “alive” (obstacles). This randomness ensures the starting grid is different every time you play.
  • Cellular Automata Logic: Every few frames, the code checks each cell on the grid to decide if it should become an obstacle, stay as one, or disappear. This decision depends on how many neighboring cells are also alive. For example:
    • If a cell is an obstacle and has too many or too few neighbors, it disappears.
    • If a cell is empty but has the right number of alive neighbors, it becomes an obstacle. This logic ensures the obstacles move and evolve naturally over time.
  • Obstacle Management: To keep the game challenging, I added a function to make sure there are always at least 10 obstacles on the grid. If the number of obstacles drops too low, the code randomly adds new ones.
  • Pulsing Effect for Obstacles: To make the obstacles visually dynamic, I added a pulsing effect. This effect changes the color intensity of obstacles smoothly over time using a sine wave. The sin() function creates a smooth wave that oscillates between values, giving the obstacles a “breathing” effect. Here’s the code:
    if (grid[x][y] === 1) {
      fill(150 + sin(frameCount * 0.05) * 50, 50, 50); // Pulsing red effect
    } else {
      fill(30);
    }
    

    In this code:

  • frameCount is a built-in variable that counts the number of frames since the sketch started. This makes the color change over time.
  • sin(frameCount * 0.05) creates a wave that oscillates between -1 and 1.
  • By multiplying the wave value by 50 and adding 150, the color smoothly pulses between lighter and darker shades of red. This effect makes the obstacles look alive and dynamic, matching the Cellular Automata theme.

Challenges:
One big challenge was balancing the speed of the Cellular Automata and the snake. At first, the obstacles were changing way too fast, making the game unplayable. To fix this, I slowed down how often the obstacles update compared to the snake’s movement. This kept the game smooth and manageable.

Another challenge was ensuring there were always enough obstacles on the grid. Sometimes, the Cellular Automata rules would clear too many obstacles, leaving the grid empty. To solve this, I added a check to add new obstacles whenever the number dropped below a certain threshold.

Future Improvements:
Here are some things I’d like to add in the future:

  • Player Options: Let players choose how obstacles behave, like making them grow faster or slower.
  • Dynamic Difficulty: Make the game harder as the player scores more points by speeding up the snake or increasing obstacle density.
  • Enhanced Visuals: Add glowing effects or different colors for obstacles to make the game look even better.
  • Sound Effects: Include sounds for eating food, hitting obstacles, or speeding up.

Final Project Draft 1- Vibrations of Being

Concept:

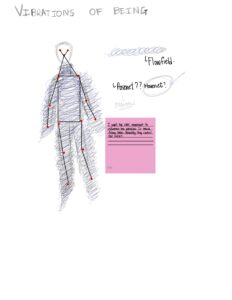
For my final project, I want to replicate the feeling evoked by Antony Gormley’s work, particularly the quantum physics concept that we are not made of particles, but of waves. This idea speaks to the ebb and flow of our emotions — how we experience ups and downs, and how our feelings constantly shift and flow like waves. When I came across Gormley’s work, I knew that I wanted to replicate this dynamic energy and motion in my own way, bringing my twist to it through code. I aim to visualize the human form and emotions as fluid, wave-like entities, mirroring the infinite possibilities of quantum existence.

Interaction Methodology:

To create an interaction where users influence flow field particles with their movements, I will use ml5.js and TensorFlow.js for real-time machine learning. These libraries will allow the webcam to track the user’s body movement, and the detected positions (such as arms, legs, and joints) will influence how the flow field particles behave.

Steps to Implement Interaction:

  1. Pose Detection:
    • Using ml5.js, I will implement pose detection models like MoveNet to track key body points (e.g., shoulders, elbows, wrists, hips) and convert them into coordinates.
  2. Movement Capture:
    • The webcam will capture the user’s movement in real-time, and MoveNet will process the data frame by frame to track changes in the user’s position.
  3. Particle Interaction:
    • The user’s proximity and movement will influence the particles. For example:
      • If the user moves closer, the particles will move toward them.
      • The direction of body movements (like moving an arm left or right) will control the direction of the flow field, allowing the user to “steer” the particles.
  4. Flow Field Behavior:
    • The particles will change their behavior based on the user’s gestures and position. For example, raising or lowering the hands could speed up or slow down the flow, while lateral movements could push the particles in specific directions.

The goal is for the flow field to update continuously, with particles moving based on real-time data from the user’s body.

Libraries Used:

  • ml5.js for pose detection and movement tracking.
  • TensorFlow.js for more advanced machine learning tasks, if needed.

Design of Canvas

Interaction Idea 1: Side-by-Side Camera and Sketch View

Concept: In this design, the user will see both their live webcam feed and the flow field sketch on the screen at the same time. The webcam will show their movements, and the particles in the flow field will react in real-time to these movements. This approach highlights the connection between the user’s actions and how they influence the flow field, making the interaction more intuitive and visually engaging.

User Experience Flow:

  • Webcam Feed: The camera will be shown on one side of the screen (either the left or top half).
  • Flow Field Display: The flow field, containing the particles, will occupy the other side (right or bottom half).
  • As the user moves, they can immediately see how their body affects the movement of the particles in the flow field. For example, particles may gather around them, follow their gestures, or change direction based on their movements.

Interaction Design:

  • The user will control the flow field by using their body, which will be visible in the webcam feed.
  • The particles will react to the movement of specific body parts, such as arms or legs.
  • The user can influence the flow by moving closer to or further away from the camera or by making different gestures, which will change the pattern or direction of the wave-like particles.

Interaction idea 2: Dark Screen with Movement-Based Particle Control

Concept: In this design, the user’s movements will be the primary focus, with no webcam feed visible at first. The screen will be dark, and as the user begins to move, they will start influencing the flow field. This approach keeps the user’s attention solely on how their actions shape the environment, with no visual distractions from their own body.

User Experience Flow:

  • Initial Dark Screen: The screen starts out black, with no indication of the user’s presence.
  • Movement Trigger: Once the user starts to move, the flow field will emerge, and the particles will begin to react to the user’s gestures and position.
  • As the user moves, they’ll feel more engaged, knowing that their actions are directly influencing the particles, but without seeing themselves.

Interaction Design:

  • The user will only see the flow field, which will respond dynamically to their movement.
  • The particles will react to the user’s proximity and gestures, such as raising a hand, making the flow field change accordingly.

Base Sketch:

Currently, I have implemented the basic framework for MoveNet, and it’s working really well. To ensure stability and avoid potential issues with updates, I included the machine learning library and the compressed TensorFlow files directly into the project. This way, the setup is self-contained, and I don’t have to rely on external links in the index.html file. The sketch is already capable of detecting body movements, serving as the foundation for allowing users to influence the flow field with their motions.

Resources:

BodyPose

Tensor Flow

Week 11 – Fabric Cellular Automaton

Concept:

Inspiration

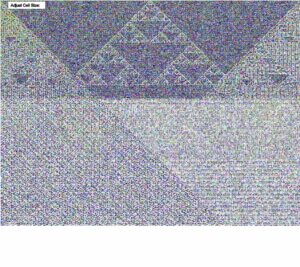
Throughout the semester, my coding skills have improved. Looking back at my first assignment and this one, I think there is a lot of improvement in making my ideas come to life.  For this week’s project, I used a dimensional Cellular Automaton to create a fabric-like pattern. My project is an interactive cellular automaton inspired by the RGB Cellular Automaton project. The randomized ruleset and adjustable cell size allow users to visualize infinite visual possibilities. In this project, each layer of cells builds on the previous to create a unique pattern. 

Highlight and Progress:

I began this journey by searching for inspiration because I felt there were a lot of constraints in the algorithmic design of the cellular automaton. I started experimenting with this project in hopes of creating a system where the color of the cells that are equivalent to one would change around the mouse; however, I faced so many issues, and the system would stop working all the time. I tried to fix it, but I had limited time to finish this assignment. As a result, I began experimenting with different shapes and sizes and even tried to create a new rule set each time the mouse was pressed.

Different Stages of the project


Throughout the process, I began improving the project by adding layers to it, as you can see from the interface, I initially wanted it to feel like a website. I think what I like the most about the project is the visualization. I think it is interesting and engaging to see and experiment with. I am proud that I was able to tackle the ruleset to be able to change it. This is done by pressing the mouse. When the mouse is pressed, the for() loop goes through each index of the cells and sets the value to 0, resetting all cells. For each cell, the x and y positions are calculated based on trigonometric functions After resetting the grid, the center cell is set to 1, making it an active cell. This marks the starting point for the new pattern.

//  start at generation 0
let generation = 0;
// cell size
let w = 3;
let slider;
//state
let isComplete = false;

// starting rule
let ruleset = [0, 1, 1, 0, 1, 0, 1, 1];

function setup() {
  createCanvas(windowWidth, windowHeight);
  background(255);
  textFont("Arial");

  //   make slider to change cell size
  slider = createSlider(2, 20, w);
  slider.position(25, 25);
  slider.style("width", "100px");

  // save button
  saveButton = createButton("Save Canvas");
  saveButton.position(160, 5);
  saveButton.mousePressed(saveCanvasImage);

  // reset button
  resetButton = createButton("Reset");
  resetButton.position(290, 5); // Place it next to the save button
  resetButton.mousePressed(resetCanvas);

  //array of 0s and 1s
  cells = new Array(floor(width / w));
  for (let i = 0; i < cells.length; i++) {
    cells[i] = 0;
  }
  cells[floor(cells.length / 2)] = 1;
}

function draw() {
  //slider w value
  w = slider.value();
  fill(240);
  stroke(0);

//   for slider text 
  rect(25, 5, 104, 20,2);
  fill(0);
  stroke(255);
  textSize(13);
  textFont("Arial");
  text("Adjust Cell Size:", 30, 20);
  
//   for resitting ruleset text 
  fill(240);
  stroke(0);
  rect(385, 5, 240, 20,2);
  fill(0);
  stroke(255);
  textSize(13);
  textFont("Arial");
  text("Press Mouse to Generate a new pattern ", 390, 20);


  for (let i = 1; i < cells.length - 1; i++) {
    //drawing the cells with a state of 1
    if (cells[i] == 1) {
      noFill();
      stroke(random(180), random(180), random(250));
      //y-position according to the generation
      square(i * w, generation * w, random(w));
    }
  }

  //next generation.
  let nextgen = cells.slice();
  for (let i = 1; i < cells.length - 1; i++) {
    let left = cells[i - 1];
    let me = cells[i];
    let right = cells[i + 1];
    nextgen[i] = rules(left, me, right);
  }
  cells = nextgen;

  // gen + 1
  generation++;

  // stop when it reaches bottom of the canvas
  if (generation * w > height) {
    noLoop();
    isComplete = true;
  }
}

// a new state from the ruleset.
function rules(a, b, c) {
  let s = "" + a + b + c;
  let index = parseInt(s, 2);
  return ruleset[7 - index];
}

// mouse is pressed
function mousePressed() {
  // make new ruleset with random 0s and 1s
  ruleset = [];
  for (let i = 0; i < 8; i++) {
    ruleset.push(floor(random(2))); // Random 0 or
    //  fill(255);
    // square(i *w, generation * w, w);
  }
  //https://p5js.org/reference/p5/console/ for debugging
  console.log("New Ruleset: ", ruleset);

  // restart with the new ruleset
  cells = new Array(floor(width / w));
  for (let i = 0; i < cells.length; i++) {
    cells[i] = 0;
    noStroke();

    let x1 = 5 * i * cos(i);
    let y1 = i * sin(i);
    fill(205, 220, random(90, 155), 10);
    circle(x1, y1, w * random(150));
  }
  cells[floor(cells.length / 2)] = 1;
  generation = 0;
  loop();
}

// save image
function saveCanvasImage() {
  saveCanvas("cellularAutomata", "png");
}

// restart
function resetCanvas() {
  background(255);
  cells = new Array(floor(width / w));
  for (let i = 0; i < cells.length; i++) {
    cells[i] = 0;
  }
  cells[floor(cells.length / 2)] = 1;
  generation = 0;
  loop(); //
}


Embedded Sketch:


Future Work:

To improve this project in the future, it would be interesting to see how with a web camera, audiences can interrupt the pattern by making noise. Additionally, adding a system to choose a set of colors and maybe a layout for the different patterns would also be interesting to visualize. Improving this project to become a website where people can experiment with the endless possibilities using Cellular Automaton in terms of shape, size, color, and layout would be interesting to see. Perhaps this project would evolve into an educational tool, teaching concepts behind  Cellular Automaton and mathematical systems while reflecting the intersection of art, technology, and science in an interactive format.

Resources:

Wolfram Science and Stephen Wolfram’s “A New Kind of Science.” www.wolframscience.com/gallery-of-art/RGB-Elementary-Cellular-Automaton.html.

https://mathworld.wolfram.com/ElementaryCellularAutomaton.html


Assignment 11

Concept

The project simulates a cellular automaton inspired by systems like Conway’s Game of Life, where cells in a grid evolve based on interactions with their neighbors. The interactive interface enables users to experiment with custom rules, toggle cells’ states, and observe dynamic patterns as the simulation progresses. This tool bridges computational art and mathematics, creating a visually engaging environment where users can explore emergent behaviors.

Highlight I’m proud of
createSpan('<b><br>Grow');
grow = createSelect();
for (let i = 0; i <= 8; i++) grow.option(i);
grow.value(2);

createSpan('<b><br>Underpopulate');
underpop = createSelect();
for (let i = 1; i <= 7; i++) underpop.option(i);
underpop.value(4);

createSpan('<b><br>Overpopulate');
overpop = createSelect();
for (let i = 2; i <= 8; i++) overpop.option(i);
overpop.value(5);
  • Grow: Minimum neighbors needed for a cell to come alive.
  • Underpopulate: Minimum neighbors needed for a cell to stay alive.
  • Overpopulate: Maximum neighbors allowed before a cell dies.


  • Choose unique colors for alive cells, enabling personalized designs and aesthetics.


  • Use intuitive mouse interactions to toggle cells directly, making the system user-friendly.
    function mousePressed() {
      let w = (width / cellSize);
      let x = floor(mouseX / cellSize);
      let y = floor(mouseY / cellSize);
      let n = x + y * w;
      if (cells[n] != null) {
        eraseMode = cells[n].alive; // Determines if the user is erasing or drawing
      }
    }
    
    function draw() {
      if (mouseIsPressed) {
        let w = (width / cellSize);
        let x = floor(mouseX / cellSize);
        let y = floor(mouseY / cellSize);
        let n = x + y * w;
        if (cells[n] != null) {
          cells[n].alive = !eraseMode; // Toggles the state of the cell
        }
      }
    }


Embedded sketch


Edit Sketch: https://editor.p5js.org/mariamalkhoori/sketches/uPT54nwAo

Reflection and ideas for future work or improvements
  • Allow users to draw predefined shapes (e.g., gliders or oscillators) directly onto the grid.
  • Implement a zoom/pan feature for exploring large grids in greater detail.
  • Create a timeline or “playback” feature that lets users view how the grid evolved over time.

Week 11 – Zombie Automata by Dachi

Sketch:

p5.js Web Editor | Zombie Automata

Inspiration

To begin, I followed existing coding tutorials by The Coding Train on cellular automata to understand the basics and gather ideas for implementation. While working on the project, I drew inspiration from my high school IB Math Internal Assessment, where I explored the Susceptible-Infected-Recovered (SIR) model of disease spread (well technically I did SZR model). The concepts I learned there seemed to work well for current task.
Additionally, being a fan of zombie-themed shows and series, I thought that modeling a zombie outbreak would add an engaging narrative to the project. Combining these elements, I designed a simulation that not only explored cellular automata but also offered a creative and interactive way to visualize infection dynamics.

Process

The development process started with studying cellular automata and experimenting with simple rulesets to understand how basic principles could lead to complex behavior. After following coding tutorials to build a foundational understanding, I modified and expanded on these ideas to create a zombie outbreak simulation. The automata were structured to include four states, empty, human, zombie, and dead, each with defined transition rules.
I implemented the grid and the rules governing state transitions. I experimented with parameters such as infection and recovery rates, as well as grid sizes and cell dimensions, to observe how these changes affected the visual patterns. To ensure interactivity, I developed a user interface with sliders and buttons, allowing users to adjust parameters and directly interact with the simulation in real time.

How It Works

The simulation is based on a grid where each cell represents a specific state:
  • Humans: Are susceptible to infection if neighboring zombies are present. The probability of infection is determined by the user-adjustable infection rate.
  • Zombies: Persist unless a recovery rate is enabled, which allows them to turn back into humans.
  • Dead Cells: Represent the aftermath of human-zombie interactions and remain static.
  • Empty Cells: Simply occupy space with no active behavior.
At the start of the simulation, a few cells are randomly assigned as zombies to initiate the outbreak, and users can also click on any cell to manually spawn zombies or toggle states between humans and zombies.
Users can interact with the simulation by toggling the state of cells (e.g., turning humans into zombies) or by adjusting sliders to modify parameters such as infection rate, recovery rate, and cell size. The real-time interactivity encourages exploration of how these factors influence the patterns and dynamics.

Code I’m Proud Of

A part of the project that I am particularly proud of is the implementation of probabilistic infection dynamics

if (state === HUMAN) {
  let neighbors = countNeighbors(i, j, ZOMBIE);
  if (neighbors > 0) {
    if (random() < 1 - pow(1 - infectionRate, neighbors)) {
      nextGrid[i][j] = ZOMBIE;
    } else {
      nextGrid[i][j] = HUMAN;
    }
  } else {
    nextGrid[i][j] = HUMAN;
  }
}

This code not only introduces a realistic element of risk-based infection but also produces visually interesting outcomes as the patterns evolve. Watching the outbreak spread dynamically based on these probabilities was quite fun.

Challenges

One of the main challenges was balancing the simulation’s performance and functionality. With many cells updating at each frame, the program occasionally slowed down, especially with smaller cell sizes.  I also tried adding some features (cure) which I later removed due to lack of visual engagement (other structures might suite it better), of course such simulation in itself is oversimplification so you have to be mindful when adding parameters.

Reflection and Future Considerations

This project was a good opportunity to deepen my understanding of cellular automata and their potential for creating dynamic patterns. The combination of technical programming and creative design made the process both educational and enjoyable. I’m particularly pleased with how the interactivity turned the simulation into a fun engaging experience.
Looking ahead, I would like to enhance the simulation by introducing additional rulesets or elements, such as safe zones or zombie types with varying behaviors. Adding a graph to track population changes over time would also provide users with a clearer understanding of the dynamics at play. These improvements would further expand the educational and aesthetic appeal of the project. Furthermore, I could switch from grid cell to other structures similar to real life scenarios.