For my final project in Decoding Nature, I built FALAJ, an interactive artwork that simulates the ancient Emirati falaj irrigation system.
The Falaj
A falaj is one of the oldest water systems in the world. It works entirely on gravity, with water flowing from an underground source called the Umm Al Falaj through carved stone channels down to farmland and date palms below. No pumps, no machinery, just water finding its natural path downhill. The earliest falaj systems in the UAE were found in Al Ain, and scientists have confirmed they are over 3,000 years old (UAE History and Culture). The Al Ain oasis, which still has working aflaj today, is recognized as a UNESCO World Heritage Site (UNESCO).
What makes the falaj special is the dawran, a time-based system where each farmer receives water for a set period before it moves to the next plot. It is one of the earliest examples of a community sharing a natural resource fairly, managed by time rather than ownership.
The Idea
This course taught me to look at nature differently. The falaj is something I grew up around in the UAE without ever really thinking about it. Studying natural systems this semester made me see it as something worth exploring more deeply.
The challenge was figuring out how to bring it to life visually. I thought about it for a long time. Should it look realistic, should it be a diagram, should it feel like a game? Earlier in the semester we visited teamLab and I saw Waterfall of Light Particles. That experience stayed with me. teamLab does not simulate water realistically, they express it as light, as movement, as something you feel rather than understand. When I started thinking about the falaj, that approach made complete sense. Water flowing through ancient stone channels is already something beautiful and alive. It deserved to be shown that way.
That became the goal of FALAJ. Not a diagram, not an educational tool. A living visual piece that lets you feel how this ancient system works.
Implementation Details
FALAJ was built phase by phase, with each stage adding a new layer on top of the last. It was a long process with many rebuilds and unexpected challenges along the way. What you see in the final sketch is the result of all of that.
Phase 1 — The Mother Well
Particles fall from the mother well. blendMode(ADD) makes them glow like light rather than paint.
Phase 2 — The Channel and Sharia Pool
Particles now flow down a stone channel and collect in the sharia pool.
Phase 3 — Branching and the Dawran
Water splits into three branches with the dawran rotating between them automatically. Click to switch manually.
Phase 4 — Palm Trees
Palms grow at each branch tip and respond to water level, fuller and brighter when fed, and dimmer when dry.
Phase 5 — Seasons and Polish
Four seasons with different moods, wind, and timing. Visual details like shimmer, foam, and pool depth were added.
Phase 6 — Sharia Pool and Mouse Interactions
A real water pool with rising and falling levels. Each season gets its own mouse interaction.
Phase 7 — Intro, Stars and Ground
An intro fade-in sequence was added. Winter stars appear in the sky. A solid ground plane anchors the palms to the scene.
Phase 8 — Design Polish
Bigger palms, seasonal ground texture, smooth season transitions, a unified HUD, and water rates tuned.
Final Sketch — FALAJ
Water falls from the mother well through stone channels into the sharia pool. The dawran timer rotates water between three date palms. You can redirect it manually by clicking the selector dots. Palms respond visually to how much water they receive. Dates ripen in the summer and can be harvested by clicking the crown. Four seasons cycle with different moods, wind, and ground textures. Each season has its own mouse interaction. In Winter, stars and shooting stars appear in the sky.
Technical Implementation
Particle Systems
420 particles, each with its own lifespan, visibility, and trail. Only a fraction draws visible trails, which creates the sparse glow.
Used for particle wobble, channel shimmer, stone texture, and pool breathing.
let n = noise(this.x * NOISE_SC, this.y * NOISE_SC, frameCount * 0.006);
let wobble = map(n, 0, 1, -0.5, 0.5);
this.vx += wobble * 0.06 * wobbleMult;
Flocking — Separation
In Summer, the mouse repels nearby particles outward, the separation principle.
let d = dist(p.x, p.y, mouseX, mouseY);
if (d < 50 && d > 1) {
  let f = map(d, 0, 50, 0.07, 0);
  p.vx += (p.x - mouseX) / d * f;
}
Video Documentation
A walkthrough of FALAJ showing all four seasons, mouse interactions, date harvesting in Summer, season skipping, and branch redirection.
Reflection
The moment the falaj and teamLab connection clicked was when the whole project made sense to me. Water already flows naturally through ancient stone channels, expressing that as light felt right.
The dawran arc ended up being one of my favorite parts of the sketch. What started as a simple timer turned into something that actually feels like it belongs to the falaj.
Sound was the hardest part. I could not find the right audio and synthesized sounds never felt natural. Real recorded water from an actual falaj would be the first thing I would add.
If I continued, I would push the visual design further and build the historical UAE aflaj map reveal that I originally planned but did not have time to finish.
Cellular automata are simple: a row of cells, each one either on or off, and every step each cell looks at its neighbors and decides whether to turn on or off based on a fixed rule. From these tiny local rules, complex patterns emerge. It’s how zebra stripes form, how seashell patterns grow, and how forest fires spread.
That got me thinking about my cultural background. Zellige is the Islamic tilework you see across the Alhambra in Granada, the Alcázar of Seville, the madrasas of Fez, and the Mezquita of Córdoba. It’s made of small hand-cut glazed ceramic pieces assembled into geometric patterns on walls and floors, using a traditional shared palette (cobalt, green, white, manganese, ochre, red, turquoise). What makes it special is that these aren’t just beautiful patterns, they’re mathematical systems. Islamic artisans figured out how to make infinite complexity from simple local rules, centuries before computers.
So my question was: what if these artisans had cellular automata? Same traditional colors, same symmetry principles, but a new way of generating the shapes inside. It’s not a reconstruction, it’s an alternate history experiment.
About rules: a rule is an instruction card. Each cell looks at three things (left neighbor, itself, right neighbor) and the rule decides what it becomes next. There are 256 possible rule cards, numbered 0 to 255. Rule 90 makes fractal triangles, Rule 30 makes static, Rule 110 makes moving shapes. Every time the sketch generates a new zellige, the code picks a random number 0 to 255, and that’s the rule that shapes the pattern.
I picked four Andalusian monuments as inspiration: the Alhambra (Granada), the Alcázar of Seville, the Bou Inania Madrasa (Fez), and the Mezquita of Córdoba. Real Islamic tilework in all four uses many symmetries. In this sketch, each city is given one specific symmetry count (Alhambra 8, Seville 6, Fez 12, Cordoba 4) as a creative simplification, so each mode has its own personality. That’s an artistic choice, not historical reconstruction.
The cleanest piece of code is the rules function. Originally, it was 8 long if-else statements, one for each neighbor combination. Using bit shifting, it becomes two lines:
function rules(a, b, c) {
  let index = (a << 2) | (b << 1) | c;
  return ruleset[7 - index];
}
a, b, c are each 0 or 1. The expression (a << 2) | (b << 1) | c treats them as three binary digits that combine into a number from 0 to 7, which is the index into the ruleset. Eight branches of code replaced by one math expression.
Embedded sketch
The zellige fills the top of the canvas, with a control strip below it. Click the zellige for a new one with a random rule. The four city buttons switch palettes and fold counts. The zoom button toggles a magnifier lens that follows the mouse. Pause/play stops or resumes the auto cycle. The caption at the bottom shows the current rule number, its binary form, and fold count.
Milestones and challenges
The sketch was built in five phases, each solving one problem.
Phase 1 — From line to ring. Bent the class 1D CA into a circle so time flows outward. The result was a lopsided crescent with a seam where the ends of the cell array met.
Phase 2 — Wedges. Used a short cell array representing one wedge, drawn 8 times around the center. First clean rotational symmetry, a pinwheel look.
Phase 3 — Mirrored wedges. Added mirror symmetry by flipping every other wedge, so neighbors look like reflections of each other (the way real zellige does). With Rule 90 the result looked the same as Phase 2, which confused me, but testing Rule 110 proved the flipping was actually working.
Phase 4 — Palette and center. Zellige colors cycling ring by ring, cells as diamonds, star ornament at the center. First phase that actually looked like tilework.
Phase 5 — Interactive final. Added the four city modes, the control panel, the magnifier lens, and auto cycle.
The two biggest challenges were:
The seam. When I first bent the line into a circle, the pattern broke where the start and end of the cell array met. Splitting the cells into wedges (Phase 2) fixed it.
The magnifier bug. At first, the zoom lens kept drawing itself onto the canvas, then capturing that in the next frame, until the screen filled with circles. I fixed it by drawing the zellige on a hidden layer and having the lens read from that clean copy.
Reflection and future work
The biggest thing I learned is that simple rules can produce deep beauty. Rule 90 is just eight yes/no answers, but its outputs look like medieval tile panels, snowflakes, and seashells. Islamic artisans and Wolfram’s rules are solving the same problem from opposite directions, both arriving at the same family of patterns.
This sketch is an interpretation, not a reproduction. The zellige palette is historically documented, but the fold counts per city, the cell shape, and the CA rules driving the patterns are creative choices. Real Islamic tilework uses far more variety in every monument. That’s the alternate history framing: what might these traditions look like if this tool had existed for them?
Future work:
Sample real colors from photos of each monument
Use traditional motifs at the center instead of a simple star
Let each city use more than one fold count
Try different cell shapes like stars or arrows, not just diamonds
Before oil, the Arabian Gulf had pearls. Every summer during Al Ghous Al Kabir (The Big Dive), fleets of wooden Dhows sailed out while divers plunged to the seafloor with nothing but a nose clip, a collection bag, and Al Zubail, a stone weight tied to the leg to help them sink. The only thing connecting them to the surface was Al Yada, a rope held by a crew member on the Dhow.
This sketch simulates that dive. The player controls a pearl diver descending from a Dhow into the Arabian Gulf, collecting pearls from the seabed before their breath runs out. The visual concept came from Xavi Bou’s Ornitographies, making invisible motion visible. Here, the diver’s path through the water is the thing being revealed.
Sketch
Code I’m Proud Of
The most interesting part is how forces stack underwater. Three things push against each other every frame:
// Dive toward mouse
Body.applyForce(diver, diver.position, { x: fx, y: fy });

// Tidal current fights you sideways
Body.applyForce(diver, diver.position, { x: currentX, y: currentY });

// Oxygen drains faster the deeper you go
let depthDrain = map(diver.position.y, MIN_DIVER_Y, 578, 0.1, 0.22);
oxygen -= depthDrain;
None of these forces work alone, they fight each other. That tension is what makes the dive feel hard, which felt true to the history. The current also shifts direction every few seconds, so the player can never fully settle.
Process and Challenges
The sketch was built in stages, each one adding a new layer of physics or visual detail.
Phase 1 — Engine and water
Just the physics engine running inside p5.js. Nothing moves yet, just proving the two libraries work together.
Phase 2 — First bodies: seafloor, dhow, diver
A circle for the diver, a rectangle for the seafloor, and one for the Dhow. The diver falls under gravity and lands on the floor. No control yet, just physics bodies existing in the world.
Phase 3 — Forces: buoyancy and diving
Gravity is turned off. Everything is now controlled through applyForce. Buoyancy pushes the diver up every frame. Holding the mouse pushes it toward the cursor. This is where it first felt like something underwater.
Phase 4 — Rope, Collision Events and Pearls
Oyster shells added as sensor bodies. A collisionStart event fires when the diver touches one, spawning a glowing pearl. The rope connects the diver to the Dhow using manual distance math, drawn as a bezier curve. A top boundary stops the diver from floating above the water surface.
Phase 5 — Final
Already embedded above. The final version added everything that made it feel like the Gulf: the drawn Dhow with sail and rigging, the pearl diver figure with Al Zubail stone weight, gradient sky, animated wave surface, sun, clouds, fish, seaweed, bubbles, splash on water entry, the two phase return journey, oxygen system draining faster with depth, and shifting underwater currents that push the diver off course every few seconds.
Reflection
What surprised me was how much the history shaped the design. The rope length, the oxygen mechanic, the stone weight, these are not decorative details. They are the actual constraints real divers worked within. Simulating even a simplified version of them made the difficulty feel earned, not arbitrary.
Things I would add with more time: varying pearl depths, a multi dive scoring system, and an automatic rope pull mechanic like the real Al Seib, pulling the diver up whether they are ready or not.
I wanted to simulate a desert sandstorm, specifically a haboob, which comes from the Arabic word هبوب meaning “blasting wind.” The idea was simple: start calm, build slowly, hit a peak, then fade back to silence and repeat.
I looked into how sandstorms actually work. Turns out there are three types of particles in a real storm. Heavy grains that barely move on the ground, medium grains that bounce and leap, and fine dust that the wind just carries completely. That’s exactly what the three particle types in this sketch are based on.
For inspiration I looked at Ryoichi Kurokawa, he makes audiovisual pieces that build tension slowly and let silence do the work. And Robert Hodgin who has been making flocking simulations for over 20 years and finds something new in them every time.
Code I’m proud of
The part I like most is how new particles are born from existing ones. A sand grain on the ground gets knocked loose and becomes a bouncing grain. A bouncing grain kicks up dust. The storm builds itself, I didn’t script it, it just emerges.
let source = random(creeps);
flock.addBoid(new Boid(source.pos.x, source.pos.y, 'saltation'));
A new particle appears at the exact position of an existing one. That one line is basically the whole storm.
Embedded sketch
Milestones
Milestone 1 — Stillness
Dark canvas, 28 tiny sand specks near the bottom barely moving.
Milestone 2 — Wind starts
Wind builds, first bouncing amber grains appear born from the sand grains below.
Milestone 3 — Three layers
Fine dust forms from bouncing grains and fills the entire canvas. Three layers, three speeds, that’s the haboob.
Milestone 4 — Peak and settling
Everything turns orange-red at the peak, wind stops, dust disappears first, then the bouncing grains slow down.
Milestone 5 — The loop
Screen fades to black, new grains fall from the top, storm restarts with grains in different positions. See the embedded sketch above.
Reflection
The arc feels right, calm, tension, peak, silence, reset. It reads like a real storm. If I were to push it further I’d add sound. Wind building, a deep rumble at the peak, then silence. I’d also experiment with a horizon line and different times of day; a golden hour haboob looks completely different from a midday one.
I wanted to build something that felt genuinely alive, not just shapes moving around a screen, but a system with real logic behind it. I kept coming back to one question: how do ants form those perfect lines without anyone telling them where to go?
The answer is surprisingly simple. One scout finds a path and leaves a chemical trail called a pheromone. Workers smell it and follow. The more ants walk the same path, the stronger the smell, the more ants follow. A highway emerges from nothing, no leader, no plan, just chemistry.
That became the concept. You are the scout. Move your mouse, and the colony follows the exact path you traced. Stop moving, and the scout breaks away to investigate the environment on its own, sniffing nearby rocks while the workers wait in place.
The moment that made everything click was the pebble investigation system. When the mouse stops, the scout doesn’t just freeze, it actively searches for the nearest rock within 120 pixels and slowly approaches it, like an ant sniffing an obstacle. When it gets close enough it clears that target and finds the next one.
// ── LEADER
if (mouseStill) {
  // slow crawl speed while exploring
  leader.maxSpeed = 0.5;
  // clear pebble target once scout is close enough
  if (targetPebble) {
    let d = dist(leader.pos.x, leader.pos.y, targetPebble.x, targetPebble.y);
    if (d < SEEK_STOP) targetPebble = null;
  }
  // find a new pebble if not already investigating one
  if (!targetPebble) targetPebble = findNearestPebble();
  // arrive at pebble slowly, or wander if none nearby
  if (targetPebble) leader.arrive(createVector(targetPebble.x, targetPebble.y));
  else              leader.wander();
What I love about this is that it uses the same arrive() behavior the whole project is built on, just at a slower speed. One behavior, three different contexts: following the mouse, following history points, investigating a rock. That reuse felt elegant.
Embedded Sketch
Milestones and Process
Phase 1 — Getting the chain to work
Started with two plain circles. One follows the mouse using arrive. Every frame, its position gets saved into a history array. The second circle targets history[40], where the first was 40 frames ago. That delay creates the following effect. The main challenge was stopping them from overlapping when the mouse stopped, fixed by only recording history when the leader actually moved.
Phase 2 — Scaling to a colony
Scaled from one follower to seven using a simple loop. Each ant targets a different point further back in history. Added real ant bodies, the sandy background, and separation logic between every pair of ants so they never overlap.
Phase 3 — The Final Sketch
Added the fading pheromone trail, pebble investigation when the mouse stops, workers freezing while the scout explores, and a custom glowing cursor. The final version can be found embedded above.
Reflection and Future Ideas
The biggest surprise was how little code produces this behavior. A five-line loop creates the chain. One Perlin noise value creates the wander. Simple rules, complex result, exactly what the ant research described.
Future ideas:
Add a real food source that the scout can find and bring workers to complete the full foraging loop
Two competing colonies with different trail colors racing to the same food
Make the trail actually fade so workers that fall too far behind lose the scent and wander off alone
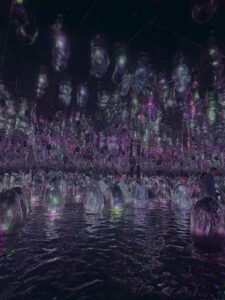
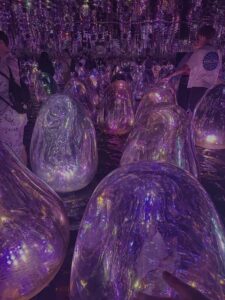
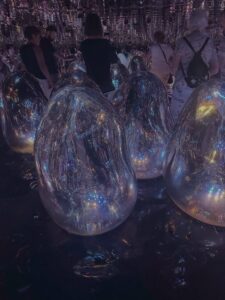
I visited teamLab Phenomena Abu Dhabi and chose the artwork called “Floating Microcosms.” Here is the official video from teamLab showing the installation:
It is a dark room with shallow water on the floor. Egg-shaped glass sculptures called “ovoids” float on the water. When you push one, it tilts, glows with color, and makes a sound. Then the eggs around it respond one after another, a wave of light that spreads across the room. The ceiling is a mirror, so everything reflects upward.
Here are some photos I took when I visited:
Why I Chose This
The interaction is so simple: push an egg, but what happens is beautiful. One touch creates a chain reaction of light across the whole room. It makes you feel like you are part of the artwork. I also liked how the eggs look alive, they float, they glow from inside, and the colors keep changing.
Code I Am Proud Of
The chain reaction that fades with each hop. When you click one ovoid, it tells its neighbors to light up, but weaker. Those neighbors tell their neighbors even weaker. After 2-3 hops, it dies out, so not every egg lights up. Just the nearby ones.
let nextStrength = strength * 0.4;
if (nextStrength > 0.15) {
  for (let other of ovoids) {
    if (other === this) continue;
    let d = dist(this.x, this.y, other.x, other.y);
    if (d < 160) {
      let delay = floor(map(d, 0, 160, 20, 50));
      other.chainTimer = delay;
      other.chainStrength = nextStrength;
    }
  }
}
Direct click = strength 1.0. First neighbors get 0.4. Their neighbors get 0.16 too weak to keep going. This makes the wave fade naturally, just like the real installation.
Creative twist: “Water Memory.” In the real artwork, the water goes dark after each interaction. In my version, every touch leaves glowing color marks on the water that slowly fade. After many clicks, the water becomes a colorful painting of everywhere you have touched.
Embedded Sketches
Phase 1 — The Scene
Dark room, visible water, ovoids floating with internal swirl patterns, and a ceiling mirror. No interaction yet.
Phase 2 — Interaction
Click to glow, chain reaction that fades after 2-3 hops, ripples, mouse push, ceiling mirror lights up.
Final — Water Memory
Same as Phase 2 plus the creative twist: colored marks stay on the water after each touch.
Milestones and Challenges
Chain reaction spreading everywhere. My first version activated all neighbors at full strength; every egg in the room lit up from one click. The fix was to make each hop weaker (strength × 0.4 each time), so it dies out after 2-3 rings.
Water not visible. My first water was too dark, almost the same color as the ceiling. I made it much lighter (dark blue-purple) and added a bright shimmer line at the surface edge.
Reflection and Future Work
My sketch captures the core of “Floating Microcosms”: push an egg, watch light spread. But the real artwork has things I cannot recreate: the physical feeling of pushing a real sculpture, the sound each egg makes, warm water on your feet, and the infinite mirror ceiling.
Ideas for the future:
Add sound so each ovoid plays a tone when it glows
Use WebGL for real 3D translucent eggs
Make ovoids bump into each other when they collide
It is not a painting or an image I drew. It is a program that creates a new desert landscape every time you run it. The dunes grow, move, shake, get rained on, and then settle into a final peaceful scene, all on their own, with no human drawing anything.
The system moves through four stages, like a story:
Wind — pushes the sand around and builds up the dunes
Tremor — the ground shakes, and the dunes collapse and spread out
Rain — water smooths everything down and darkens the sand
Stillness — everything stops. The desert rests
Every time you press “New Seed,” you get a completely different desert. Same rules, different result. That is what makes it generative art: the system creates the art, not me.
Why a Desert?
I am from the UAE. I grew up around the desert. Most people think sand dunes just sit there, but they actually move and change shape constantly. Wind pushes sand from one side to another. After a storm, the dunes look completely different. When it rains (which is rare), the sand turns dark and the surface becomes smooth.
I wanted to recreate that in code. Not a realistic photograph, but the feeling of how a desert changes over time.
How It Works — The Big Idea
Layers Create Depth
The desert you see on screen is made of seven layers stacked on top of each other, like layers of paper. The layers in the back are pale and barely move. The layers in the front are golden, tall, and move faster. This creates a feeling of distance and depth, even though everything is flat.
Each layer has its own terrain, a line of hills and valleys that represents the top of the sand. This terrain is stored as a list of numbers. Each number says, “how tall is the sand at this spot?” When the program draws the layer, it connects all those heights with smooth curves, fills everything below with color, and that is your dune.
The Sky Changes With Each Phase
The sky is not just a static background. It changes color depending on which phase is active:
Wind has a warm golden sunset sky
Tremor has a dark, heavy, ominous sky
Rain has a cool grey-blue sky
Stillness has a peaceful, warm dawn
The sky smoothly fades from one palette to the next when the phase changes. This makes the transitions feel natural instead of sudden.
The Four Phases — What Each One Does
Wind — Building the Dunes
This is the first and most important phase. The wind is what gives the dunes their shape.
Here is how it works in simple terms: the program looks at each point on the terrain and asks, “how strong is the wind here?” The wind strength is not random; it uses something called Perlin noise, which creates smooth, flowing patterns (think of it like a weather map where nearby areas have similar wind). Where the wind is strong, it picks up sand from that spot and drops it a little further along. Over many frames, this creates realistic dune shapes, ridges, valleys, and peaks.
But there is a problem: if sand just piles up forever, you get impossibly steep spikes. That does not happen in real life because sand slides when it gets too steep. So the program checks every point: “is the slope here steeper than sand can actually hold?” If yes, the excess sand slides down to the neighbors. This rule is called the angle of repose and it is from real physics.
There is also a safety check: the total amount of sand never changes. Sand is not created or destroyed, only moved from one place to another. This keeps the terrain looking realistic.
// Wind force from Perlin noise
let windNoise = noise(i * 0.05, t + layer.seedOffset * 0.001);
let windForce = map(windNoise, 0, 1, -0.4, 0.4 + WIND_BIAS) * spd;

let amount = windForce * windStrength;

// Move sand in wind direction
let target = windForce > 0 ? i + 1 : i - 1;
target = constrain(target, 1, NUM_POINTS - 2);

h[i] -= amount;
h[target] += amount;
Tremor — Shaking Things Up
After the wind has built up nice, tall dunes, the ground shakes.
The tremor does not just wobble the screen. It actually changes the terrain. Here is what happens:
Tall dunes collapse. The program finds every point that is above average height and pulls it downward. The sand that falls off the top gets spread to nearby points. So tall, sharp dunes become wider and flatter, just like real sand behaves during a sandstorm.
The layers shake. Each layer moves up and down by a small random amount every frame. The front layers shake a lot, the back layers barely move. This creates a convincing sandstorm effect.
Dust rises. Small brown particles spawn from the tops of the front dunes and float upward, like dust being kicked up by the vibration.
The tremor starts gently and builds up over time (a “cold start”), which makes it feel like a real sandstorm building in intensity.
let diff = h[i] - avg;

if (diff > 0.01) {
  let fall = diff * TREMOR_EROSION * spd * (0.2 + power);
  h[i] -= fall;

  // Sand spreads to 3 neighbors on each side
  h[i - 1] += fall * 0.22;
  h[i - 2] += fall * 0.15;
  h[i - 3] += fall * 0.08;
  h[i + 1] += fall * 0.22;
  h[i + 2] += fall * 0.15;
  h[i + 3] += fall * 0.08;
}
Rain — Smoothing Everything
Rain does two things to the terrain:
Splash erosion. When rain hits sand, it smooths it out. In the code, each point’s height gets averaged with its two neighbors. High points go down a little, low points come up a little. Over time, this erases sharp edges and makes everything gentler.
Water flows downhill. Wherever one point is higher than the next, some sand flows from the high side to the low side, like water carrying sediment. This flattens the terrain even further.
You can see raindrops falling on the screen as small white streaks. When a drop hits the front dune, it kicks up 2-3 tiny sand splash particles that fly upward, a small detail that makes it feel alive.
The coolest visual effect in this phase is the wet sand. When it rains, the sand slowly darkens. Each layer has two colors: a dry color (warm golden) and a wet color (dark brown). As rain continues, the colors blend toward the wet version. The back layers get very dark grey-brown, and the front layers get rich brown. This creates a strong sense of depth when everything is wet; you can clearly see each layer separated by color.
// Blend between dry and wet color based on wetness
let r = lerp(this.dryColor[0], this.wetColor[0], this.wetness);
let g = lerp(this.dryColor[1], this.wetColor[1], this.wetness);
let b = lerp(this.dryColor[2], this.wetColor[2], this.wetness);
fill(r, g, b);
Stillness — The Quiet Ending
Nothing moves. The terrain is frozen exactly as the rain left it. The sand slowly dries back to its original golden color. Any remaining shake from the tremor settles to zero. The sky fades to a warm, peaceful dawn.
This is the “take a photo” moment. The desert has been through wind, tremor, and rain, and now it rests.
The Auto Timeline
The sketch runs all four phases automatically in sequence. You just press play and watch:
Wind runs for 10 seconds
Tremor runs for 8 seconds
Rain runs for 9 seconds
Stillness stays forever
Press Space to start over with a brand new landscape.
The Controls
There is a thin bar at the top of the screen with simple controls:
Wind / Tremor / Rain / Still — click any phase to jump to it manually
When you select a phase, a slider appears that lets you adjust that phase’s strength (how strong the wind blows, how powerful the tremor is, how fast the rain erodes)
Auto — toggles the automatic timeline on/off
New Seed — generates a completely new desert
The UI was designed to be minimal and not distract from the artwork. It uses warm gold text on a dark transparent bar, matching the desert color palette.
Techniques From Class
This project uses several techniques we learned in class:
Perlin Noise — I use noise in two ways. First, to generate the initial terrain shape for each dune layer (the hills and valleys). Second, to create the wind field, noise gives me smooth, flowing wind patterns where nearby points have similar wind strength, just like real weather.
Forces — Wind pushes sand along the terrain. Gravity pulls raindrops and dust particles downward. The angle of repose redistributes sand when slopes are too steep. These are all force-based systems.
Classes — I built three classes to organize the code:
DuneLayer handles everything about one layer of dunes (its height, color, position, drawing)
Sky manages the gradient background and phase transitions
ParticleSystem handles all the floating particles (dust, rain, splashes)
Arrays — Each dune layer stores its terrain as an array of 150 height values. All the physics (wind, tremor, rain) works by reading and modifying these arrays every frame.
Oscillation — During the tremor phase, each layer shakes up and down in a jittery motion. Front layers shake more, back layers shake less, creating a convincing depth effect.
Color Lerping — The lerp() function blends between two values smoothly. I use it everywhere: blending sky colors between phases, blending sand between dry and wet colors, fading particle transparency, and fading the phase label text.
The Three Prints
I captured three high-resolution images from the system, one from each active phase. Together, they tell the story of one desert going through three stages of change.
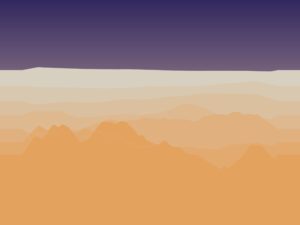
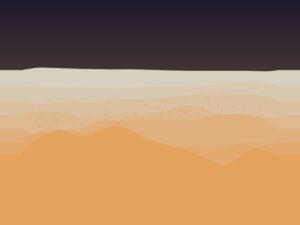
Print 1 — Wind
Warm golden sky. Sharp dune ridges carved by wind. The sand is dry and bright. This is the desert being actively shaped, the most dynamic moment.
Print 2 — Tremor
Dark, heavy sky. The tall dunes from the wind phase have collapsed and spread out. Dust particles hang in the air. The landscape has been shaken apart.
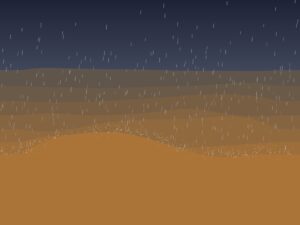
Print 3 — Rain
Cool grey-blue sky. White rain streaks fall across the scene. The sand has turned dark brown from moisture. The terrain is smoother, peaks are lower, and sharp edges are gone. A quiet, moody moment.
Video
A walkthrough of the full system: the auto timeline playing through all four phases, followed by manual switching between modes and adjusting the strength sliders.
How I Built It — The Process
I did not build everything at once. The project was developed in six phases, each one adding a new feature on top of the last. I tested each phase and made sure it worked before moving on:
Phase 1 — Foundation. I built the seven-layer dune system, the sky gradients, and the smooth curve rendering. No physics yet, just the visual base. The big decision here was making each layer auto-calculate all its properties (color, height, position, speed) from just its index number. This meant I could change the number of layers without rewriting anything.
Phase 2 — Wind. Added wind transport and slope stability. This was the hardest part of the whole project. If the wind is too strong, everything flattens instantly. If the slope rules are too strict, nothing interesting happens. Finding the right balance took a lot of trial and error. I also tried adding floating wind particles at first, but they looked messy and disconnected from the terrain. I removed them; the dune movement itself shows the wind better than any particle could.
Phase 3 — Tremor. Added the tremor effect with peak erosion, per-layer shaking, and dust particles. To activate tremor mode, press “T.” The sky transition was tricky; my first wind and tremor palettes looked too similar, so the change was not noticeable. I made the palettes more distinct and sped up the transition. I also experimented with a dust haze overlay, but it looked like a flat layer on top of the terrain, so I removed it.
Phase 4 — Rain. Added splash erosion, runoff, raindrops, and the wet sand color system. To activate rain mode, press “R.” The rain went through many iterations. At first, it came in bursts instead of a steady drizzle, so I adjusted the spawn rate and distributed drops across the full screen height. The wet sand color also needed depth-aware tuning: initially, all layers darkened to the same tone, which made the back layers hard to see. Assigning each layer a different wet color (darker for the back, warmer for the front) fixed this issue.
Phase 5 — Stillness + Timeline. Added the fourth phase, where everything stops, and the auto timeline that advances through all four phases automatically. A small phase label fades in at the bottom-left when each phase starts.
Phase 6 — UI. Added the top bar with phase buttons, contextual sliders, auto toggle, and a new seed button. The first version was a big panel on the right side, but it took too much space and did not feel right for a class project. I simplified it to a thin bar at the top.
What I Learned and What I Would Change
What works well:
The seven layers create a real feeling of depth and distance
The phase transitions feel smooth and natural, sky and terrain change together
The wet sand darkening during rain is subtle but makes a big difference
The auto timeline tells a complete story without any user input
What I would do differently next time:
Add a 3D perspective view instead of the flat side view, this would make the prints more dramatic
Add sound, wind howling, rain pattering, ground rumbling during tremor
Make the timeline longer with slower, more gradual transitions
Add mouse interaction, drag to create wind, click to trigger tremors
Try different environments, snow, ocean waves, volcanic landscapes using the same system
References
R.A. Bagnold — The Physics of Blown Sand and Desert Dunes (1941). The classic science book about how wind moves sand and shapes dunes. This is where I learned about saltation (how wind picks up and drops sand grains).
Angle of Repose — A concept from granular mechanics (the science of how piles of material behave). It is the steepest angle a pile of sand can have before it slides. This rule is what keeps my dunes looking realistic.
Ken Perlin — Perlin Noise (1983). The algorithm I use to generate smooth, natural-looking randomness for both terrain and wind patterns.
Soil Liquefaction — A real phenomenon where vibration makes sand temporarily act like liquid. This is the idea behind my tremor phase.
Daniel Shiffman — The Nature of Code. The textbook for this course. Used as a general reference for forces, noise, and particle systems in p5.js.
I’m building a generative desert landscape. Not a drawing of a desert, a system that grows one. Dunes form, shift, break apart, and settle, all on their own, driven by wind, tremors, and rain.
The title is “Shifting Grounds.”
The system moves through four phases like a timeline:
Wind → Ground Tremor → Rain → Stillness
Wind pushes sand around and builds dunes
Ground Tremor shakes things up, dunes collapse and spread out
Rain smooths the surface through erosion
Stillness everything settles. The terrain stops changing. This is the frame I export for my A3 prints
The simulation runs once and ends. It doesn’t loop.
Why a Desert?
I’m from the UAE. The desert isn’t just a landscape to me, it’s something I grew up around. I’ve always noticed how dunes shift and reshape themselves. Sand looks still but it never really is.
I want to explore that through code. How do dunes actually get their shape? Why are some tall and some flat? What happens when wind hits a ridge? This project is my way of digging into those questions and turning them into generative art.
Design — How Will It Work?
The Height Map
Instead of simulating thousands of sand particles (which is way too complex and slow), I’m using a height map. It’s just an array:
Each index is a column on the canvas. The value is how tall the sand is at that spot. When I draw it, I fill from the bottom up to the height. That gives me a terrain profile, like a side view of the desert.
Why this approach:
Way more stable than particles
Easier to control
Better for high-res A3 output
Clean and simple
Rendering
The look is minimal. Warm sandy monochrome palette. Shading is based on slope:
fill(baseColor - slope * contrast)
Steep slopes = darker. Flat areas = lighter. This fakes sunlight hitting the dunes from the side and creates a 3D look using just math. No textures, no images, just numbers and color.
Code Design — Functions, Classes, Structure
Here’s how I’m planning to organize the code:
windPhase() — moves sand using Perlin noise for wind direction and strength. After moving sand, it checks slope stability (angle of repose) so dunes don’t become unrealistically steep
tremorPhase() — lowers the stability threshold temporarily so dunes collapse and spread. Adds small random jitter to simulate vibration
rainPhase() — averages each column’s height with its neighbors. This is what erosion does, peaks go down, valleys fill up, everything smooths out
renderTerrain() — draws the height map with slope-based shading
State Management
A variable like currentPhase controls which phase is active. Each phase runs for a set number of frames, then transitions to the next:
WIND → TREMOR → RAIN → STILLNESS
In stillness, the draw loop still runs but nothing changes. The terrain is frozen in its final form.
Key Variables
heightMap[] — the core data. One value per pixel column
windStrength — controlled by Perlin noise, varies across space
maxSlope — the angle of repose. How steep sand pile can be before it slides
currentPhase — which phase the system is in
phaseTimer — counts frames in each phase
Interactivity (Planned)
Different noise seeds = different landscapes each run
Keyboard controls to adjust wind strength or skip phases
Parameter presets for different “climates” (strong wind, heavy rain, etc.)
States and Variations
Each run of the sketch will look different because of Perlin noise; different seeds create completely different dune formations from the same rules. That’s what makes it generative. I don’t place the dunes. The algorithm does.
For my three A3 prints, I plan to create variation by:
Changing the noise seed (different dune shapes)
Adjusting wind strength and direction (some runs make tall, sharp dunes, others make gentle rolling ones)
Varying how long each phase lasts (more wind = more dramatic terrain, more rain = smoother result)
The final stillness frame from each run becomes a unique print.
The Scariest Part
The most frightening part of this project is the wind simulation.
If sand transport is too strong, everything flattens instantly, and no dunes form. If the slope stability rules are too strict, the terrain freezes before anything interesting happens. The whole project depends on finding the right balance between these forces.
What I Did to Reduce This Risk
I wrote a basic prototype that tests the two core mechanics together: wind transport and slope stability.
This isn’t the final system. It only has the wind phase. But it confirms that the core mechanic, the hardest part, actually works. The tremor, rain, and stillness phases will be simpler to add on top of this foundation.
Other Risks I’m Watching
The final print might look too simple on A3 paper. Since it is just a 1D height map, it could feel flat. I need to test it early. If it looks too basic, I might add more depth, like a fake 3D effect or layered lines. I will decide after the full system is working.
References
R.A. Bagnold — The Physics of Blown Sand and Desert Dunes (1941).
Angle of Repose — From granular mechanics. The maximum steepness a pile of sand can have before it slides.
Ken Perlin — Perlin Noise (1983).
Soil Liquefaction — When vibration makes sand temporarily act like liquid.
Aeolian Transport — The geological process of wind moving sand.
For this project, I was inspired by Memo Akten’s “Simple Harmonic Motion #12 for 16 Percussionists.” In that piece, 16 performers stand on stage, and each one receives instructions from a computer through their earpiece when to step forward, when to hit their drum, and when to turn on their flashlight. They don’t know what the bigger picture looks like. They just follow their own simple instructions. But when you watch all 16 of them together, something beautiful and complex emerges.
I wanted to translate that idea into a visual sketch. Instead of real performers, I have 16 glowing nodes arranged in a circle. Instead of a computer sending cues through earpieces, I have an invisible point, “the conductor,” that orbits around them. When it gets close to a node, that node lights up. The conductor’s path starts clean and orderly, then gradually becomes chaotic and unpredictable, then returns to order. And the viewer can use their mouse to become a second conductor, creating a tension between human control and machine control.
Code I’m Proud Of:
getActivation() method from the Shockwave class:
getActivation(nodeX, nodeY) {
    let d = dist(this.x, this.y, nodeX, nodeY);
    let distFromWave = abs(d - this.radius);

    if (distFromWave < this.activationWidth) {
      return map(distFromWave, 0, this.activationWidth, 1, 0);
    }
    return 0;
  }
What this does is pretty simple: it checks how far a node is from the wave’s current edge. If the node is within the wave’s “thickness” (60 pixels), it gets activated stronger if it’s right on the edge, weaker if it’s at the boundary. If it’s outside that band, nothing happens. So when you click, the ring expands outward and each node lights up only when the wave actually reaches it, not all at once. That one small function is what makes the whole click interaction feel like dropping a stone in water instead of just flipping a switch.
Milestones and Challenges
Stage 1: Circle of 16 Nodes. I placed 16 nodes evenly around a circle using cos() and sin(). The main challenge was getting the spacing right and making the glow effect look soft instead of harsh.
Stage 2: The Invisible Conductor I added an invisible point that orbits the circle and activates nearby nodes based on distance. The tricky part was making the activation smooth without lerp(), the nodes just snapped on and off like a light switch, which looked bad.
Stage 3: Hit Flashes and Ripples. When a node reaches peak activation, it now flashes bright and sends out a ripple ring. The challenge was making sure the hit only fires once per pass, not every single frame while the conductor is nearby. I solved this with a simple flag called wasAboveThreshold.
Stage 4: Order to Chaos to Order. This is where it got interesting. I made the conductor’s path morph between a circle, a figure-8, and random noise over a 35-second cycle. Getting the blending right took some trial and error at first; the transitions were too sudden, and it looked glitchy instead of smooth.
Embedded Sketch
Stage 5:Polish and Mouse Interactivity I added connection lines between nodes, a center glow, film grain, and mouse interactivity. The mouse acts as a second conductor with a smaller reach (so you can only affect a few nodes at a time). Clicking sends a shockwave. The biggest challenge here was combining three different activation sources (machine, mouse, and shockwave) without them conflicting with each other.
Reflection
This project taught me a lot about how simple rules can create complex-looking behavior. Each node only knows one thing: how far it is from the conductor, but when you watch all 16 together, it looks like something alive. That’s basically the same idea behind Akten’s original piece, and I think that’s what makes it so powerful. If I had more time, I’d love to add sound, maybe a soft tone or drum hit when each node gets activated, so it feels more like an actual performance. I’d also like to try it with more nodes (maybe 32 or 64) to see how the patterns change. Another idea is to let the viewer switch between order and chaos manually using a key press, so they have even more control over the composition.
A simulation of UAE falconry using flocking behavior and physics forces
Embedded Sketch
How to Interact
Move your mouse : The falcon follows and birds run away
Click : Creates a dive attack with spinning chaos
Press +/- : Add or remove birds
Press R : Reset everything
Press S : See the invisible force circles (debug mode)
Concept & Inspiration
I wanted to create something connected to UAE culture, so I chose falconry the traditional hunting practice where falcons chase desert birds called Houbara Bustards. The idea is simple: you control a falcon (the mouse), and it hunts a flock of birds. The birds try to stick together for safety, but when the falcon gets close, they scatter. There are also two green “oasis” spots where birds naturally want to gather. When you click, the falcon does a dive attack that creates a spinning vortex.
My inspiration came from:
UAE’s falconry tradition – Recognized by UNESCO as cultural heritage
perceptionRadius – How far a bird can “see” neighbors
panicLevel – Maps speed to fear (0 = calm, 1 = terrified)
maxForce – How sharply a bird can turn
Methods that organize behavior:
cohesion() – Pull toward flock center
separation() – Avoid crashing into neighbors
flee() – Escape from predator
seekOasis() – Drift toward safe zones
turbulence() – Get caught in chaos vortex
flock() – Combines all forces with priorities
2-Falcon Class (The Predator)
Variables:
wingAngle – For flapping animation
sizeMultiplier – Grows when moving fast
Methods:
follow() – Smoothly chase mouse
show() – Draw with animated wings
Global Variables
Clear names that explain themselves:
diveActive – Is turbulence happening right now?
divePos – Where did the user click?
diveDuration – Countdown timer for chaos
showDebug – Toggle for seeing perception circles
Code Highlights
Here are three pieces of code I’m particularly proud of:
1. Panic Escalation System
// FLEE: Escape from predator
// Force strength increases as falcon gets closer (gradient of fear)
flee(target) {
  let perceptionRadius = 150; // How far bird can sense danger
  let desired = p5.Vector.sub(this.pos, target); // Point AWAY from falcon
  let d = desired.mag(); // Distance to falcon

  // Only flee if falcon is within perception range
  if (d < perceptionRadius) {
    desired.setMag(this.maxSpeed); // Set to maximum speed (fleeing urgently)
    let steer = p5.Vector.sub(desired, this.vel); // Steering = desired - current
    steer.limit(this.maxForce); // Don't turn impossibly sharp

    // KEY FEATURE: Map distance to force strength
    // Close (0px) = 2x force, Far (150px) = 0.5x force
    let strength = map(d, 0, perceptionRadius, 2, 0.5);
    steer.mult(strength);

    return steer;
  }
  return createVector(0, 0); // No force if falcon is far
}
The map() function creates a gradient of fear. At 0 distance = 2x force. At 150 pixels = 0.5x force. This makes the behavior feel natural instead of just on/off. Birds don’t just “run”, they panic MORE as danger gets closer.
2. Creating the Spinning Vortex
// Create spinning vortex force
let toCenter = p5.Vector.sub(diveCenter, this.pos);
let vortex = toCenter.copy();
vortex.rotate(HALF_PI); // KEY: Rotate 90° transforms "pull" into "orbit"

// Add random chaos
let chaos = p5.Vector.random2D();
chaos.mult(random(2, 5));

// Combine structured spin + random chaos
let turbulence = p5.Vector.add(vortex, chaos);
The key insight is that rotating a force 90 degrees turns “pull toward center” into “orbit around center”. Then adding random chaos makes it unpredictable but still structured. This one line vortex.rotate(HALF_PI) is the difference between an explosion and a whirlwind.
3. Weighted Separation Force
let diff = p5.Vector.sub(this.pos, other.pos); // Point away from neighbor
diff.div(d); // IMPORTANT: Closer neighbors create stronger push
Dividing by distance means: bird at 10px pushes 10x harder than bird at 100px. This single line creates realistic personal space. It’s elegant math that produces natural behavior.
Development Milestones & Challenges
I built this in 6 steps, adding one feature at a time:
Milestone 1: Basic Birds Moving Around
I started by creating a Houbara class with basic physics: position, velocity, and acceleration. At this point, birds just drifted randomly across the screen.
Challenge: Getting the triangle shape to point in the direction they’re moving using rotate(this.vel.heading()).
At first I tried rotating without translate() first, which made all the birds rotate around the canvas origin (0,0) instead of their own centers. Solution: Use push(), then translate() to the bird’s position, then rotate(), then draw the shape, then pop(). The order matters!
Cohesion – Birds want to move toward the center of the flock
Separation – Birds don’t want to crash into each other
Challenge: At first, all the birds just merged into one blob. They were stuck together in a tight cluster.
Solution: I made the separation force stronger (1.5x weight) and gave it a smaller radius (50px vs 100px for cohesion). This creates the “nervous flock” behavior they want to stay together but maintain personal space.
Milestone 3: Falcon Chases Birds
Made the mouse act like a predator using Reynolds’ Steering Behaviors. Birds flee when the falcon gets within 150 pixels.
Challenge: The flee force was either too weak (birds didn’t care about falcon) or too strong (birds shot off screen instantly).
Solution: I used map() to scale flee force from 0.5x to 2x based on distance. This creates realistic panic where birds freak out more when danger is right on top of them. It’s a gradient instead of binary.
Milestone 4: Dive Attack Turbulence
When you click, it creates chaos at that spot. The turbulence combines two things:
A vortex that spins birds in a circle (by rotating the force vector 90 degrees)
Random chaos pushing birds in unpredictable directions
Challenge: I initially just pushed birds away from the click point, which looked like an explosion. Boring.
Solution: The breakthrough was understanding that vortex.rotate(HALF_PI) turns a “push away” force into circular motion. This creates the spinning whirlwind effect.
Milestone 5: Making It Look Good
Added visual improvements:
Created an actual Falcon class with flapping wings
Added the two green oasis spots
Birds leave motion trails
Birds change color based on speed (tan → reddish)
Sand particles scatter during dive
Challenge: I accidentally put the seekOasis() function in the Falcon class instead of the Houbara class. Got error: TypeError: this.seekOasis is not a function
Solution: Read the error message carefully! It told me exactly what was wrong. Moved the method to the correct class (birds seek oases, not falcons).
Milestone 6: Polish & Controls
Final touches:
Designed the UI with desert colors (browns and golds)
Added keyboard controls (R, +, -, S)
Made the oases pulse using sin() animation
Changed edge wrapping to bouncing physics
Made the falcon grow bigger when moving fast
Challenge: The perception circle was appearing in the wrong spot because it was inside the falcon’s rotation transformation.
Solution: I moved the circle drawing from inside Falcon.show() to the main draw() function, before any transformations are applied. Now it uses absolute world coordinates instead of the falcon’s rotated local coordinates.
The final polished version with all features is available in the embedded sketch above.
How the Forces Work Together
Each bird calculates 5 forces every frame and combines them:
cohesionForce.mult(1.0);// Want to stay with group
separationForce.mult(1.5);// Don’t crash into neighbors
fleeForce.mult(2.5);// RUN FROM DANGER (strongest)
This matches how real animals behave: immediate threats override long-term goals.
Reflection
What I Learned
Simple rules create complex patterns. Each bird only knows about its nearby neighbors, yet the whole flock moves as one. This is called “emergent behavior.”
Small numbers matter.
Changing flee force from 2.0 to 2.5 completely changed how scared birds act. The difference between good and great simulation is often just finding the right numbers.
Building step-by-step works.
Adding one feature at a time made debugging way easier than trying to do everything at once.
Theme matters.
Framing this as falconry instead of “particles following forces” made it way more interesting.
What Worked Well
Force priority system feels natural (survival > safety > togetherness)
Visual feedback makes invisible forces visible (color changes, trails, size)
Keyboard controls make it interactive
Vortex turbulence looks really cool
What I’d Improve
Plan UI design earlier instead of adding it last
Use systematic testing for force weights instead of random tweaking
Add sounds (wing flaps, bird chirps, dive whoosh)
Implement energy system (birds get tired, need to rest)
Create visual dive animation (falcon swoops before turbulence)