Midterm — “Shifting Grounds”

What Is This Project?

I built a desert that builds itself.

It is not a painting or an image I drew. It is a program that creates a new desert landscape every time you run it. The dunes grow, move, shake, get rained on, and then settle into a final peaceful scene, all on their own, with no human drawing anything.

The system moves through four stages, like a story:

  1. Wind — pushes the sand around and builds up the dunes
  2. Tremor — the ground shakes, and the dunes collapse and spread out
  3. Rain — water smooths everything down and darkens the sand
  4. Stillness — everything stops. The desert rests

Every time you press “New Seed,” you get a completely different desert. Same rules, different result. That is what makes it generative art: the system creates the art, not me.

Why a Desert?

I am from the UAE. I grew up around the desert. Most people think sand dunes just sit there, but they actually move and change shape constantly. Wind pushes sand from one side to another. After a storm, the dunes look completely different. When it rains (which is rare), the sand turns dark and the surface becomes smooth.

I wanted to recreate that in code. Not a realistic photograph, but the feeling of how a desert changes over time.

How It Works — The Big Idea

Layers Create Depth

The desert you see on screen is made of seven layers stacked on top of each other, like layers of paper.  The layers in the back are pale and barely move. The layers in the front are golden, tall, and move faster. This creates a feeling of distance and depth, even though everything is flat.

Each layer has its own terrain, a line of hills and valleys that represents the top of the sand. This terrain is stored as a list of numbers. Each number says, “how tall is the sand at this spot?” When the program draws the layer, it connects all those heights with smooth curves, fills everything below with color, and that is your dune.

The Sky Changes With Each Phase

The sky is not just a static background. It changes color depending on which phase is active:

  • Wind has a warm golden sunset sky
  • Tremor has a dark, heavy, ominous sky
  • Rain has a cool grey-blue sky
  • Stillness has a peaceful, warm dawn

The sky smoothly fades from one palette to the next when the phase changes. This makes the transitions feel natural instead of sudden.

The Four Phases — What Each One Does

Wind — Building the Dunes

This is the first and most important phase. The wind is what gives the dunes their shape.

Here is how it works in simple terms: the program looks at each point on the terrain and asks, “how strong is the wind here?” The wind strength is not random; it uses something called Perlin noise, which creates smooth, flowing patterns (think of it like a weather map where nearby areas have similar wind). Where the wind is strong, it picks up sand from that spot and drops it a little further along. Over many frames, this creates realistic dune shapes, ridges, valleys, and peaks.

But there is a problem: if sand just piles up forever, you get impossibly steep spikes. That does not happen in real life because sand slides when it gets too steep. So the program checks every point: “is the slope here steeper than sand can actually hold?” If yes, the excess sand slides down to the neighbors. This rule is called the angle of repose and it is from real physics.

There is also a safety check: the total amount of sand never changes. Sand is not created or destroyed, only moved from one place to another. This keeps the terrain looking realistic.

// Wind force from Perlin noise
let windNoise = noise(i * 0.05, t + layer.seedOffset * 0.001);
let windForce = map(windNoise, 0, 1, -0.4, 0.4 + WIND_BIAS) * spd;

let amount = windForce * windStrength;

// Move sand in wind direction
let target = windForce > 0 ? i + 1 : i - 1;
target = constrain(target, 1, NUM_POINTS - 2);

h[i] -= amount;
h[target] += amount;

Tremor — Shaking Things Up

After the wind has built up nice, tall dunes, the ground shakes.

The tremor does not just wobble the screen. It actually changes the terrain. Here is what happens:

  1. Tall dunes collapse. The program finds every point that is above average height and pulls it downward. The sand that falls off the top gets spread to nearby points. So tall, sharp dunes become wider and flatter, just like real sand behaves during a sandstorm.
  2. The layers shake. Each layer moves up and down by a small random amount every frame. The front layers shake a lot, the back layers barely move. This creates a convincing sandstorm effect.
  3. Dust rises. Small brown particles spawn from the tops of the front dunes and float upward, like dust being kicked up by the vibration.

The tremor starts gently and builds up over time (a “cold start”), which makes it feel like a real sandstorm building in intensity.

let diff = h[i] - avg;

if (diff > 0.01) {
  let fall = diff * TREMOR_EROSION * spd * (0.2 + power);
  h[i] -= fall;

  // Sand spreads to 3 neighbors on each side
  h[i - 1] += fall * 0.22;
  h[i - 2] += fall * 0.15;
  h[i - 3] += fall * 0.08;
  h[i + 1] += fall * 0.22;
  h[i + 2] += fall * 0.15;
  h[i + 3] += fall * 0.08;
}

Rain — Smoothing Everything

Rain does two things to the terrain:

  1. Splash erosion. When rain hits sand, it smooths it out. In the code, each point’s height gets averaged with its two neighbors. High points go down a little, low points come up a little. Over time, this erases sharp edges and makes everything gentler.
  2. Water flows downhill. Wherever one point is higher than the next, some sand flows from the high side to the low side, like water carrying sediment. This flattens the terrain even further.

You can see raindrops falling on the screen as small white streaks. When a drop hits the front dune, it kicks up 2-3 tiny sand splash particles that fly upward, a small detail that makes it feel alive.

The coolest visual effect in this phase is the wet sand. When it rains, the sand slowly darkens. Each layer has two colors: a dry color (warm golden) and a wet color (dark brown). As rain continues, the colors blend toward the wet version. The back layers get very dark grey-brown, and the front layers get rich brown. This creates a strong sense of depth when everything is wet; you can clearly see each layer separated by color.

// Blend between dry and wet color based on wetness
let r = lerp(this.dryColor[0], this.wetColor[0], this.wetness);
let g = lerp(this.dryColor[1], this.wetColor[1], this.wetness);
let b = lerp(this.dryColor[2], this.wetColor[2], this.wetness);
fill(r, g, b);

Stillness — The Quiet Ending

Nothing moves. The terrain is frozen exactly as the rain left it. The sand slowly dries back to its original golden color. Any remaining shake from the tremor settles to zero. The sky fades to a warm, peaceful dawn.

This is the “take a photo” moment. The desert has been through wind, tremor, and rain, and now it rests.

The Auto Timeline

The sketch runs all four phases automatically in sequence. You just press play and watch:

  • Wind runs for 10 seconds
  • Tremor runs for 8 seconds
  • Rain runs for 9 seconds
  • Stillness stays forever

Press Space to start over with a brand new landscape.

The Controls

There is a thin bar at the top of the screen with simple controls:

  • Wind / Tremor / Rain / Still — click any phase to jump to it manually
  • When you select a phase, a slider appears that lets you adjust that phase’s strength (how strong the wind blows, how powerful the tremor is, how fast the rain erodes)
  • Auto — toggles the automatic timeline on/off
  • New Seed — generates a completely new desert

The UI was designed to be minimal and not distract from the artwork. It uses warm gold text on a dark transparent bar, matching the desert color palette.

Techniques From Class

This project uses several techniques we learned in class:

Perlin Noise — I use noise in two ways. First, to generate the initial terrain shape for each dune layer (the hills and valleys). Second, to create the wind field, noise gives me smooth, flowing wind patterns where nearby points have similar wind strength, just like real weather.

Forces — Wind pushes sand along the terrain. Gravity pulls raindrops and dust particles downward. The angle of repose redistributes sand when slopes are too steep. These are all force-based systems.

Classes — I built three classes to organize the code:

  • DuneLayer handles everything about one layer of dunes (its height, color, position, drawing)
  • Sky manages the gradient background and phase transitions
  • ParticleSystem handles all the floating particles (dust, rain, splashes)

Arrays — Each dune layer stores its terrain as an array of 150 height values. All the physics (wind, tremor, rain) works by reading and modifying these arrays every frame.

Oscillation — During the tremor phase, each layer shakes up and down in a jittery motion. Front layers shake more, back layers shake less, creating a convincing depth effect.

Color Lerping — The lerp() function blends between two values smoothly. I use it everywhere: blending sky colors between phases, blending sand between dry and wet colors, fading particle transparency, and fading the phase label text.

The Three Prints

I captured three high-resolution images from the system, one from each active phase. Together, they tell the story of one desert going through three stages of change.
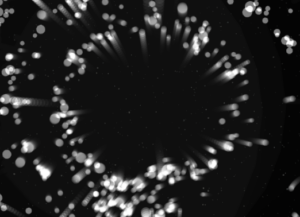
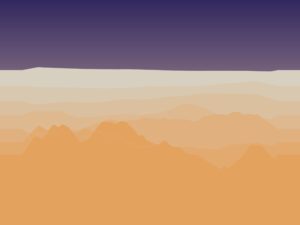
Print 1 — Wind

Warm golden sky. Sharp dune ridges carved by wind. The sand is dry and bright. This is the desert being actively shaped, the most dynamic moment.
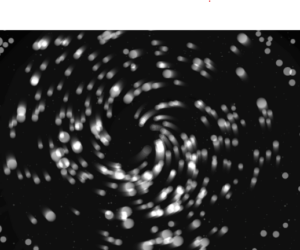
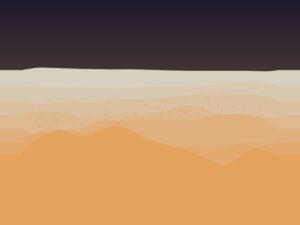
Print 2 — Tremor

Dark, heavy sky. The tall dunes from the wind phase have collapsed and spread out. Dust particles hang in the air. The landscape has been shaken apart.
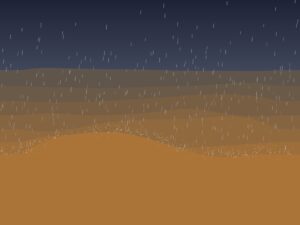
Print 3 — Rain

Cool grey-blue sky. White rain streaks fall across the scene. The sand has turned dark brown from moisture. The terrain is smoother, peaks are lower, and sharp edges are gone. A quiet, moody moment.

Video

A walkthrough of the full system: the auto timeline playing through all four phases, followed by manual switching between modes and adjusting the strength sliders.

How I Built It — The Process

I did not build everything at once. The project was developed in six phases, each one adding a new feature on top of the last. I tested each phase and made sure it worked before moving on:

Phase 1 — Foundation. I built the seven-layer dune system, the sky gradients, and the smooth curve rendering. No physics yet, just the visual base. The big decision here was making each layer auto-calculate all its properties (color, height, position, speed) from just its index number. This meant I could change the number of layers without rewriting anything.

Phase 2 — Wind. Added wind transport and slope stability. This was the hardest part of the whole project. If the wind is too strong, everything flattens instantly. If the slope rules are too strict, nothing interesting happens. Finding the right balance took a lot of trial and error. I also tried adding floating wind particles at first, but they looked messy and disconnected from the terrain. I removed them; the dune movement itself shows the wind better than any particle could.


Phase 3 — Tremor. Added the tremor effect with peak erosion, per-layer shaking, and dust particles. To activate tremor mode, press “T.” The sky transition was tricky; my first wind and tremor palettes looked too similar, so the change was not noticeable. I made the palettes more distinct and sped up the transition. I also experimented with a dust haze overlay, but it looked like a flat layer on top of the terrain, so I removed it.

Phase 4 — Rain. Added splash erosion, runoff, raindrops, and the wet sand color system. To activate rain mode, press “R.” The rain went through many iterations. At first, it came in bursts instead of a steady drizzle, so I adjusted the spawn rate and distributed drops across the full screen height. The wet sand color also needed depth-aware tuning: initially, all layers darkened to the same tone, which made the back layers hard to see. Assigning each layer a different wet color (darker for the back, warmer for the front) fixed this issue.
Phase 5 — Stillness + Timeline. Added the fourth phase, where everything stops, and the auto timeline that advances through all four phases automatically. A small phase label fades in at the bottom-left when each phase starts.
Phase 6 — UI. Added the top bar with phase buttons, contextual sliders, auto toggle, and a new seed button. The first version was a big panel on the right side, but it took too much space and did not feel right for a class project. I simplified it to a thin bar at the top.

What I Learned and What I Would Change

What works well:

  • The seven layers create a real feeling of depth and distance
  • The phase transitions feel smooth and natural, sky and terrain change together
  • The wet sand darkening during rain is subtle but makes a big difference
  • The auto timeline tells a complete story without any user input

What I would do differently next time:

  • Add a 3D perspective view instead of the flat side view, this would make the prints more dramatic
  • Add sound, wind howling, rain pattering, ground rumbling during tremor
  • Make the timeline longer with slower, more gradual transitions
  • Add mouse interaction, drag to create wind, click to trigger tremors
  • Try different environments, snow, ocean waves, volcanic landscapes using the same system

References

  • R.A. BagnoldThe Physics of Blown Sand and Desert Dunes (1941). The classic science book about how wind moves sand and shapes dunes. This is where I learned about saltation (how wind picks up and drops sand grains).
  • Angle of Repose — A concept from granular mechanics (the science of how piles of material behave). It is the steepest angle a pile of sand can have before it slides. This rule is what keeps my dunes looking realistic.
  • Ken Perlin — Perlin Noise (1983). The algorithm I use to generate smooth, natural-looking randomness for both terrain and wind patterns.
  • Soil Liquefaction — A real phenomenon where vibration makes sand temporarily act like liquid. This is the idea behind my tremor phase.
  • Daniel ShiffmanThe Nature of Code. The textbook for this course. Used as a general reference for forces, noise, and particle systems in p5.js.


Amal – Assignment 7

Inspiration

I tried to attach the video I recorded but it takes so long to download. but here is a picture instead 🙂

Reason for Choosing This Visual

I chose Massless Suns and Dark Suns because it looks simple at first, but the more you observe it, the more complex it becomes. The installation is built from glowing spheres of light, yet it feels immersive and almost physical. What interested me most was how interaction affects the space. When someone approaches a sphere, it responds, and that response spreads to nearby spheres.

I was drawn to how minimal the elements are, but how much atmosphere they create. There is no complex geometry or detailed objects, just light, spacing, and behavior. That made it a strong candidate to recreate in code because the challenge is not modeling objects, but recreating a feeling.

Highlight of Code

The part of the code I am most proud of is the “energy propagation system.”

if (a.energy > 0.55 && b.cooldown <= 0) {
  if (a.absorbing) {
    b.energy -= a.darkness * influence * 0.7;
  } else {
    b.energy += a.energy * influence;
  }
  b.cooldown = 7;
}

Instead of triggering all spheres at once, each sphere influences nearby ones based on distance. This creates a ripple effect that moves through the system rather than a flat reaction. I also modified this logic so that once a sphere becomes a dark sun, it reverses the behavior and starts removing energy instead of spreading it.

This small change made the interaction feel more dynamic and gave the system two different modes of behavior.

Embedded Sketch

First Prototype

The first prototype focused only on basic glowing circles and mouse interaction. At that stage, the spheres would brighten when the mouse was nearby, but there was no propagation or system behavior. Everything reacted individually.

This version helped me understand how to create the glow effect using layered transparency, but it felt flat and disconnected. That is what led me to introduce interaction between the spheres.

Milestones and Challenges
Milestones

1. Visual Breakdown
I started by analyzing the installation and identifying the key elements I wanted to recreate: glowing spheres, soft pulsing, and spatial interaction.

2. Orb System
I created a class for the spheres so each one could store its own position, size, and energy. This made it easier to control them individually.

3. Glow Effect
I experimented with multiple layered circles to simulate light. This was important because a single circle did not create the same visual depth.

4. Interaction
I added mouse proximity detection so the spheres respond when the viewer moves near them.

5. Ripple Behavior
I introduced energy propagation between nearby spheres, which created the chain reaction effect.

6. Creative Twist
Finally, I added the dark sun transformation, where some spheres change behavior after repeated activation.

Challenges

One of the main challenges was making the spheres feel like they emit light rather than just being colored shapes. This required layering multiple transparent shapes and adjusting opacity carefully.

Another challenge was controlling the ripple effect. If the energy spread too quickly, everything would activate at once and lose the sense of flow. If it was too slow, the interaction felt unresponsive. Finding the right balance took multiple iterations.

The biggest conceptual challenge was adding a twist without losing the original inspiration. I wanted the system to evolve, but still clearly relate to the original installation.

Reflection and Future Improvements

This project helped me understand how much of an artwork can be recreated through behavior rather than exact visuals. The installation is not defined by specific shapes, but by how those shapes respond and interact. Translating that into code required focusing on motion, timing, and relationships between elements.

The addition of dark suns made the system feel less predictable and more alive. Instead of always returning to a stable glowing state, the system changes over time based on interaction. This made the piece feel more dynamic and slightly unstable.

For future improvements, I would like to explore adding depth, possibly by introducing a 3D space or parallax movement. I would also experiment with more complex interaction, such as tracking multiple users or using sound input to influence the system.

Youssab Midterm – “ASCENT”

The Concept

I wanted to make something that felt alive. Not a simulation of something external like weather or traffic, something that felt emotionally alive. I’ve played Celeste probably four or five times at this point and I love it way more than a normal person should. There’s this moment early in the game where you first get the dash ability and suddenly this tiny pixel character feels like she can do anything. I kept thinking: how much of that is physics? How much of it is just particles and forces?

So I decided to find out.

ASCENT is a three-scene generative art piece built in p5.js. Each scene is a different visual mood and a different physics experiment, but they follow the same emotional arc as Celeste: the intro, the climb, and the heart at the summit.

The core idea was to see how much of Celeste’s feel I could reverse-engineer using particle systems and real-time physics. Not copy the game but rather understand the underlying forces that make it feel the way it does. It was more of a learning experience for me.

The Physics Behind It

The whole piece runs on a few simple systems stacked on top of each other.

Scene I uses three independent arrays of snowflake particles: background, midground, foreground; each with different speed, opacity, and size. No 3D, no perspective maths, just layering. The depth emerges from the difference in speed. Each flake also has a wobble offset that drives a sin() drift, so they move like actual snow rather than falling straight down:

this.wobble += this.wobbleSpeed;
this.x += this.drift + sin(this.wobble) * 0.35;
this.y += this.speed;

Scene II is the physics-heavy one. The player character has proper velocity, gravity, platform collision, and an 8-directional dash. I tried to match how Celeste movement actually feels snappy stops, responsive direction changes, a dash that suppresses gravity mid-flight so diagonal dashes arc instead of dropping.

Scene III is where everything comes together. The Crystal Heart puzzle: six birds orbit above the platforms, each flying back and forth in a specific direction. The player has to dash in the correct sequence  (just like the Chapter 1 bird mechanic in Celeste) and when they get it right, a cinematic kicks off that ends with a large glowing 3D heart rotating at screen centre.

Building It Up: Milestones & Challenges

Milestone 1: Getting the Player to Actually Stop Moving

This was my first real “it’s 1am and I have no idea what’s wrong” moment.

I had a keys2 = {} object and was updating it with keyPressed and keyReleased:

function keyPressed()  { keys2[key] = true;  }
function keyReleased() { keys2[key] = false; }

Seemed completely fine. But the character would just… get stuck. Once she started moving left she would never stop, no matter what I pressed. I tried everything  clearing the object on scene change, logging the state every frame, adding explicit false-sets for every possible key string.

It took me way longer than I want to admit to figure out the actual problem. In p5.js, key is a single global string that gets overwritten on every single key event. So if you’re holding A and press D at the same time, then release A, by the time keyReleased fires, key is already 'D'. You just cleared D from your map instead of A. The character is now permanently stuck going left with no way to tell her to stop.

The fix was to throw the whole system out and use keyIsDown() instead. It queries the actual hardware key state in real time directly inside update(), so it’s always accurate, never stale, and you don’t need keyReleased for movement at all:

const L = keyIsDown(37) || keyIsDown(65);   // ← or A
const R = keyIsDown(39) || keyIsDown(68);   // → or D

if      (L && !R) { this.vx = -MOVE_SPD; this.facing = -1; }
else if (R && !L) { this.vx =  MOVE_SPD; this.facing =  1; }
else              { this.vx = 0; }

The else { this.vx = 0; } line is what actually makes it feel like Celeste. No momentum, no friction just instant stop when you let go. Turned out the snappiness was a feature, not a bug I was trying to add.

Milestone 2: The Dash Edge Case

Once movement worked I ran into the dash problem. I wanted the dash to fire exactly once per button press, but keyIsDown(88) is true for every frame you hold X. First attempt it would fire 12 dashes in a row the moment you pressed the key.

The fix was a one-line edge detector. You store whether the button was down last frame, and only trigger when it transitions from up to down:

const pressed = X && !this.dashWasDown;
this.dashWasDown = X;

if (pressed && this.dashReady && !this.dashing) {
  // fire dash exactly once
}

Also had to normalise the diagonal directions so a dash moves at the same speed as a dash. If you don’t do this, diagonal dashes are 1.4× faster because the vector (1,1) has length √2. Multiplying both components by 0.7071 (which is 1/√2) brings it back to unit length.

Milestone 3: Particle Architecture

I spent a while figuring out the best way to organise the particles. I ended up giving each Player instance its own particles array so each scene manages its own effects independently. Every particle is a proper Particle class with update() and draw() methods.

The life system is what makes everything feel cohesive. Every particle starts at life = 1 and loses a random decayamount each frame. The colour, size, and opacity all interpolate from their start values down to zero:

let c  = lerpColor(color(...this.c2), color(...this.c1), this.life);
let sz = max(map(this.life, 0, 1, 0, this.sz) * PX, 1);
fill(red(c), green(c), blue(c), map(this.life, 0, 1, 0, this.maxA));

The motion blur effect on the dash is done with an offscreen createGraphics() buffer. Each frame I paint a semi-transparent dark rectangle over it before drawing the new particles, so older ones fade out gradually. It took me a few tries to find the right fade alpha too high and there’s no trail, too low and it persists forever. I landed on alpha = 30 which gives about a half-second trail at 60fps.

Milestone 4: The Bird Puzzle and Cinematic

The puzzle mechanic is the part I’m most proud of. Six birds orbit the Crystal Heart, each flying back and forth in their assigned direction using a sine wave:

b.x = b.bx + b.dx * sin(b.t) * b.range;
b.y = b.by + b.dy * sin(b.t) * b.range;

The next bird in the sequence is highlighted with a pulsing ring and shows its arrow label. When the player dashes in the right direction, that bird is collected and the next one lights up. Wrong direction and everything resets with a red screen flash.

When all six birds are collected, a cinematic state machine kicks in. This was genuinely the most fun thing to build because I got to reverse-engineer Celeste’s heart collection sequence by watching it on YouTube frame by frame and then figuring out how I would implement each part:

  • Phase 1: Birds lerp toward the heart centre using smoothstep easing (p*p*(3-2*p)) so they accelerate then decelerate naturally, then dissolve into a white screen flash
  • Phase 2: A trio of shockwave rings expands outward from screen centre as the heart begins to ease in
  • Phase 3: The heart is fully revealed rotating, glowing, filling the screen with a name card fading in beneath it

Milestone 5: The 3D Heart — Getting It Actually Right

This is the part that took the longest to get right and the part I learned the most from, so it deserves its own section.

At first I had a HeartEmitter3D class that spawned lots of small heart-shaped particles. They were there, technically, but you couldn’t really read them as a heart just a cloud of scattered red specks. It wasn’t what I wanted. I wanted one clear, large, unmistakable heart rotating at screen centre.

I kept coming back to a reference sketch we worked with in class a fire emitter that used a plane() with a texture mapped onto it and the rotating trick to make it always face the camera. The trick is this: you rotate the whole 3D world with rotateY(angle), and then inside each particle you undo that rotation with rotateY(-angle). The world tilts, but the plane stays flat toward you, a billboard. Combined with blendMode(ADD), overlapping planes accumulate light instead of occlding each other, which is what gives the glow.

Getting from “I understand the concept” to “it actually works in my sketch” took several iterations. The first few attempts I tried to fake the world rotation with spawn-position offsets, which did nothing visible because the planes still all faced the same direction regardless. The actual fix was much simpler — just wrap the emitter call in a push/rotateY/pop block exactly as the reference does:

blendMode(ADD);
push();
  rotateY(heartAngle3D);          // tilt the world
  heartEmitter.run(rate, heartAngle3D);
pop();
blendMode(BLEND);

And inside each particle’s display():

translate(this.pos.x, this.pos.y, this.pos.z);
rotateY(-heartAngle3D);   // undo the tilt → always face the camera
plane(this.d);

heartAngle3D increments by 0.02 every frame at the top of draw()  exactly the same as angle += 0.02 in the reference. One angle, one variable, driving everything.

Once the rotation was actually working, the next problem was that the heart texture was upside down. This is a WEBGL thing when p5 maps a createGraphics() buffer onto a plane(), it flips the Y axis. The cleanest fix turned out to be in the texture builder itself: instead of writing each pixel to row py, write it to row sz - 1 - py  its vertically mirrored position. That way the texture is pre-flipped and arrives on screen the right way up. No extra rotation, no matrix math. Fixed in one line:

pg.rect(px2, sz - 1 - py, 1, 1);  // write to mirrored row

The final heart is a single plane(1200)  one big textured quad filling most of the canvas, spinning slowly, tinted (255, 80, 100). Then a ShimmerEmitter spawns one small particle per frame from the heart’s surface: tiny planes with the same texture, size 12–28px, drifting upward and fading. The overall effect is minimal just the heart and a soft shimmer coming off it. No beams, no sparkle rings, no 2D overlay.

The texture is built procedurally using the implicit heart curve:

let val = pow(hx*hx + hy*hy - 1, 3) - hx*hx * hy*hy*hy;
if (val <= 0) { /* inside the heart */ }

It goes from a bright white core to a deep red at the edge, which is exactly what you want for blendMode(ADD)  the bright centre blooms outward.

Code Structure

Everything is in proper classes. Each thing that has its own state and behaviour owns it internally:

  • Particle — a single particle with position, velocity, gravity, colour interpolation and a life cycle
  • Snowflake — a snow particle that knows its layer, resets itself when it falls off screen
  • Player — owns its own particles[] and hair[] arrays, handles all physics and input internally, exposes update(platforms) and draw()
  • Bird — a puzzle bird with its own sine-wave flight path, update(), and draw(isNext, pulse)
  • Shockwave — an expanding ring that handles its own easing and fade
  • ShimmerParticle / ShimmerEmitter — the 3D billboard particles that drift off the heart surface

The scene functions (drawScene1, drawScene2, drawScene3) orchestrate these objects without knowing their internal details.


The Final Result

  • Press 1 — intro snowstorm scene
  • Press 2 — playable character, WASD/arrows to move, X or Z to dash
  • Press 3 — Crystal Heart puzzle, dash in the order the highlighted bird is showing
  • Press S — save the current frame

Reflection

The thing that surprised me most is how much of Celeste’s feel comes from things that are easy to implement once you know about them. The hair colour changing with dash availability. The instant stop when you let go of movement. Gravity suppression during the dash. None of these are technically difficult they’re just specific values and conditions that communicate state through motion rather than UI.

The heart took the longest and taught me the most. I went into it thinking the hard part would be making it look good. It turned out the hard part was understanding what was actually happening in 3D space: why the rotation works, why the billboard trick works, why writing pixels to mirrored rows fixes a texture flip. Once I understood each piece properly the code got simpler, not more complicated. The final version of the heart emitter is shorter than any of the broken attempts that preceded it.

The keyIsDown() bug cost me about three hours. I’m documenting it here because I know I would have found a blog post about it incredibly useful when I was stuck.

What I want to add next:

  • Coyote time — a short window where you can still jump after walking off a platform edge. Celeste does this and it’s the difference between a jump feeling fair and feeling wrong
  • Audio — the typewriter scene specifically needs it. Each character click, wind ambience in the snow
  • Scene transitions — a fade or wipe instead of the hard cut when pressing 1/2/3
  • Randomised puzzle sequence — right now the bird order is fixed. I want to shuffle it on each run

References

Inspiration

  • Celeste (Maddy Thorson & Noel Berry, 2018) Crystal Heart collection sequence, layered snow, hair-as-dash-indicator, Chapter 1 bird puzzle

  • Our in-class sketches: particle and fire emitter sketches shared in class, was beneficial in both the 2D particle architecture and the 3D billboard approach for the heart

Technical

  • p5.js — keyIsDown() — the actual fix for the stuck-movement bug
  • p5.js — createGraphics() — offscreen buffer for motion blur, persistent glow, and procedural texture generation
  • p5.js — lerpColor() — fire-to-crystal particle colour transition
  • p5.js — WEBGL / plane() — 3D billboard technique for the heart emitter
  • Smoothstep — Wikipediap*p*(3-2*p) used for bird convergence easing and heart scale-in animation
  • The Nature of Code — Daniel Shiffman, particle systems and forces chapters
  • Implicit heart curve: (x² + y² - 1)³ - x²y³ ≤ 0 — used to generate the procedural heart texture pixel-by-pixel

Three snapshots from the sketch:


AI Disclosure Claude (Anthropic) was used as a coding assistant to polish and refactor some parts of the code whenever I felt it’s getting too messy. I also used it in debugging the billboard trick and the texture Y-flip when I ran into problems with WEBGL and when I was debugging the KeyPressed issue.

MIdterm Project – Adinkra Particle System

Midterm Project Overview

This project is a generative art system built in p5.js, centered on three Adinkra symbols from Ghana. Adinkra are visual symbols created by the Akan people. Each one encodes a philosophical proverb, a value, or a worldview that has been passed down through cloth, pottery, and architecture for centuries. Growing up Ghanaian, these symbols have always been part of my visual landscape. For this project, I wanted to bring them into a computational one.

The core idea is this: the symbols are invisible. There are no outlines drawn on screen. Instead, each symbol exists as a mathematical force field — a set of curves that attract particles toward them. Particles are born on the symbol’s edges, drift away through Perlin noise turbulence, and are pulled back by physics-based forces. What you see is not a drawing of the symbol. It is the symbol’s behavior, made visible through collective motion.

The system has four modes, switchable by pressing 1, 2, 3, or 4. Each mode corresponds to a different symbol or combination of symbols, with a distinct color palette drawn from the Ghanaian national flag: red, gold, and green on a black field.

Initially, the system had four modes built on particle-maze navigation — goal attraction, wall repulsion, and turbulence fields. The final version takes a completely different direction: instead of walls shaping particle paths from the outside, the symbol’s own geometry becomes the invisible attractor. The maze is gone. The symbol is the maze.

The Three Symbols

Choosing which Adinkra symbols to use was not a technical decision — it was a personal one. I needed symbols I could relate to and explain with honesty, not just describe. These three are the ones I keep returning to.

Mode 1 — Sankofa

“Se wo were fi na wosankofa a yenkyi” — It is not wrong to go back and retrieve what you forgot.

Sankofa exists in two visual forms. The one used in this project is the abstract heart form — the version stamped on cloth, carved into gold weights, and worn on ceremonial fabric across Ghana. The symbol is a heart body — two lobes that sweep down and meet at a pointed base — but what distinguishes it from a plain heart are the spirals. At the very top, where the two lobe lines meet in a V, each side continues past that meeting point and curls inward into the heart’s own interior. The left line curls down-right in a clockwise spiral, the right line curls down-left counter-clockwise. These inner spirals nestle inside the heart. At the bottom of the heart, flanking the pointed tip, two smaller spirals curl outward — away from the body, like feet planted on the ground. The whole symbol is bilaterally symmetric and deliberate in every curve.

As a Ghanaian studying abroad, this symbol means something specific to me. The further I move from home — geographically, culturally, academically — the more I feel the pull of that backward glance. Sankofa is not about being stuck in the past. It is about knowing what to carry with you.

In the system, Sankofa is rendered in red and gold — blood and heritage. Particles spawn across the full outline: both heart lobes, the two inner V-extension spirals, and the two outward bottom spirals. Perlin noise pushes particles away from the outline. A physics force pulls every particle back toward its travelling target point on the symbol. That constant tension between leaving and returning enacts the proverb directly in the particle physics.

Mode 2 — Gye Nyame

“Gye Nyame” — Except God. A declaration of the supremacy and omnipotence of God.

Gye Nyame is the most widely used Adinkra symbol in Ghana. You see it on walls, on fabric, on the backs of tro-tros, carved into doorframes, and on the Ghanaian 200 cedi(currency) note. It is not affiliated with any single religion — it expresses a universal acknowledgment that there is a force greater than human understanding. In Akan culture, Nyame is the origin and sustainer of all things.

The structure of Gye Nyame is unlike any other symbol. Running down the center is a chain of four alternating C-scroll knobs — bulging left, then right slightly lower, then left again, then right again — like the knuckles of a clenched fist stacked vertically. These give the symbol its distinctive textured spine. From the top of this spine, one large arm sweeps out to the upper-left in a wide arc, and its tip hooks back downward. From the bottom of the spine, a matching arm sweeps out to the lower-right and its tip hooks back upward. These two diagonal arms are not mirror images of each other across a horizontal axis — they are a 180-degree rotation of each other, which is why the symbol is described as chiral: it looks different from its own reflection. That diagonal asymmetry is the most identifiable thing about Gye Nyame.

In the system, particles spawn across all features — the four alternating spine knobs and both fishhook arms. Each particle travels along the outline continuously, with a sinusoidal oscillation displacing its target perpendicularly so the arms appear to breathe. The palette is gold and green — divine and natural, sun and land.

Mode 3 — Adinkrahene

“Chief of Adinkra” — greatness, charisma, and leadership.

Adinkrahene — the chief of all Adinkra symbols — is structurally the simplest: three concentric circles. Its power is architectural. It is said to have inspired the design of many other Adinkra symbols, which is why it sits at the head of the entire system. Simplicity as authority.

In the system, each of the three rings carries a different flag color: the inner ring is red, the middle ring is gold, and the outer ring is green. This mirrors the horizontal bands of the Ghanaian flag radiating outward from a center, the same way leadership radiates outward from a source. About 18% of particles are radiators — born at the center and travelling outward through all three rings before fading. They represent authority emanating from a single point.

Mode 4 — Composite

The fourth mode draws all three symbols at the same time using separate particle sub-systems. I wanted to experiment around it and see the outcome. The three force fields overlap and interact. Where Sankofa’s heart body overlaps with Adinkrahene’s inner ring, red particles from both systems cluster into unplanned concentrations. The symbols coexist the way traditions coexist, distinct but not isolated.

Implementation Details

The system is a single p5.js sketch organized into four layers: a mode system that handles keyboard input and configuration, a geometry layer that defines the mathematical outlines of each symbol, a physics layer that computes forces, and three particle classes — one per symbol — each managing its own movement, behavior, and rendering.

From the Progress Version to the Final Version

The progress version was a functional system built on maze navigation — particles moved through walls using goal attraction, wall repulsion, and Perlin noise turbulence. The technical foundation was solid. What it lacked was a conceptual anchor: the modes were mechanically distinct but did not say anything together.

The pivot to Adinkra symbols changed the project completely. Instead of walls shaping particle paths from the outside, the symbol’s own geometry became the invisible attractor. The maze walls were removed. The physics stayed. The symbols became the maze.

 Particle System

All four modes are built on a particle system. Each mode maintains a pool of 900 to 1,100 particles (2,400 in composite mode). Rather than destroying and recreating particles, the system calls reset() on a particle when it dies, recycling it with a new spawn position, velocity, color, and lifespan. This keeps memory usage flat and the frame rate stable throughout the session.

Every particle stores its previous position alongside its current one. Each frame, it draws a line segment from prev to pos before updating prev. This is what creates the motion trail. The trail length is controlled by fadeAlpha — the transparency of the dark wash applied over the entire canvas each frame. A lower value means longer, slower-fading trails.

// In draw() — dark wash creates motion trails
noStroke();
fill(0, 0, 7, fadeAlpha);
rect(0, 0, width, height);
// Inside any particle's show() method
show() {
  let a = (this.life / this.maxLife) * this.alp;
  stroke(this.hue, this.sat, this.bri, a);
  strokeWeight(max(this.r * (this.life / this.maxLife), 0.4));
  line(this.prev.x, this.prev.y, this.pos.x, this.pos.y);
  this.prev = this.pos.copy();
}

Forces and Newton’s Second Law

Particle motion is governed by F = ma. Each particle has a mass property. When a force is applied, it is divided by the particle’s mass before being added to acceleration. Heavier particles respond more slowly to the same force, which gives the system organic weight variation across the particle pool.

applyForce(f) {
  // F = ma  →  a = F / m
  this.acc.add(p5.Vector.div(f, this.mass));
}

In all three symbol modes, two forces act on every particle simultaneously. The first is a force toward a travelling target point on the symbol’s outline — this keeps the particle anchored to the geometry. The second is Perlin noise drift — this gives the particle organic, independent energy so it does not look mechanical. The balance between these two forces is what determines how tightly the symbol reads versus how alive the system feels.

update(sm) {
  // Advance t along the outline
  this.travelT += this.travelSpd * sm;
  if (this.travelT > 1) this.travelT -= 1;
  if (this.travelT < 0) this.travelT += 1;

  // Force 1: pull toward travelling target on outline
  let idx = floor(this.travelT * sankofaLUT.length) % sankofaLUT.length;
  let tgt = sankofaLUT[idx].copy();
  let toTarget = p5.Vector.sub(tgt, this.pos);
  let d = toTarget.mag();
  toTarget.normalize();
  toTarget.mult(constrain(d * 0.043, 0, 2.2));
  this.applyForce(toTarget);

  // Force 2: Perlin noise drift
  let na = noise(this.pos.x * 0.006, this.pos.y * 0.006,
                 frameCount * 0.003 + this.noiseOff) * TWO_PI * 2;
  let dr = p5.Vector.fromAngle(na);
  dr.setMag(0.11 * sm);
  this.applyForce(dr);

  this.vel.add(this.acc);
  this.vel.limit(3.2 * sm);
  this.pos.add(this.vel);
  this.acc.mult(0);
  this.life--;
}

Travelling Along the Outline (Orbital Motion)

The most important motion decision in the final version was the introduction of travelT — a normalized parameter (0 to 1) that advances along the precomputed outline look-up table every frame, at a random speed and random direction (some particles travel clockwise, some counter-clockwise). This is directly equivalent to how Adinkrahene’s ring particles advance their theta angle around the circle every frame.

Before this change, Sankofa and Gye Nyame particles only moved by being attracted toward a static nearest point on the outline. They jittered in place rather than flowing. Adding travelT gave them continuous directional motion along the symbol — the same quality that made Adinkrahene feel fluid.

// travelT advances along the LUT each frame — equivalent to
// theta advancing around Adinkrahene's ring.
// Random speed + random direction gives each particle
// independent orbital motion along the symbol outline.
this.travelT += this.travelSpd * sm;
if (this.travelT > 1) this.travelT -= 1;
if (this.travelT < 0) this.travelT += 1;

let idx = floor(this.travelT * sankofaLUT.length) % sankofaLUT.length;
let tgt = sankofaLUT[idx].copy();

Oscillation

Each particle has its own independent oscillation parameters: oscAmp (amplitude), oscFreq (frequency), and oscPhase (starting phase offset). Every frame, the particle’s target point is displaced sinusoidally perpendicular to the outline — so the symbol appears to breathe in and out rather than holding a rigid fixed shape. Because every particle has a different phase, the breathing is organic and asynchronous across the full outline.

// Compute perpendicular direction to the outline at target point
let toTgt = p5.Vector.sub(tgt, this.pos);
let perp  = createVector(-toTgt.y, toTgt.x);
if (perp.mag() > 0.01) perp.normalize();

// Displace target sinusoidally — symbol breathes in and out
let osc = this.oscAmp * sin(frameCount * this.oscFreq * sm + this.oscPhase);
tgt.add(p5.Vector.mult(perp, osc));

Perlin Noise

Perlin noise is used across all four modes to add organic drift to particle motion. Unlike random(), which produces sharp, uncorrelated values, noise() produces smooth continuous fields that evolve over time. The noise is sampled in three dimensions: x and y from the particle’s position, and a time dimension from frameCount multiplied by a small constant. The third dimension makes the field evolve slowly so the drift changes character over time rather than holding a fixed direction.

Each particle has a unique noiseOff value assigned at spawn. This offsets its position in the noise field so no two particles ever follow the same trajectory, even if they start from the same point. Without this, all particles drift in the same direction at the same time, which looks mechanical rather than alive.

// 3D noise: x/y position + time + unique per-particle offset.
// noiseOff ensures no two particles share the same noise trajectory.
let na = noise(
  this.pos.x * 0.006,
  this.pos.y * 0.006,
  frameCount * 0.003 + this.noiseOff
) * TWO_PI * 2;

let dr = p5.Vector.fromAngle(na);
dr.setMag(0.11 * sm);
this.applyForce(dr);

Warmup and Speed Ramp

A warmup system was added to solve a practical problem: the particles move quickly at full speed, making it difficult to capture clean screenshots for the three required export images. When a mode starts (or resets), modeFrame is set to zero. Each draw call, speedMult is computed by mapping modeFrame from the range 0 to 600 (about ten seconds at 60fps) to the range 0.18 to 1.0. This multiplier is applied to every dynamic value in all three particle classes — travel speed, noise magnitude, oscillation frequency, and the velocity cap. The system starts at 18% of full energy and smoothly accelerates to full speed over ten seconds.

During warmup, the HUD shows a pulsing “BUILDING — press S to save now” message so the optimal screenshot window is always clearly signposted. Pressing R resets the warmup ramp at any time.

// In draw() — ramps from WARMUP_MIN (0.18) to 1.0
// over WARMUP_FRAMES (600) frames, then holds at full speed
modeFrame++;
let speedMult = map(modeFrame, 0, WARMUP_FRAMES, WARMUP_MIN, 1.0);
speedMult = constrain(speedMult, WARMUP_MIN, 1.0);
// Inside every particle's update(sm) — sm scales all motion
this.vel.limit(3.2 * sm);

Geometry: Precomputed Look-Up Tables

Each symbol’s outline is defined as a series of cubic Bézier curves, sampled once at startup into a flat array of p5.Vector points called a look-up table (LUT). Sankofa has five segments (two heart lobes, two inner V-spirals, two bottom outward spirals) sampled into 800 points. Gye Nyame has seven segments (four knob scrolls, two arm segments each built from three chained cubics) also sampled into 800 points.

Rather than recomputing Bézier geometry inside the draw loop every frame, particles simply index into these arrays. This is what makes the system performant enough to run 1,100 particles per mode at 60fps. The LUTs are rebuilt whenever the canvas size changes (on R or mode switch) so the geometry always scales correctly to the canvas dimensions.

// Evaluate a cubic Bézier at t, push result into arr (canvas coords)
function sampleCubic(arr, ax, ay, bx, by, cx_, cy_, dx, dy, n) {
  for (let i = 0; i <= n; i++) {
    let t  = i / n;
    let m  = 1 - t;
    let x  = m*m*m*ax + 3*m*m*t*bx + 3*m*t*t*cx_ + t*t*t*dx;
    let y  = m*m*m*ay + 3*m*m*t*by + 3*m*t*t*cy_ + t*t*t*dy;
    arr.push(createVector(cx() + x, cy() + y));
  }
}
// Example: building the Sankofa LUT at startup
// Each call samples one Bézier segment into sankofaLUT.
// All five segments (heart lobes, inner spirals, bottom spirals)
// are sampled once and never recomputed during the draw loop.
function buildSankofaLUT() {
  sankofaLUT = [];
  let k = K();             // scale factor = min(w,h) * 0.0031
  let nH = floor(LUT_SIZE * 0.30);  // points per lobe segment
  let nS = floor(LUT_SIZE * 0.08);  // points per spiral arc

  // Left heart lobe: bottom point → V at top center
  sampleCubic(sankofaLUT,
    0, 95*k,  -40*k, 70*k,  -82*k, 28*k,  -82*k, -20*k,  nH);

  // Left inner spiral: from V, curls down-right
  sampleCubic(sankofaLUT,
    0, -28*k,  12*k, -42*k,  36*k, -40*k,  38*k, -22*k,  nS);

  // ... (right lobe, right spiral, bottom spirals follow same pattern)
}

The screenshots below were captured during developmental stages. They show how the system evolved from a basic noise-driven particle experiment with no symbol geometry, to a single-symbol prototype, to the full multi-mode system with all three Adinkra symbols, their individual color palettes, and the orbital travelT motion system in place. Each stage informed the decisions that shaped the final version.


The Three Outputs

The three exported images below were captured during the warmup phase of each mode — when the particles are moving slowly enough for the symbol to read clearly, but with enough energy that the trails and motion feel alive rather than static. Each image was saved using the S key at the moment the composition felt most balanced.

Output 1 — Sankofa. Red and gold particles tracing the abstract heart body with the V-extension inner spirals nestled at the top and the two outward bottom spirals flanking the pointed tip.

Output 2 — Gye Nyame. Gold and green particles tracing the alternating C-knob spine and the two diagonal fishhook arms — upper-left hooking down, lower-right hooking up.

Output 3 — Adinkrahene. Three concentric rings in red (inner), gold (middle), and green (outer), mirroring the Ghanaian flag’s stripes. A radiator streak is visible crossing all three rings outward from the center.


Output 4 — Composite Image.

Sketch

Video Documentation

The video below demonstrates all four modes of the system in sequence. Modes are switched live using the keyboard.


Reflection

What Changed From the Progress Version

The progress version worked mechanically but had no conceptual anchor. Four modes of maze navigation — functional, but nothing to say.

Rebuilding around Adinkra symbols gave the project a reason to exist. These symbols are not decorations. They are compressed philosophy from my own culture. Making them the invisible architecture of a particle system felt like engaging with that tradition rather than just referencing it.

What Worked

The invisible symbol approach is more legible than expected. After twenty to thirty seconds, the shape reads clearly from particle density and trail patterns alone — no drawn outline needed.

The flag color assignment has real logic behind it. Adinkrahene’s rings being red, gold, and green — mirroring the flag’s stripes radiating outward — is not arbitrary, which makes it easy to write about honestly.

The travelT motion system was the most important technical decision. Before it, particles jittered statically near the outline. After it, they flow continuously along the symbol in both directions. That change made the whole system feel alive.

The warmup ramp solved the screenshot problem cleanly. The first ten seconds of each mode are naturally the best window — no extra configuration, just press S.

What Was Hard

Getting the symbol geometry right took the longest. Both Sankofa and Gye Nyame are complex shapes that resist clean Bézier approximation. Several versions were discarded. The hardest part was not the math — it was building enough visual understanding of each symbol to know when the approximation was close enough.

Gye Nyame required understanding that its two diagonal arms are a 180-degree rotation of each other, not a mirror reflection. That asymmetry — the chirality — had to be correct in the coordinates before the symbol read as itself.

The closest-point lookup was a performance problem. Running Bézier math per particle per frame at 1,100 particles tanks the frame rate. The precomputed LUT — sampling the outline once at startup, doing a flat array search every frame — fixed it.

Plans for Future Improvement

Mouse interaction — clicking creates a temporary repulsion force, particles push away then return. Sankofa’s meaning becomes physically interactive.

Audio reactivity — microphone amplitude mapped to speedMult so the symbols respond to sound. The global speed multiplier is already in place; connecting an audio input would be a small change.

More symbols — Dwennimmen (strength and humility) and Funtunfunefu (democracy) are both geometrically interesting and personally meaningful. New LUT geometry, same motion system.

Mode transitions — a dissolve instead of a hard cut to black. Old particles fade out while new ones spawn in, suggesting the symbols share the same world.

References

Adinkra — Cultural Sources

Rattray, R. S. (1927). Religion and Art in Ashanti. Oxford: Clarendon Press.

Willis, W. B. (1998). The Adinkra Dictionary. The Pyramid Complex.

Adinkra Symbols of West Africa. adinkrasymbols.org

Eglash, R., Bennett, A., Lachney, M., & Bulley, E. Adinkra Spirals. csdt.org/culture/adinkra/spirals.html — geometric analysis of logarithmic spirals in Adinkra symbols.

Technical Resources

Shiffman, D. (2024). The Nature of Code, 2nd Edition. natureofcode.com

p5.js Reference Documentation. p5js.org/reference

The Coding Train — Daniel Shiffman. Introduction Videos I.2–I.4. thecodingtrain.com

Visual Inspirations

Ghanaian Kente cloth — the red, gold, green, and black palette comes directly from Kente patterns and the national flag.

AI Disclosure

AI tools (Claude, Anthropic) were used for debugging geometry and performance issues, identifying the LUT optimization, reviewing force application logic, and assisting with drafting this documentation. All creative decisions and final code were done by me.

Midterm Project (POST TO BE EDITED)

Project Overview

This project explores a single question: can a particle system feel less like simulation and more like atmosphere?

I designed a generative system that behaves like a living cloud of cosmic dust. Instead of producing one fixed composition, the sketch continuously evolves and can be steered into different “cosmic events” through three operating modes:

  1. NURSERY — diffuse, drifting birth-fields of matter
  2. SINGULARITY — gravitational collapse toward a center
  3. SUPERNOVA — violent outward blast and shock-like motion

The visual goal was to create images that feel photographic and painterly at the same time: soft glows, suspended particles, and dynamic trails that imply depth.

Core Concept

The concept is inspired by astronomical imagery, but translated into a procedural language:

  • Birth (diffusion)
  • Attraction (collapse)
  • Explosion (release)

These are treated not only as physical states but as aesthetic states. The same particle population is reinterpreted through changing force fields and trail accumulation over time.

I was particularly interested in the tension between control (known forces, reproducible logic), and emergence (unexpected compositions and visual accidents).

This is what makes the output truly generative: the system is authored, but each frame remains open-ended.

What Changed from the Starting Sketch

The starting version established the core particle loop and 3 state controls.

However, it was still a prototype:

  • Only a single rendering style (point strokes)
  • Low-resolution/off-target export buffer
  • Background tint drift issues over time
  • No dedicated print workflow
  • No color interaction controls

The final midterm version is substantially expanded:

A) Rendering pipeline upgrade
– Introduced layered rendering via `trailLayer` (screen) and `trailLayerHR` (high-res memory).
– Trails are preserved and faded over time independently of the base background.
– This allows longer atmospheric strokes without permanently destroying background consistency, as was happening before in the first iteration.

B) Visual quality upgrade
– Multi-pass glow rendering per particle (halo + mid + core).
– More controlled velocity damping and motion smoothing.
– Larger and more visible dust behavior for stronger material presence.

C) Interaction + composition upgrade
– Added a Color Shift slider (`0–360`) to rotate the palette across HSB space.
– Default keeps the original blue/purple range; slider supports warm/yellow/red variants for alternate print moods.

D) Output and print-readiness upgrade
– Export target standardized at 4800 × 3600.
– Save trigger implemented on S key.
– Timestamped filenames generated for iteration tracking.

Technical Implementation

4.1 Particle engine

The sketch uses a classic particle architecture:

– `Dust` class with:
– `pos`, `vel`, `acc`
– `lifespan`
– per-particle hue and size attributes
– `applyForce()` for composable behavior
– state-based force fields applied every frame

This combines core programming techniques from class:

1. Particle systems (object lifecycle + continual spawn/death)
2. Vector-based force simulation (`p5.Vector`, gravity/repulsion/drag)

It also uses:

– oscillation (`sin`) for shimmer dynamics,
– state machine logic for mode switching,
– off-screen rendering buffers for high-resolution output.

4.2 State logic

The state variable controls force behavior:

– NURSERY: noise-like drifting flow
– SINGULARITY: attraction toward cursor
– SUPERNOVA: repulsion blast from cursor zone

This keeps one core system while producing multiple visual outcomes from the same underlying model.

4.3 Trail architecture and background consistency

A key challenge was preserving a stable background while retaining long-lived trails.

Solution:

– render base color to main canvas each frame,
– draw particles to transparent trail layers,
– fade trails by reducing alpha over time,
– composite trail layer over base.

This decouples “world background” from “particle residue,” preventing muddy drift and preserving consistent color identity.

Creative Process + Iteration Notes

The process moved through several stages:

1. Skeleton system — particles, force switching, basic trails.
2. Material tuning — glow stacking, smoothing, fade timing, and stroke scale.
3. Color exploration — preserving original cool palette while adding full-spectrum shift controls.
4. Output engineering — shifting from “preview sketch” to “print production tool.”

A major shift in mindset was treating the sketch not just as a visual toy, but as a capture instrument for composition.

I began composing moments intentionally:

– waiting for dense flow regions,
– steering with cursor in singularity/supernova moments,
– selecting color shift and temporal build-up before capture.

This made each final export less like a screenshot and more like a harvested frame from a living system.

Final Outputs

I particularly like the third one, which reminds me of the film Arrival (2016), where extraterrestrials use circular logograms like the one depicted in the third output to communicate visually. Try to achieve this in the sketch!

Video Documentation

Reflection

This project taught me that strong generative outcomes come from balancing three layers:

  1. Physics logic (how particles move)
  2. Render logic (how particles appear)
  3. Capture logic (how moments are preserved).

The starting sketch had the first layer; the final midterm became successful only after all three were integrated.

What worked best:

  • Robust mode switching with meaningful visual differences
  • Stable background + persistent trails
  • High-resolution pipeline aligned with print requirements.

What I would improve next:

  • Richer mode-specific rendering signatures (even stronger distinction per mode)
  • Static star-dust depth field layer

References / Inspirations

  • p5.js Reference — https://p5js.org/reference/
  • p5.js `createGraphics()` documentation
  • Astrophotography color references (nebula palettes)
  • Class lecture notes on particle systems, vectors, and oscillation

AI Disclosure

AI assistance was used during development for debugging rendering behavior, refining export strategy, and drafting and structuring documentation. All concept direction, aesthetic decisions, interaction design, and final selection of outputs were authored and curated myself.

Amal – Midterm: Proliferate

Project Overview

Phases of the Bacterial Growth Curve

Proliferate is a generative visual system inspired by the behavior of bacteria growing inside a petri dish. The project explores how simple rules of division, movement, and environmental influence can produce complex and aesthetically varied visual outcomes. The system simulates colonies that expand outward in generations, referencing the biological process of binary fission, where organisms divide and multiply over time.

The composition is centered around a circular dish that frames the interaction space. Within this space, colonies emerge, expand, and drift, creating layered visual trails. While the initial intention was to simulate a blooming effect similar to organic growth patterns, this proved difficult to achieve. I attempted to incorporate molding behavior based on feedback from a project check-in, but this was only partially successful. Instead, the system evolved toward a balance between structured growth and organic motion.

The project is designed to feel slightly gamified. Users can interact with the system by introducing new colonies and adjusting environmental conditions in real time, which directly influence how the system evolves visually. The name Proliferate comes from the rapid division of bacteria and reflects the way visual elements multiply across the canvas.

Generative System Design

The system operates through interactive and evolving states rather than fixed outputs. Each interaction produces a different visual result, ensuring variation across compositions.

These variations are driven by:

  • User interaction through mouse input
  • Adjustable environmental parameters
  • Generational growth of colonies over time

Each colony grows in stages, where the number of cells doubles with each generation. This creates radial formations that feel structured, while the movement of individual cells remains fluid and unpredictable.

The system combines multiple techniques:

  • Noise-driven motion to create organic wandering behavior
  • Force-based movement, including attraction and damping
  • Generational expansion using exponential growth patterns
  • Real-time parameter mapping through interactive controls

Together, these elements create a system that balances control and unpredictability.

Interaction and Environmental Controls

The system includes four sliders that act as environmental conditions influencing the behavior of the colonies. These are designed to feel like variables within a biological system.

Energy increases the movement of the cells. It can be understood as adding nutrients to the environment, causing the bacteria to become more active and spread further.

Growth controls how many times a colony divides. Higher values create dense and complex formations, while lower values result in minimal structures.

Air affects the speed of movement by influencing how quickly the noise changes. Higher values create more chaotic and dynamic motion.

Pull controls how strongly cells are drawn toward the center of the dish. Increasing this value creates tighter clustering, while lower values allow the system to expand outward.

These controls allow the user to experiment with different “conditions,” producing a wide range of visual outcomes from calm and contained to chaotic and dispersed.

Implementation and Process

This project builds on an earlier midterm progress version, which initially explored generative motion without a strong structural system. In that version, the movement had a more fluid and wiggly quality, creating trailing, tail-like forms that I found visually interesting. However, this behavior relied on continuous accumulation and became a major performance issue, causing the system to lag significantly over time.

Additionally, the particles were not constrained within a defined boundary, so they would drift across the entire canvas rather than staying within the petri dish. While this created more chaotic and expressive visuals, it further contributed to performance issues and reduced control over the composition.

Because of these limitations, I shifted toward a more structured approach. The updated system constrains all movement within the dish and introduces a generational growth model, which significantly improves performance and stability. As a result, the system feels less laggy and more controlled.

Through iteration, the work developed into a more defined system centered around colonies and generational growth. Instead of relying purely on continuous motion, I introduced a structured expansion model where colonies grow outward in rings, allowing the system to remain stable while still feeling dynamic.

Each colony consists of cells arranged in expanding rings. These cells maintain a base position but are continuously influenced by motion and forces, allowing them to shift, drift, and create layered visual traces over time without overwhelming the system.

A key challenge was attempting to replicate organic blooming or molding behavior. While I explored this direction and attempted to implement it based on feedback from a project check-in, the result was not fully realized within the timeframe. This led to a shift toward a hybrid approach that combines structured radial growth with organic motion.

While the current system is more stable and responsive, it does feel slightly less visually expressive than the earlier version. However, this trade-off allowed for a more reliable and interactive experience. I believe there is a way to achieve both performance and richer organic behavior, but I have not fully reached that solution yet.

The interface was intentionally kept minimal and clean to prioritize the visuals. Buttons for restarting, saving, and toggling information were designed to feel simple and unobtrusive, supporting the interaction without distracting from the system itself.

Sound is triggered when a new colony is introduced. The audio was sourced from freesound.org and adds a subtle layer of feedback to the interaction, reinforcing the moment of activation within the system.

The project evolved significantly from its initial version. Early experiments focused on movement but lacked compositional clarity and structure.

Key developments include:

  • Introducing generational growth patterns
  • Adding environmental controls through sliders
  • Establishing a clear composition using the dish as a boundary
  • Refining motion through the combination of forces and noise

Although the original goal of achieving a blooming effect was not fully met, the current system reflects a stronger balance between control and emergence.

Final Outputs


The following images represent selected outputs from the system:

High energy and growth settings produce dense, overlapping colonies, with movement constrained within the petri dish boundary.
Lower energy and growth settings produce sparse, evenly distributed colonies, with movement constrained within the petri dish boundary.
Moderate energy and growth settings produce a balanced colony distribution, where controlled movement and expansion create a layered yet readable system within the constrained dish.
Reflection

Proliferate demonstrates how simple behavioral rules can generate complex and visually engaging systems. The combination of structured growth and dynamic motion creates a space for continuous variation, where each interaction produces a unique outcome.

One of the strongest aspects of the project is the ability to control environmental conditions in real time. This encourages experimentation and allows the user to actively shape the visual result.

Future improvements would focus on developing more convincing organic behaviors, particularly in relation to blooming or molding, as well as expanding the system to include additional modes of interaction or evolution over time.

References and AI Disclosure

Inspirations:

  • Bacterial growth and binary fission
  • Petri dish cultures and laboratory environments

Sound:

  • Audio sourced from freesound.org

AI Disclosure:
AI tools were used as support throughout the development process, primarily for debugging, refining specific parts of the code, and understanding how certain behaviors could be implemented more effectively. AI was also used to help improve the interface design, including the structure and responsiveness of buttons and controls.

All core ideas, system design decisions, visual direction, and experimentation were developed independently. AI functioned as a technical aid rather than a generator of the project itself.

Buernortey – Assignment 7

Video of Inspiration

Why I Chose This Visual

At teamLab, visitors could pick up a pencil drawing of a butterfly, flower, or lizard, color it in, and slide it under a scanner. Seconds later, their drawing appeared on the floor, glowing, animated, and moving freely through all the other visitors’ creations.

I chose a butterfly pencil drawing and colored it yellow. Watching that specific butterfly appear on the floor and drift between everyone else’s drawings was unlike anything else in the installation. Every other room at teamLab was something you walked through. This one was something you contributed to. The floor felt like a collective painting that no single person made, a shared canvas where hundreds of people’s choices all coexisted at once. That feeling is what I wanted to recreate in code.

The Sketch

The sketch shows a yellow butterfly entering from the left edge of a glowing, color-shifting floor, drifting organically through a crowd of colored creatures, flowers, fish, lizards, and swirling light forms, all wandering autonomously in every direction.

My creative twist: In the real installation, the floor was one continuous shared projection and you had no control over where your drawing went. In my version, I gave each creature a fully hand-coded personality — fish have tails, dorsal fins, and an eye with a pupil; lizards have four legs, a wagging tail, and a snout; flowers rotate their petals slowly as they drift; swirls pulse with orbiting circles. Each type is drawn entirely with p5’s shape functions — no images. The background also constantly shifts between deep blue, purple, magenta, and teal gradients, with large soft blobs of colored light drifting across the floor to simulate the ambient projected pools of color that filled the room at teamLab.

Code I’m Proud Of

The two pieces of code I’m most proud of are the wander steering system and the bezier butterfly wings.

Every creature , including the butterfly, uses wander steering. Instead of moving in straight lines or bouncing off walls, each creature accumulates tiny random velocity nudges every frame. This produces natural, unpredictable paths that feel alive rather than mechanical:

// Wander: nudge direction slightly each frame
this.vx += random(-0.04, 0.04);
this.vy += random(-0.03, 0.03);

// Speed cap — keep drift gentle
if (abs(this.vx) > this.spd)       this.vx *= 0.97;
if (abs(this.vy) > this.spd * 0.5) this.vy *= 0.97;

// Soft vertical boundaries — no hard bouncing
if (this.y < height * 0.32) this.vy += 0.05;
if (this.y > height * 0.97) this.vy -= 0.05;

The butterfly wings use bezierVertex() : four control points per wing half, mirrored on both sides, with a sin() oscillation scaling the wing width to simulate flapping:

// Upper wing — bezier shape
fill(yw);
beginShape();
vertex(0, -s * 0.10);
bezierVertex(s*0.22, -s*0.85, s*0.95, -s*0.72, s*0.82, -s*0.08);
bezierVertex(s*0.48,  s*0.12, s*0.10,  s*0.04, 0,      -s*0.10);
endShape(CLOSE);

// Flap: scales wing width using sin() — makes wings open and close
scale(side * (1 + flap * 0.28), 1);


Milestones and Challenges

Drawing every creature in pure code: The first decision was to use no images at all. Every flower petal, fish tail, lizard leg, and butterfly wing is drawn with p5’s shape functions. This took the most time but felt true to the spirit of the installation: simple outlines brought to life by color and motion.

Getting the butterfly wings right:  The bezier control points for the wings required a lot of manual tuning. The upper and lower wing have different shapes and different amber tones, and the mirroring had to be handled carefully using scale(-1, 1) inside a push()/pop() block so the two sides stayed symmetrical.

The shifting background: The original dark background made everything look dim. The solution was a background that draws a full-height gradient every frame, blending between three RGB color stops that slowly transition through a series of blue, purple, and magenta palettes. Five large drifting light blobs were added on top to simulate the ambient projected pools of color from the real installation.

Challenge, Perspective on a 2D canvas: The real teamLab floor had true projection-mapped depth — creatures far away appeared smaller and more faded. In 2D p5.js this had to be faked with a vanishing-point grid where lines converge on a horizon point, horizontal lines spaced using a power curve for perspective, and a warm glow rising from the bottom of the frame. It reads as a floor but is not true 3D.

Challenge:  When all the creatures were first added at similar speeds, the result looked like a screensaver. The fix was differentiating speed ranges per type, swirls drift slowly, fish move quicker, and the yellow butterfly moves faster and more directionally than everything else. That hierarchy gives the butterfly a sense of purpose and navigation rather than just floating.

Reflection and Ideas for Future Work

The most surprising part of building this was how much of the experience at teamLab came from pacing rather than visuals. The gentleness, nothing crashing, nothing disappearing abruptly, everything drifting, was harder to code than any of the shapes. Getting the wander steering to feel calm required many small adjustments to speed caps and boundary forces.

What is still missing most is convincing depth. The real floor had a spatial quality where distance was clearly readable. My version is flat, and that flatness makes it feel more like a simulation than an environment.

Ideas for future versions:

  • Use p5’s WEBGL mode so creatures scale smaller as they move toward the horizon, matching real perspective depth
  • Add a coloring step and let the user pick a color for their butterfly before it enters the floor
  • Implement Boids flocking so similar creatures occasionally cluster and drift together, which happened naturally at teamLab
  • Add ambient sound, low electronic tones and soft wing-flutter audio, to complete the immersion

Assignment 7

Inspiration 

I chose teamLab’s “Floating Microcosms” because I love how it feels like a living environment. In the real installation, stone-like objects float on water and change color when touched. I wanted to see if I could use math to copy that floating feeling and make digital objects talk to each other using ripples of light.

Code Highlight

I am proud of the Perspective Ripple. On a flat screen, it’s hard to make things look like they are lying down on the ground. I used a “math trick” to make the ripples wide but short. This tricks your eyes into thinking the water is a flat surface stretching away from you.

// This makes the ripple look like it's flat on the water
if (this.rippleSize < 140) {
  noFill();
  // The ripple fades out as it gets bigger
  let alpha = map(this.rippleSize, 0, 140, 0.6, 0);
  stroke(this.hue, 70, 100, alpha);
  
  // The Trick: Width is 2x, but Height is only 0.6x
  ellipse(0, 20, this.rippleSize * 2, this.rippleSize * 0.6);
  this.rippleSize += 1.8;
}


Milestones and Challenges

  • Milestone 1: The Floating Feeling. I used Simple Harmonic Motion (sine waves) to make the objects bob up and down. The challenge was making them look natural. Adding a tiny bit of “side-to-side” movement made them feel much more like they were on water.

  • Milestone 2: The Water Surface. At first, the background was just a boring blue. I fixed this by drawing hundreds of thin lines that move slightly. This made the water look like it was actually moving.

Sorting the Objects. A big problem was that objects in the back were being drawn on top of the ones in the front. This made the 3D effect look broken.

As a solution, I added a sort command that checks the Y-position of every object. It makes sure the ones at the bottom of the screen (closest to you) are always drawn last so they stay in front.

Reflections and Future Ideas

This project taught me that small details, like a shadow or a slight tilt, make a big difference in making digital art feel “real.” For the future I could add.

  • Sounds: I want to add a “ding” sound every time a ripple hits another object.

  • Wind: I want to make it so if you move the mouse fast, it creates “wind” that pushes the objects around.

Haris – Midterm

The Digital Milky Way

Concept

When thinking about the midterm project I was trying to come up with a design that would be both enjoyable to build and beautiful for the viewers to experience. Something that has always fascinated me with both intrigue and beauty is the space, endless galaxies, start, planets… So my goal was to recrate some of that in p5 and try to make an artwork out of it.

I had also worked on space design for my previous assignments and found that those were the assignments I enjoyed working on the most and the ones that in my opinion turned out the most beautiful so the decision was obvious and quickly made.

Like many other projects of mine I didn’t want the user to be just a viewer. I wanted everyone to be able to experience the artwork by interacting with it. So besides adding the 3 modes that can be accessed with pressing numbers 1,2 and 3 on the keyboard I also implemented a click function which pushed away the particles creating interactive art.

The three modes

The project is divided into 3 different states all showing another beautiful part of space.

1. Planet with a ring

The first mode is inspired by Saturn which is known for its beautiful ring that circles it. It is also inspired by  my previous work where all my planets had rings. I think this brings depth to the planets and makes them more than just colored circles on the screen. For the ring I decided to integrate a particle system that we have been using in class which did make the project look way better, but also did give my laptop some troubles which I will talk more about later.

2. Black hole

The second mode of the project takes us into the fascinating world of black holes. To be more precise, the second mode gives the user the ability of the black hole at their fingertips, or should I say, mouse pointer. The particles are now start being dragged into the black hole as the planet disappears outside of the users view.

2.1 Black hole “sub-mode” (It’s not a bug its a feature!) 

When testing and implementing all the different modes I discovered something very interesting. If, during the 2nd mode, the user puts their mouse in the middle and lets the particles come together and then quickly removes the mouse it makes the particles explode in different directions creating a beautiful scene. I decided to leave the bug and use it as a feature in the design.

3. Galaxy

The third and final mode is the galaxy mode. Inspired by our galaxy, The Milky Way, it is supposed to represent the beautiful formation of galaxies in and outside of our observable universe. Particles are the main theme of this mode as they create a loop like shape that simulates galaxies. But since I felt that this mode could have some extra interactivity I implemented the click mechanic that pushes particles away.

I believe all the modes turned out how I wanted them to be and one of my favorite things to do is switch between modes and watch how the particles react to the different states they are given and I hope the users will enjoy them too.

Milestones

The road from the blank canvas to the finished product was a fun one but it did bring some challenges along the way. In the following passage I will try to explain some of the systems implemented in the project and how they work as well as walk you through some challenges I faced and what I did to overcome them.

From the start of the project I knew I was going to work with the particle system and guided by previous experience from class where my laptop kind of struggled to run the basic particle system I knew I was in for a ride. But to make my life easier, before implementing the particle system using textures and WEBGL I decided to create them with simple dots that my laptop would be able to run and which I could later replace for particles.

This turned out to be a great idea as it helped me develop the logic without making my laptop work too hard so I could focus on the logic more than worrying about performance.

Orbit mode

The orbit mode was used as a base for the whole project. Essentially, I wanted to simulate a static planetary system where all objects moved in a predetermined circular pattern. Instead of coding circular motion, I wanted to implement a combination of forces to simulate such a system.

Each particle is assigned a target radius, which determines the ring it belongs to. These radii are grouped into bands to create multiple layers of rings:

let targetR =
  band < 0.60 ? random(115, 170) :
  band < 0.90 ? random(185, 245) :
                random(265, 335);

There are also multiple forces that act on the particles to create the orbit effect.

Gravity like attraction:

let grav = toCenter.copy().mult(0.14 * planet.massScale / (1 + d * 0.006));

Tangential force:

let tangential = createVector(-toCenter.y, toCenter.x);
tangential.mult(0.22 * planet.spin);

Spring force:

let err = d - p.targetR;
let spring = toCenter.copy().mult(err * 0.008);

Together all of these help create the ring like structure we see on the screen.

Galaxy mode

One of the most important design decisions was to re-seed particle positions when switching to galaxy mode:

initGalaxy();

Instead of placing particles in discrete rings, they are distributed in a dense radial disk, with higher concentration near the center:

let diskR = 18 + (-log(1 - u)) * 60;

Also a characteristic of galaxies is the fact that particles closer to the center rotate faster than those further away. I implemented this using:

let orbit = 1.0 / sqrt(r * 0.85)

Thankfully I didn’t have any major challenges other than my laptops performance and the rest of the project went smoothly. I had to increase the pixel density when I was saving the photos but since my laptop struggles so much to run it I returned it to 1 so I could actually watch my project.

Video documentation

Video showcasing the interaction withing the project:

Final sketch

Reflection and Future Improvements

Working on this project was very fun and scary at the same time. It was fun to get to implement things that we have worked on in previous classes and to bring everything together into one project, but it was scary to think about everything that could go wrong on such big project and to have to worry about laptop performance holding me back.  But overall I am very happy with how the project turned out and am excited for others to experience it also.

As for the future improvements I would definitely love to play with colors and add more planets and different galaxies to the project. I would also maybe explore implementation of sound in some way but am not sure what kind at this moment.

Assignment 7 : Yash

Recreating the Void: teamLab Phenomena

Concept & Inspiration

We were tasked with selecting an installation that resonated with us and recreating its core aesthetic and interactive mechanics using p5.js.

I was immediately drawn to a specific room featuring a massive, heavy-looking dark sphere suspended in an intensely illuminated, blood-red space. Drawing on my background in film, I was captivated by the cinematic tension of the lighting. The stark contrast between the vibrant red environment and the pitch-black, light-absorbing object created a deeply imposing atmosphere. My goal was to translate that physical, heavy presence into a digital WebGL space, making the object feel tangible and reactive.

P5.js Sketch


The final sketch places the user inside a contained 3D room. At the center is a thick, glossy black cylinder rotating on its edge, constantly drifting via Perlin noise. Rather than a static environment, the sketch utilizes dynamic lighting, a highly reflective “dark mirror” floor, and physics-based raycasting to allow the user to push the shape away from their specific point of view.


Code Highlight

One of the most interesting parts of the code to write was the 3D mouse interaction. Instead of just moving the object on a flat X/Y axis, I wanted the object to be pushed away from the camera’s exact perspective.

By subtracting the camera’s current 3D position from the shape’s position, we get a normalized vector. Depending on whether the user is just hovering or actively clicking, a different level of force is applied along that specific path to shove the object back into the 3D depth of the room.

// --- MOUSE HOVER AND CLICK INTERACTION ---
  // Convert mouse coords to WEBGL space
  let mx = mouseX - width / 2;
  let my = mouseY - height / 2;

  let d = dist(mx, my, shapePos.x, shapePos.y);

  if (d < radius + 20 && mouseX !== 0 && mouseY !== 0) {
    cursor('pointer'); // Hints to the user that this thing is clickable

    // Figure out which direction to push the shape (away from camera)
    let camPos = createVector(cam.eyeX, cam.eyeY, cam.eyeZ);
    let pushDirection = p5.Vector.sub(shapePos, camPos).normalize();

    // If clicking push it harder, otherwise just a gentle nudge on hover
    let pushForce = 0;
    if (mouseIsPressed) {
      pushForce = 250; // clicking = big push
    } else {
      pushForce = 80;  // just hovering = small push
    }

    baseTarget.add(p5.Vector.mult(pushDirection, pushForce));
  }
Milestones and Challenges

Milestone 1: Establishing the 3D Perspective and the “Dark Mirror” Illusion The very first major hurdle was moving from a flat 2D illusion to a true 3D space. Initially, looking straight at a red background with a split line felt too flat. I had to explicitly construct a “stage” with actual mathematical walls, a floor, and a ceiling using WebGL planes.

The biggest technical challenge within this milestone was faking the floor’s reflection. WebGL in vanilla p5.js doesn’t natively handle raytraced reflections. To solve this, I had to think about drawing order: I first drew a pure black version of the shape upside down underneath the floor coordinates. Then, I drew the floor on top of it using a slightly transparent, highly specular dark red material (fill(5, 0, 0, 220)). This allowed the inverted shape to bleed through, perfectly mimicking the glossy, dark mirror effect from the physical teamLab installation.

Reflection & Future Work

To make the digital installation feel as immersive as the physical one, I realized that visuals alone weren’t enough. I introduced a cinematic, low-frequency drone track (BGMUSIC.mp3) that begins looping the moment the user first interacts with the canvas. This heavy audio grounds the piece and gives the digital void a sense of physical scale.

I also focused heavily on non-verbal UI cues. To teach the user how to interact without writing instructions on the screen, I programmed the mouse cursor to dynamically change: a pointing finger when hovering over the object, an open hand when looking around, and a closed grabbing hand when dragging the camera. Furthermore, the sketch auto-pans upon loading, proving the space is 3D before handing control over to the user.

For future work, I would love to tie the p5.Amplitude() of the background audio to the thickness of the shape, allowing the object to pulse and “breathe” in time with the low frequencies of the drone music.