Project Overview
This project explores body-based interaction through computer vision, where the user’s hands become controllers for two physically simulated characters. Using hand tracking, each finger is mapped to different limbs of the stickmen, allowing users to control movement in real time. The game is made out of 3 mini games that users can enjoy with their friends. The minigames include: basketball, football, and fencing. The goal of the game was to put the users in “shoes” or in this case maybe in hands of the puppet masters, controlling the stickmen and competing against each other in various sports.
Some inspiration was taken from other physics based video games such as Human Fall Flat. The key concept of that video game and the one I made is the physics engine. Human Fall Flat is heavily reliant on physics engine for the control of the characters which makes the game hard, but intentionally so. Similar to that my game is also meant to challenge players in a way. The movement is intentionally hard to master but I feel like that is what makes the game fun and what brings out the competitiveness in the players. But I also believe there is a thin line between fun challenging game and the game that is just broken and unplayable because of its difficulty. So through testing and continues optimization the goal was to create something that is challenging enough to intrigue, but not challenging enough to scare players, but I will talk more about this later.
The core concept is to transform the human body into a direct input system, removing traditional controllers and instead using gesture-based interaction. The project focuses on making digital movement feel physical by combining ml5.js hand tracking with Matter.js physics simulation.
Process
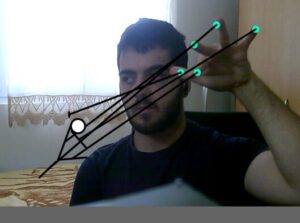
The development of this project began as an exploration of how hand tracking could function as a primary input method for controlling a digital system. Rather than relying on traditional interfaces such as keyboards or controllers, the goal was to create an experience where the user’s own body, specifically their hands, became the mechanism through which interaction occurs. So at the very beginning of the project the goal was first to get hand tracking to work and test it out to see how difficult it is to implement and how it behaves.
(I believe WordPress doesn’t have camera access and thus the sketch appears blank, to view please open the sketch in another tab and allow camera usage)
I spent time observing how accurately the model could track fingers, how stable the tracking was under different lighting conditions, and how many hands could be detected simultaneously. These early tests revealed that while the tracking was generally responsive, it could fluctuate slightly depending on hand orientation and speed. This meant that any interaction system built on top of it would need to account for noise and instability.
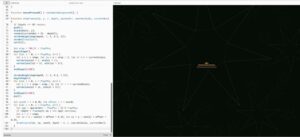
Once I had gotten hand tracking set up and I was confident in it it was time for the stickman and the floor. To build the stickman, I used Matter.js to create a set of rigid bodies representing the head, torso, arms, and legs. These parts were connected using constraints in order to simulate joints. At this stage, the system was entirely physics-driven. The intention was to create a realistic representation of a body, where movement would emerge naturally from forces and connections rather than direct manipulation. Once the structure was in place, I attempted to control the limbs by moving the constraint anchor points based on the position of the user’s fingers.
This approach, while conceptually appealing, introduced significant problems in practice. The limbs became unstable, often oscillating or reacting unpredictably to small changes in input. Because the physics engine was constantly resolving forces, even minor inaccuracies in hand tracking resulted in exaggerated or chaotic movement. The limbs would move to their own will and there was almost nothing I could try to control them. My debugging attempt consisted of commenting out all fingers except for the thumb that controls the right hand and the middle finger that controlled the body and trying go get just one arm to behave normally. I quickly discovered that no matter what I did I couldn’t get the hand to work properly, the matter.js engine although powerful did have issue when multiple bodies were too close to one another which I also noticed when working on Assignment 10.
Thus a decision was made. It was time to go back to the drawing board and redo the whole design.
I decided to recreate the world but this time I only added the floor, gravity and one stick to the ground. The goal was to control its y axis with my thumb only and thus test out my new method which was mapping the movement instead of using constraints. The proved to be much more reliable than the old method which was more realistic. But at this point in development I decided that I will sacrifice some realism for better control and more enjoyable experience.
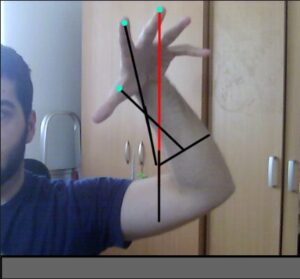
After successfully testing out the new movement on one stick I added another vertical one for torso and another one to represent the other arm. The new movement worked great with the rotation of the arms and the movement of the body and once I was happy with everything it was time to transfer it to the original stickman. Each finger was mapped to a specific body part, and its vertical position was translated into a target angle using the map() function. These angles were then applied to the corresponding bodies using Matter.Body.setAngle(). To ensure smooth transitions, I used linear interpolation (lerp()), which allowed the limbs to gradually move toward their target positions rather than snapping instantly. Additionally, angular velocity was reset on each frame to prevent the physics engine from introducing unwanted rotational forces.
I also experimented with adding more complexity to the system, including additional joints such as elbows, in an effort to increase realism. However, this made the gameplay much much harder and more complicated. Controlling multiple joints with limited and noisy input proved to be extremely difficult, and the system became confusing rather than intuitive. So this was another idea that unfortunately had to be scrapped.
Once the interaction system was functioning reliably, I began developing different modes to explore how the characters could interact within a physics environment. The first mode implemented was basketball, where a ball interacts with the stickmen’s limbs and can be directed into a hoop. This required implementing collision detection and translating limb velocity into force applied to the ball. An immediate issue I faced was the ball slowing down and getting stuck on the ball if it is not bounced and since there was no easy way to have the stickman lift the ball I made the ball bounce by itself if it was slowing down.
function updateBasketball() {
  // if ball is near ground and moving slow bounce it
  if (ball.position.y > height - 60 && Math.abs(ball.velocity.y) < 6) {
    Matter.Body.setVelocity(ball, {
      x: ball.velocity.x + random(-0.5, 0.5),
      y: -12,
    });
  }
}
The football mode followed a similar structure but introduced goals on either side of the screen and required directional control of the ball. The fencing mode was more focused on direct interaction between the players, involving swords attached to the arms and collision detection to determine scoring. At this stage of development the fencing code is looking kind of empty because I hadn’t added multiplayer yet and there wasn’t anything to do with the sword with one player realistically.
During the implementation of these modes, collision handling became a recurring challenge. Matter.js generates multiple collision events for a single contact, which caused scoring to trigger multiple times unintentionally. The final solution involved introducing cooldown timers and state flags, ensuring that each scoring event could only occur once within a short time window. This approach stabilized the scoring system across all modes.
With everything in place, I expanded the project to support two players. I sorted the detected hands based on their horizontal position on the screen. The leftmost hand was assigned to one stickman, and the rightmost hand to the other. This ensured that each player consistently controlled the correct character. However, an issue arose when using left hands instead of right hands. The mapping logic, which had been designed for right-hand input, caused controls to appear mirrored and unplayable when a left hand was used.
To resolve this, I incorporated the handedness property provided by ml5 and adjusted the mapping accordingly. By reversing the control logic for left hands, I was able to maintain consistent and intuitive behavior regardless of which hand was used.
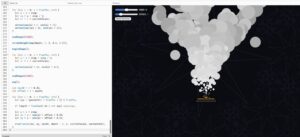
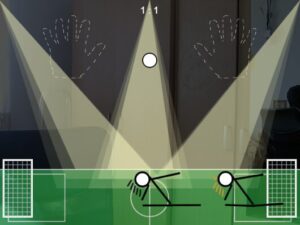
I also focused on improving the visual design of the project. Initially, the system was functional but visually minimal. I introduced distinct environments for each mode, including a basketball court, a football field, and a fencing strip, to provide context and variation. Additionally, I implemented a lighting system consisting of animated spotlight cones originating from the top of the screen. These lights are slightly angled and move subtly over time, adding depth and atmosphere without interfering with gameplay. I also tested implementing crowd stands and a crowd in the background around where the hands should be positioned, but I found this to be too distracting for the players and decided to continue without it.
In talks with the professor we concluded that there should be a way to show the users that they are supposed to use their hands to control the stickmen and to begin they should put their palms in front of the screen. To address this I added visual guides in the form of hand outline images. These guides appear when no hands are detected. I also implemented a pulsing scale animation, which made the guides feel more alive and noticeable without being distracting. This, I believe, significantly improved the clarity of the interaction.
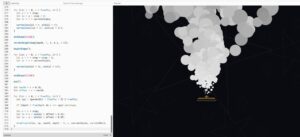
Another thing I wanted to implement was a visual element that clearly demonstrates the presence of physics in the system since the body movement is more reliant on mapping instead of constraints and physics. I experimented with adding clothing to the characters using chains of connected bodies, but this resulted in shapes that resembled capes and did not integrate well with the overall design. The movement was also visually confusing. I then shifted to implementing a hair system, where small segments are connected to the head using constraints. This approach was more successful, as the hair responded naturally to movement and provided a subtle but clear indication of physics at work. It also allowed for differentiation between characters through variations in color.
All this lead to the finish product. I liked writing this progress report as it gave me a chance to go back and explore all the different mechanics and how they were developed. It was honestly so interesting to see how the code changes depending on the “generation” of the project and how the playability and the overall feel of the game improves over time. I hope you enjoyed reading the process reflection as much as I did writing it :).
Video
Reflection and Future Improvements
Honestly I really enjoyed working on this project. Even though it was a lot of hard work and a lot more debugging and just constantly thinking about features, how to implement them and how to fix bugs I really enjoyed the whole process.
I learned a lot not only about programing in JavaScript and using ml5.js and matter.js, I learned so much about project development. Not being able to use constraints for movement and having to go with mapping taught me how not everything will always go with the plan but it is important to be able to adapt. If I could go back in time I would definitely write comments in the code more as I am writing it. I have this really bad habit of just being in the “zone” while coding and not writing any comments but I always end up going back and commenting everything after I am done with a certain feature or bug fix. Although this works with smaller projects, bigger projects like this taught me that it is important I change this habit.
In the future I would love to continue working on this project. Adding sound would be, in my opinion, the next logical step and feature to add. I would also love to add more different modes and maybe explore a different way to add clothing or some more design to the characters. But overall I am really happy with how the final project turned out.